Oct 1 - updating web site - add captions
1.0 hr doc
Oct 2 - updating web site from NHIS - update daily
text 2.0 hr doc
Oct 3 - updating web site - update daily text.
Got my race bike dyno-tuned and dropped an incredible 2 seconds off my best
lap times ever! GREAT racing day! Last race day of the season.
3.0 hr doc
Doing
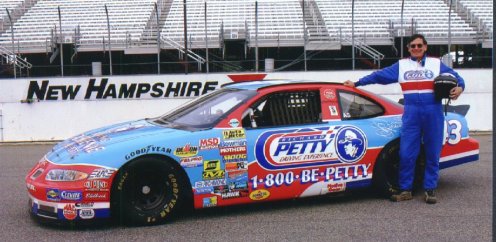
the Richard Petty thing in the stock car. It was incredibly expensive for
less than 15 minutes of track time. It really was quite a ripoff, but hey you gotta try everything once.
I did the 18 lap (8 + 10) "King's Experience". I went only
slightly faster in this thing than I do on my stock EX500, and not that much
faster than I routinely cruise on the Interstate. It pales in
comparison to motorcycle road racing. It seems to be just a tourist
thing for NASCAR fans who are impressed just because it's NASCAR. I
could have gotten some 30 hours of track time on my bike for the same money.
I'd certainly never do anything like this again. I look fat as
hell here, but it's cuz I am wearing a down vest under the suit.
It was a rather chilly day.
Packed away into the car and ready to head out on the track. I got
home in the early afternoon, but never did get back to the plane. It
always takes me a day or 2 to get back into working on the plane when I've
been away for awhile.
Oct 10 - It's been quite awhile since I was able
to work on the plane. I caught a cold, and it's that time of year
again to do a million things to get ready for winter. Having so many
things with an engine means there's a LOT of work, just taking care of them,
draining carbs, etc. I started fitting
the bubble. The initial fit is very poor, but I know from doing the
canopy frame work that if I just keep plugging away at it, it'll get better &
better. It does look like I will have to redo the aft F631A, because
the bubble comes down over it at an angle, not horizontally. I cut &
trimmed the front a couple times, using the bottom curve as the guide.
The fit got better with each cut. 3.0 hr
It's only in the 60s outside, so I have to run the garage heater, plus use
this little camping LP gas heater under the bubble, to keep it nice and
warm.
Turns out it's pretty simple to place that cut on the fwd edge, especially
in the middle. Just use your finger to feel where the downward slope
of the bubble curves and starts going forward. Mark where your finger
is. Cut along the line. Pretty simple, and not a lot of screwing
around. It's a bit harder on the corners, because the transition from
vertical to horizontal isn't so distinct and easy to feel and mark. I
could have easily just done this cut here as my first cut, rather than the
one I did back in September, which didn't really amount to much.
Oct 13 - Finally got back to the
plane again, working on the canopy fwd fit. While I am being careful, I don't see the need for a super-critical fit here at the front, as it
all gets covered and blended with epoxy, anyway. Just cut along the
front edge at the center of the curve, where it stops curving down and
starts going fwd, and that'll do it fine. I farted around some with
trimming the front a bit more, but the canopy is only about 3/4" above the
cabin frame, so that initial cut in the front curve was probably all I
needed to do for now. See pic for details on where I mean. Then
I MADE THE BIG SPLIT. Some people make it sound like a big deal,
but there was not much to it. I just put the bubble in place and ran a
3/4" tape line along the bubble, over the center of the cabin frame. I
was afraid part of the canopy lower aft edge would swing fwd after it was
split and swing down, so I allowed an extra half inch of length. I
could see I had plenty to spare for the rear window. I zipped the
bubble in half with the cutter disk, and smoothed up the edge with a Vixen
file. I used the LP gas heater some, to make sure it wasn't too
brittle, as it's in the 60s outside these days.
2.0 hr
Here's
one of those pics with me in it, to show the FAA it's really me doing this
work. You can see it's already cold enough here to require a long
sleeve flannel shirt and a down vest.
This is the aft edge of the whole bubble. The red dotted lines show
where it starts to curve up a bit from the mold, so the final cut here can't
be any more aft than this line. The blue line across the F632A shows
where the aft edge of the rear window should end up, so I've got a couple
inches to play with here. This lets me make a more conservative (aft)
cut when I make the big split down the middle.
I was a bit concerned that when I made the split cut and the bubble settled
down onto the cabin frame, it might cause the aft edge of the cut to swing
fwd a bit at the bottom. So, I laid the guide tape on a bit more aft than where it
should be. As you can see in the previous pic, I've got a couple
inches to play with on the aft window, so I wanted to make sure I didn't
come up short on this cut. The tape was laid down so it's in the
middle of the aft cabin frame F631A at the top and at the aft edge of it on
the bottom.
The bubble is laid out on the sawhorses for the big split cut. The
blocks on the ends of the boards keep the bubble from spreading.
The duct tape under the bubble also helps hold the bubble together,
especially after the cut is made.
After the initial cut, you can see that it's pretty much flush with the aft
edge of the cabin frame aft F631A. So now we know - there's no need to
make an initial cut more aft than necessary; just mark it right in the
center, between the cabin frame fwd and aft F631As, and you'll be fine.
Oct 14 - I marked the final aft edge
trim cut with tape, made the cut,
then fit it back onto the plane. I can now handle the split bubble by
myself, so that's nice. It turned out I didn't need to add any
allowance for the aft edge tipping fwd when the top dropped down onto the
cabin frame. I ended up with the same extra as what I'd allowed, and
maybe a bit more, so don't bother doing what I did by allowing an extra 3/4"
when you make the cut. I trimmed the extra off
the aft edge. Started marking the bubble for trimming & blending
the front cut into where it needs to be trimmed for the sides. I can
see where the bubble bottom edge needs to pass through the slot in the C702
skin, but I have NO idea where (inboard/outboard) that bottom edge cut
should blend into the fwd edge. 2.0 hr
Here's the bubble clamped in place after the initial split cut, and marked
for the second, final cut. As mentioned, I didn't need to allow
anything for the canopy moving fwd when it slipped down further onto the
cabin frame after the initial split cut. Here, the tape marks it right
along the center line between the cabin frame fwd and aft F631As.
Here's the fwd bubble clamped in place after the final split trim cut.
The aft edge runs right along the seam between the cabin frame fwd and aft
F631As.
The next step is to start cutting the sides. The problem I have right
now is deciding exactly where to cut. The bottom edge of the slot in
the C702 skin, marked "A" here, is pretty obvious. But I am not sure
how to blend that into the fwd edge. I am wondering if it should go
from A to B, C, or D. So, I am pondering that right now.
Oct 15 - go to Atlanta for a new gig
Oct 18-24 - updating web site
10 hr doc
Oct 25 - slow, boring day, so I updated the index
6 hr doc
Oct 29 - EAA Technical Counselor
visit #3 by Marvin Bishop 1.0 hr
Oct 30 - Back home for a couple
days - trim bubble fwd corners
to C702 skin cutouts. Mark & trim bubble bottom sides. Lay out
holes for plexi in aft F631As. Lay out C702 skin cutouts. I had
to warm up both the garage and the bubble before I could do any work.
The high temps these days are low-mid 50s, with lows into the low-mid 20s at night.
2.75 hr
Here I used the tape to lay out a line from the bottom of the slot in the
C702 to the fwd edge of the bubble. This is just a basic initial cut.
The bottom of the C702 slot is about where the middle arrow is; the rest of
the cut to the LT is just continuing the line, and will get trimmed off
anyway, with the next cut (side/bottom).
To
lay out the side cuts, first mark the bottom edge of the WD725 side arm
joggles, so you can look through the Plexiglas and more easily see where you
need to make the side cuts to be flush with the bottom of the joggle.
Here is the RT side of the bubble, with the front corner cuts already made,
and with the side cuts marked with tape. Using tape to mark your lines
is a very good idea. It's much easier to cut to the edge of tape than
it is to cut to a line, because any line you can see will have some width to
it, making it harder to define. The tape also helps you mark a
straighter line, as you pull it snug at both ends. And the tape also
helps keep the protective skin from pulling off and then getting Plexiglas
dust inside it, which will then prevent the skin from sticking to anything.
The blue arrows help make damn sure I make the cut on the CORRECT side of
the tape!.
I used one of the cut off corners as a guide to help me determine how much
to trim out the slot in the C702, so the bubble will sit nicely in the slot.
Here, I am using a carbide cutter bit in the Dremel tool to open up the C702
bubble slot. Pretty hard to shoot a right-handed camera with the left
hand, but you get the idea.
This hole needs to be trimmed open more, but after doing some grinding I found that the blue
protective skin made it hard to see just where was the edge of my cut.
You should trim away an inch or so of the blue skin before
marking and cutting these slots open.
Well, that's it for October. Let's move on to
NOVEMBER.
 Doing
the Richard Petty thing in the stock car. It was incredibly expensive for
less than 15 minutes of track time. It really was quite a ripoff, but hey you gotta try everything once.
I did the 18 lap (8 + 10) "King's Experience". I went only
slightly faster in this thing than I do on my stock EX500, and not that much
faster than I routinely cruise on the Interstate. It pales in
comparison to motorcycle road racing. It seems to be just a tourist
thing for NASCAR fans who are impressed just because it's NASCAR. I
could have gotten some 30 hours of track time on my bike for the same money.
I'd certainly never do anything like this again. I look fat as
hell here, but it's cuz I am wearing a down vest under the suit.
It was a rather chilly day.
Doing
the Richard Petty thing in the stock car. It was incredibly expensive for
less than 15 minutes of track time. It really was quite a ripoff, but hey you gotta try everything once.
I did the 18 lap (8 + 10) "King's Experience". I went only
slightly faster in this thing than I do on my stock EX500, and not that much
faster than I routinely cruise on the Interstate. It pales in
comparison to motorcycle road racing. It seems to be just a tourist
thing for NASCAR fans who are impressed just because it's NASCAR. I
could have gotten some 30 hours of track time on my bike for the same money.
I'd certainly never do anything like this again. I look fat as
hell here, but it's cuz I am wearing a down vest under the suit.
It was a rather chilly day. Packed away into the car and ready to head out on the track. I got
home in the early afternoon, but never did get back to the plane. It
always takes me a day or 2 to get back into working on the plane when I've
been away for awhile.
Packed away into the car and ready to head out on the track. I got
home in the early afternoon, but never did get back to the plane. It
always takes me a day or 2 to get back into working on the plane when I've
been away for awhile. 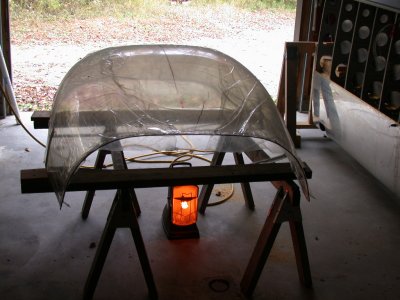 It's only in the 60s outside, so I have to run the garage heater, plus use
this little camping LP gas heater under the bubble, to keep it nice and
warm.
It's only in the 60s outside, so I have to run the garage heater, plus use
this little camping LP gas heater under the bubble, to keep it nice and
warm.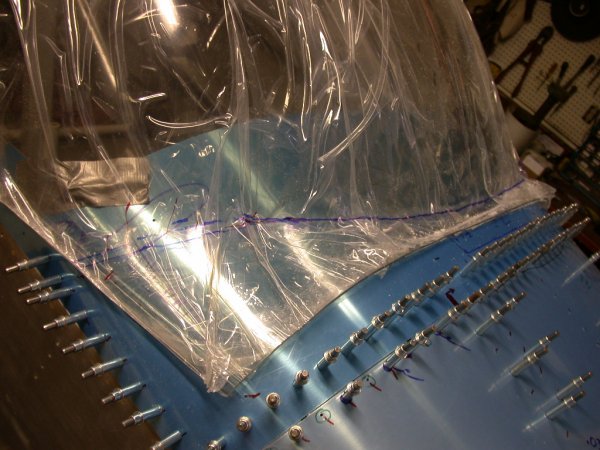 Turns out it's pretty simple to place that cut on the fwd edge, especially
in the middle. Just use your finger to feel where the downward slope
of the bubble curves and starts going forward. Mark where your finger
is. Cut along the line. Pretty simple, and not a lot of screwing
around. It's a bit harder on the corners, because the transition from
vertical to horizontal isn't so distinct and easy to feel and mark. I
could have easily just done this cut here as my first cut, rather than the
one I did back in September, which didn't really amount to much.
Turns out it's pretty simple to place that cut on the fwd edge, especially
in the middle. Just use your finger to feel where the downward slope
of the bubble curves and starts going forward. Mark where your finger
is. Cut along the line. Pretty simple, and not a lot of screwing
around. It's a bit harder on the corners, because the transition from
vertical to horizontal isn't so distinct and easy to feel and mark. I
could have easily just done this cut here as my first cut, rather than the
one I did back in September, which didn't really amount to much. Here's
one of those pics with me in it, to show the FAA it's really me doing this
work. You can see it's already cold enough here to require a long
sleeve flannel shirt and a down vest.
Here's
one of those pics with me in it, to show the FAA it's really me doing this
work. You can see it's already cold enough here to require a long
sleeve flannel shirt and a down vest.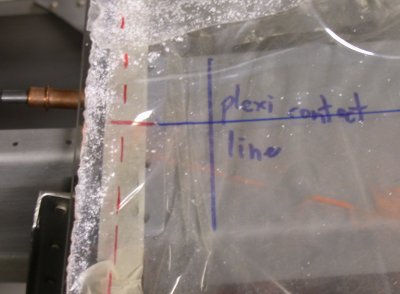 This is the aft edge of the whole bubble. The red dotted lines show
where it starts to curve up a bit from the mold, so the final cut here can't
be any more aft than this line. The blue line across the F632A shows
where the aft edge of the rear window should end up, so I've got a couple
inches to play with here. This lets me make a more conservative (aft)
cut when I make the big split down the middle.
This is the aft edge of the whole bubble. The red dotted lines show
where it starts to curve up a bit from the mold, so the final cut here can't
be any more aft than this line. The blue line across the F632A shows
where the aft edge of the rear window should end up, so I've got a couple
inches to play with here. This lets me make a more conservative (aft)
cut when I make the big split down the middle.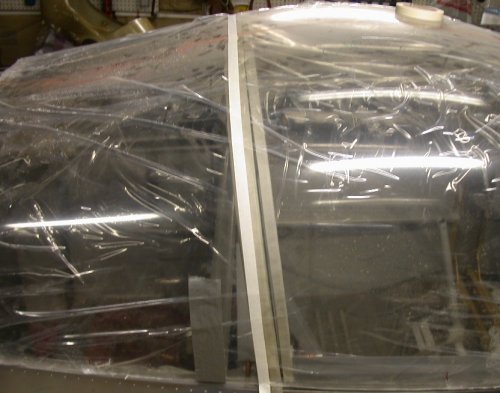 I was a bit concerned that when I made the split cut and the bubble settled
down onto the cabin frame, it might cause the aft edge of the cut to swing
fwd a bit at the bottom. So, I laid the guide tape on a bit more aft than where it
should be. As you can see in the previous pic, I've got a couple
inches to play with on the aft window, so I wanted to make sure I didn't
come up short on this cut. The tape was laid down so it's in the
middle of the aft cabin frame F631A at the top and at the aft edge of it on
the bottom.
I was a bit concerned that when I made the split cut and the bubble settled
down onto the cabin frame, it might cause the aft edge of the cut to swing
fwd a bit at the bottom. So, I laid the guide tape on a bit more aft than where it
should be. As you can see in the previous pic, I've got a couple
inches to play with on the aft window, so I wanted to make sure I didn't
come up short on this cut. The tape was laid down so it's in the
middle of the aft cabin frame F631A at the top and at the aft edge of it on
the bottom. The bubble is laid out on the sawhorses for the big split cut. The
blocks on the ends of the boards keep the bubble from spreading.
The duct tape under the bubble also helps hold the bubble together,
especially after the cut is made.
The bubble is laid out on the sawhorses for the big split cut. The
blocks on the ends of the boards keep the bubble from spreading.
The duct tape under the bubble also helps hold the bubble together,
especially after the cut is made. After the initial cut, you can see that it's pretty much flush with the aft
edge of the cabin frame aft F631A. So now we know - there's no need to
make an initial cut more aft than necessary; just mark it right in the
center, between the cabin frame fwd and aft F631As, and you'll be fine.
After the initial cut, you can see that it's pretty much flush with the aft
edge of the cabin frame aft F631A. So now we know - there's no need to
make an initial cut more aft than necessary; just mark it right in the
center, between the cabin frame fwd and aft F631As, and you'll be fine.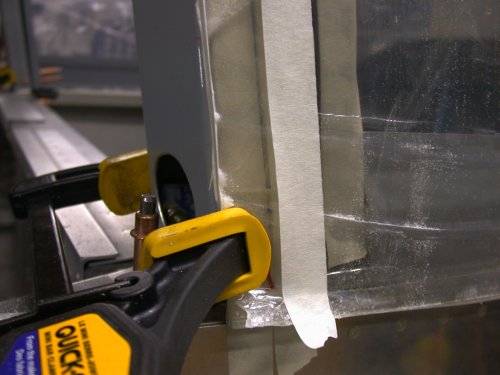 Here's the bubble clamped in place after the initial split cut, and marked
for the second, final cut. As mentioned, I didn't need to allow
anything for the canopy moving fwd when it slipped down further onto the
cabin frame after the initial split cut. Here, the tape marks it right
along the center line between the cabin frame fwd and aft F631As.
Here's the bubble clamped in place after the initial split cut, and marked
for the second, final cut. As mentioned, I didn't need to allow
anything for the canopy moving fwd when it slipped down further onto the
cabin frame after the initial split cut. Here, the tape marks it right
along the center line between the cabin frame fwd and aft F631As.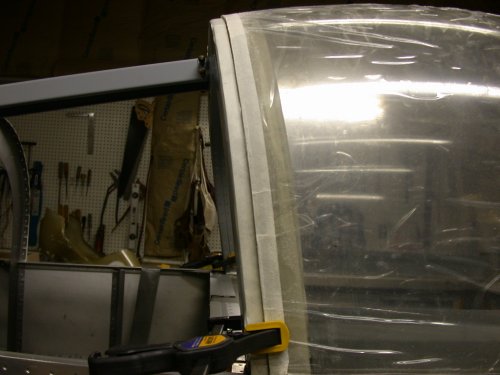 Here's the fwd bubble clamped in place after the final split trim cut.
The aft edge runs right along the seam between the cabin frame fwd and aft
F631As.
Here's the fwd bubble clamped in place after the final split trim cut.
The aft edge runs right along the seam between the cabin frame fwd and aft
F631As.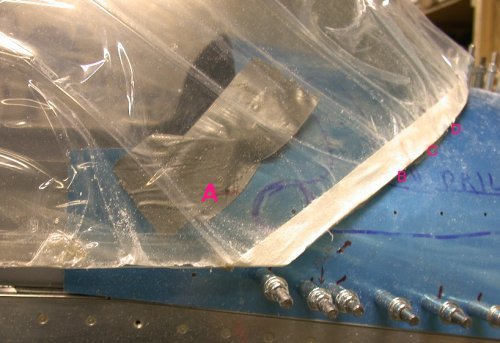 The next step is to start cutting the sides. The problem I have right
now is deciding exactly where to cut. The bottom edge of the slot in
the C702 skin, marked "A" here, is pretty obvious. But I am not sure
how to blend that into the fwd edge. I am wondering if it should go
from A to B, C, or D. So, I am pondering that right now.
The next step is to start cutting the sides. The problem I have right
now is deciding exactly where to cut. The bottom edge of the slot in
the C702 skin, marked "A" here, is pretty obvious. But I am not sure
how to blend that into the fwd edge. I am wondering if it should go
from A to B, C, or D. So, I am pondering that right now. 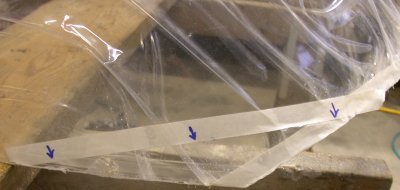 Here I used the tape to lay out a line from the bottom of the slot in the
C702 to the fwd edge of the bubble. This is just a basic initial cut.
The bottom of the C702 slot is about where the middle arrow is; the rest of
the cut to the LT is just continuing the line, and will get trimmed off
anyway, with the next cut (side/bottom).
Here I used the tape to lay out a line from the bottom of the slot in the
C702 to the fwd edge of the bubble. This is just a basic initial cut.
The bottom of the C702 slot is about where the middle arrow is; the rest of
the cut to the LT is just continuing the line, and will get trimmed off
anyway, with the next cut (side/bottom).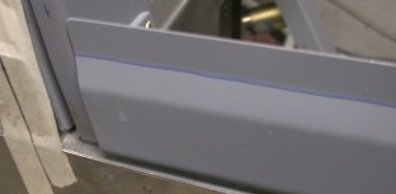 To
lay out the side cuts, first mark the bottom edge of the WD725 side arm
joggles, so you can look through the Plexiglas and more easily see where you
need to make the side cuts to be flush with the bottom of the joggle.
To
lay out the side cuts, first mark the bottom edge of the WD725 side arm
joggles, so you can look through the Plexiglas and more easily see where you
need to make the side cuts to be flush with the bottom of the joggle.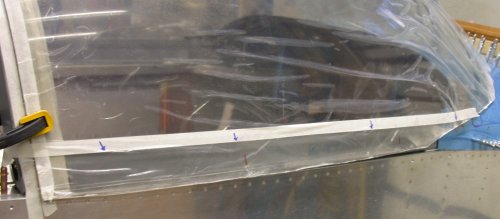 Here is the RT side of the bubble, with the front corner cuts already made,
and with the side cuts marked with tape. Using tape to mark your lines
is a very good idea. It's much easier to cut to the edge of tape than
it is to cut to a line, because any line you can see will have some width to
it, making it harder to define. The tape also helps you mark a
straighter line, as you pull it snug at both ends. And the tape also
helps keep the protective skin from pulling off and then getting Plexiglas
dust inside it, which will then prevent the skin from sticking to anything.
The blue arrows help make damn sure I make the cut on the CORRECT side of
the tape!.
Here is the RT side of the bubble, with the front corner cuts already made,
and with the side cuts marked with tape. Using tape to mark your lines
is a very good idea. It's much easier to cut to the edge of tape than
it is to cut to a line, because any line you can see will have some width to
it, making it harder to define. The tape also helps you mark a
straighter line, as you pull it snug at both ends. And the tape also
helps keep the protective skin from pulling off and then getting Plexiglas
dust inside it, which will then prevent the skin from sticking to anything.
The blue arrows help make damn sure I make the cut on the CORRECT side of
the tape!.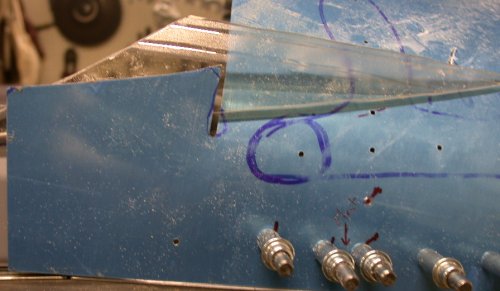 I used one of the cut off corners as a guide to help me determine how much
to trim out the slot in the C702, so the bubble will sit nicely in the slot.
I used one of the cut off corners as a guide to help me determine how much
to trim out the slot in the C702, so the bubble will sit nicely in the slot.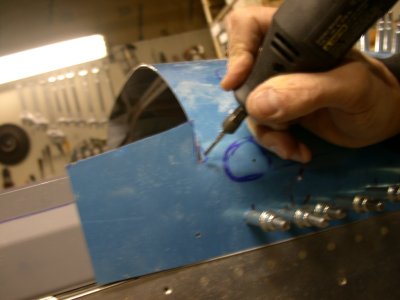 Here, I am using a carbide cutter bit in the Dremel tool to open up the C702
bubble slot. Pretty hard to shoot a right-handed camera with the left
hand, but you get the idea.
Here, I am using a carbide cutter bit in the Dremel tool to open up the C702
bubble slot. Pretty hard to shoot a right-handed camera with the left
hand, but you get the idea.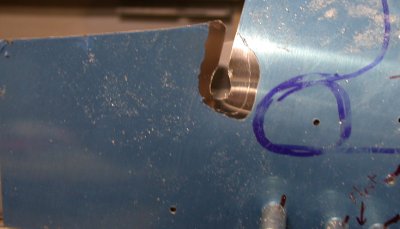 This hole needs to be trimmed open more, but after doing some grinding I found that the blue
protective skin made it hard to see just where was the edge of my cut.
You should trim away an inch or so of the blue skin before
marking and cutting these slots open.
This hole needs to be trimmed open more, but after doing some grinding I found that the blue
protective skin made it hard to see just where was the edge of my cut.
You should trim away an inch or so of the blue skin before
marking and cutting these slots open.