Aug 5 - The last time I worked on
the tail was September, 2003. Six years! It's such a
terrible shame that I've wasted over 4 years on the horrible
Eggenfellner
disaster. Hauled out all the dusty empennage parts and the Van's plans
I haven't looked at in years. Found the right places in the manual and
in the plans. Started searching for the mount hardware and small parts
like the F-798 shims that I haven't seen for six years.
2.0 hr
Aug 6 - can't find any of the
hardware at the hangar; hope it's in the garage when I get home this weekend.
Aug 10 - I found my F-798 shims
and other completed plane parts in the garage, but no sign of a labeled
container with the bolts I used to mount everything on the tail.
Seems doubtful I'd have put them all back into their general hardware
containers, but apparently I did. Started mounting the
Horizontal Stabilizer. 0.5 hr
Aug 12 - working on mounting the
tail. It took awhile to get used to using the prints. I haven't
looked at them for about 4 years, ever since I started down the Eggenfellner
Road To Hell. Posted a question about some details on VAF. Got
the HS & VS mounted & started in on elevators & rudder. I spent a
bunch of time redoing the elevator up travel & stops. When it came
time to install the bolt and washers for the elevator horns pivot bearing, I
realized it was going to be impossible to diddle those washers into place
with the VS in the way. I guess that's why the Van's manual says to
install the HS, then the elevators, then the VS. RTFM! So I
removed the "final-installed" VS and began trying to find the right
combination of washers to get zero clearance between the bearing and the
elevator horns. The LT side was perfect with the large washer & 3
AN960-416 regular washers. But I just couldn't get the RT side right.
6.5 hr
Aug 13 - Finally got the RT side
done by using one of those special
rod end safety washers I got from The Chassis Shop when I was making my
supercharger belt tension adjuster rod,
1 regular washer, and a third "washer" I made from a piece of 0.006" shim
stock I had laying around. It's also impossible to get a socket or
regular wrench onto the bolt head or nut enough to make any movement for
this. Fortunately, I had a set of "tight clearance" wrenches that let
me get the job done. Unfortunately, after I tightened up the nut, I
found out that, although Van's plans had specified an AN4-14A bolt for this,
it actually needs an AN4-15A bolt, which I do not have. So I
took it all apart and ordered $50 worth of bolts, including the AN4-15A I
need, from ACS. In the end, rather than wait days to continue the job,
I just used one of four AN4-15 bolts I have, and added a few AN4-15s to my
ACS order, in case those four I had are for something else on the plane.
The bolt is in shear, not tension, so no way could that cotter hole make a
difference in strength. Finished installing elevators. Noted
that pilot's stick is hitting the switches panel, so I worked on
cutting down the stick and installing the
Infinity Aerospace grip. 3.5 hr
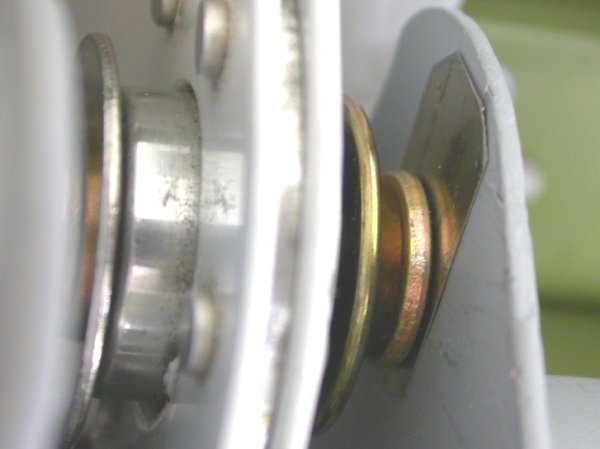
Here's the hardware I used on the elevator horn bearing mount. LT side
is a large washer next to the bearing & 3 regular washers. RT
side is a special rod end safety washer, one regular washer, and a drilled
piece of shim stock to eliminate remaining play between washers.
This is the only kind of wrench (RT end) that will get onto the elevator
horn bearing nut enough to leave you any room to swing the wrench. You
can get regular open-end wrenches onto the bolt and nut, but you can't move
them at all. There's no side clearance for any sort of box-end
wrench or socket.
Aug 14 - reinstalled VS, start
installing rudder. Both the top of the rudder and the RT end of the HS
had to first be cleaned and reprimed, due to the 6 years of fly poop all
over them. Lots of cobwebs and dead bugs to blow out of the tail
parts, too.
Aug 17 - final-adjusted rudder
rod end bearings, installed rudder, final-adjusted rudder travel, connected
rudder cables. Connecting the front end of the rudder cables
will require the F-6119 rudder cable links, which I don't think I've made
yet, as they need to be fabricated to a custom length, depending on final
rudder pedal position. They're to be made of steel, but I'm not sure
now where that steel stock might be. 2.5 hr
Aug 18 - Queried VAF about
whether or not I could substitute 0.063" or 0.125" aluminum for the 0.050"
steel in making the F-6119 link. Consensus was NO. I did,
however, get a description of what the piece of steel stock should look
like. I went home and found the steel stock in the bottom of the pile
of aluminum stock in the garage. All rusty by now, of course.
Wired brushed it clean. 1.0 hr
Aug 19 - Cleaned and primed
steel stock for the F-6119s. Fabricated four F-6119 rudder cable links. Primed
them, but unfortunately I used RUSTY metal primer, which is fine, but it
takes forever to dry, so I left them hanging overnight & will install
tomorrow. 1.5 hr
Aug 20 - I left the F-6119s out
in the 90 degree sun all day. By evening, the paint was plenty dry & hard.
Installed them, learning a couple valuable tips in the process:
1. It's MUCH easier if you do this
before you do all your avionics and wiring, so you can work from the top
down, instead of doing the contortionist thing from under the panel.
2. It's MUCH easier if you put the
two F-6119s and hardware onto the pedal first, then the cable, rather than
the other way around. This is because a washer goes on each side of
the pedal bracket, between the bracket and each F-6119; not too easy if the
brackets are already mounted to the cable when you're stuffed under the
panel. 0.5 hr
The tail is installed for now, so I started working on the
brake lines. See the August Fuselage
page for details on that.
Aug 26 - trying to put cotter
pins into the F-6119 clevis bolts. The problem is that the bolts are a
tad too short, and I can't expose enough of the cotter pin hole to get a
cotter pin in. After wasting a bunch of time trying to do it, I placed
another ACS order for both longer bolts and thinner nuts. One or the
other should solve that problem. 0.5 hr
Aug 31 - got my ACS order.
Between a combination of the thinner nuts from the order and using thinner L
washers, I got the cotter pins in and finished the F-6119s.
1.0 hr
 Here's the hardware I used on the elevator horn bearing mount. LT side
is a large washer next to the bearing & 3 regular washers. RT
side is a special rod end safety washer, one regular washer, and a drilled
piece of shim stock to eliminate remaining play between washers.
Here's the hardware I used on the elevator horn bearing mount. LT side
is a large washer next to the bearing & 3 regular washers. RT
side is a special rod end safety washer, one regular washer, and a drilled
piece of shim stock to eliminate remaining play between washers.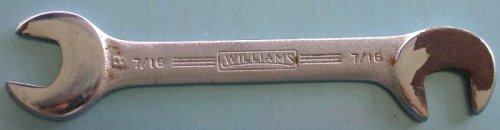 This is the only kind of wrench (RT end) that will get onto the elevator
horn bearing nut enough to leave you any room to swing the wrench. You
can get regular open-end wrenches onto the bolt and nut, but you can't move
them at all. There's no side clearance for any sort of box-end
wrench or socket.
This is the only kind of wrench (RT end) that will get onto the elevator
horn bearing nut enough to leave you any room to swing the wrench. You
can get regular open-end wrenches onto the bolt and nut, but you can't move
them at all. There's no side clearance for any sort of box-end
wrench or socket.