There was a discussion a while back on the Matronics RV list
about hangar lighting. Here are the details of how I implemented
a suggestion from my electrician to use simple cheap yard lights as hangar
lighting. These are very bright, will work at low temperatures, and
only cost $25 each, about the same as one florescent shop light. You
may want to do some or all of these mods, and/or make your own mods to fit
your situation. I MAKE NO CLAIMS THAT ANY OF THIS MEETS ANY ELECTRICAL
OR BUILDING CODES. It works fine for me, and I feel it's a
good safe install. Depending on the size of your hangar or shop and how
much light you want, you can use from 1 to 4 of these. In my 48 x 38
hangar, I am installing 3 of them in a triangle pattern, with one hooked up
temporarily for now. Even just one of these puts out a LOT of light
after it warms up.
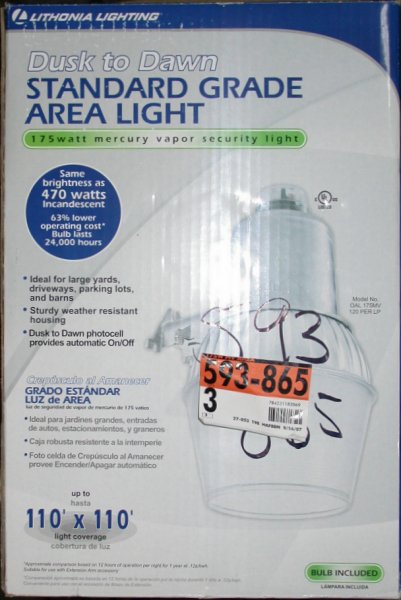
This is what you buy. Only $25 at Home Depot, and the pic even shows
the Home Depot part number. It's a relatively low wattage; 175, just a
bit more than the two 75w bulbs in a standard 4' shop light. So
electricity usage is much less than, say, common 400 watt industrial
lighting. You don't need as many of these as you would with 4' shop
lights, and the light carries down from a high ceiling much better than 4'
florescent shop lights. You just can't do cheaper lighting than this.
Remove this screw from the light sensor socket.
Remove these 2 screws holding the transformer in the housing.
Remove electrics from housing.
Cut mount arm from housing. The mount arm is for mounting to a
vertical surface, and we will be mounting this to the ceiling. With
the leverage of the arm you're cutting off, you should be able to cut this
freehand by just holding up the arm with your left hand.
Cut off the light sensor mount boss flush with the top of the housing.
You'll need a piece of wood 7/8" thick to support the edge of the housing as
you make the cut. This isn't an ESSENTIAL step, but the boss is no
longer needed, and this lets you use 6" lag bolts to mount the housing.
6" is usually the maximum length of commonly available 1/4" lag bolts.
If you can get 7" or 8" 1/4" lag bolts, then you can skip this step.
Or, if you're mounting to steel, you can use 1/4" threaded rod of any length
you want and not need this step. I'm mounting to the bottom of wood
trusses, so I am using 6" lag bolts.
Not essential, but I'd cut out the remaining center with a Dremel cutoff
wheel. Don't try to just knock these out, as the housing is very thin
cheap pot metal, and you might end up knocking out a big chunk.
Clean up the cut edges with a Scotchbrite wheel. This is the mostly
completed housing.
Use a #19 drill to match the diameter of the existing electrics mount holes
(so you retain the existing alignment), and drill all the way through the
housing on each side.
Now that your exit hole is established, use a 6" long 1/4" drill bit in a
drill press to finish the 2 mount holes. Or you could just mark the
center of the top of the cast boss here, and just drill down in one step,
without the #19 pre-drilling.
Now, modify the transformer. Remove the red wire. Hold the
Faston tabs with needlenose pliers as you do this, as the tabs are just
soldered to the transformer wires and not secured that well. We
certainly don't want to break the connection between the transformer wires and the Faston tabs.
On the side of the transformer that has 2 white wires, cut off the white
wire that goes to the light sensor socket.
Remove the black wire from the light sensor socket. Cut it to 12"
long. Crimp a Faston terminal to one end, and put it on the
transformer in the center, where the red wire was. Thread the black
wire through the loose zip tie. You now have 1 black and 1 white wire
to connect to your incoming power. The incoming ground lead will be
connected to the transformer frame and light housing via the mount bolt when
you install the light.
If you're running Romex to your light, cut a hole in the top, out near the
edge, and put in a snap bushing. I used a SB-625-8 busing and drilled
the hole to 5/8". If you can't use Romex, you can use armored flexible
cable and run it to a wire clamp in the upper side of the housing.
Drill as necessary. I did two like this using Romex and one
using armored cable. Pics of the armored cable setup (and the competed
installation) coming soon - next time I get out to the hangar.
Here's the fully modified light, ready for installation (it's upside-down in
this pic). I am using 6" long 1/4" lag bolts that go through the
transformer frame, through the light housing, and up into the bottom of wood
trusses. Pics of completed installation coming soon. If you want
to, you can also make a little plate and glue it to where you cut off the
mounting arm, either for aesthetics or to please a building inspector, if
applicable. Also, I don't have pics of it yet, but there isn't room
between the housing and the lag bolt heads to get a socket on the head, so I
cut a slot across the head of each lag bolt and used a flat tip screwdriver
to install the lag bolts.
To maximize side light and not diffuse it, you can easily remove the
diffusers, too. They're open at the bottom, so it isn't like they're
sealed or protecting the bulb much, anyway. The aluminum shroud is
about the same gauge as a pie pan, and you can easily unbend the crimp
holding the plastic diffuser to the shroud.
Here is a picture of one of the installed hangar lights. This has
Romex going through the PVC conduit, to a junction box where the Romex
connects to the light wires, then through the snap bushing, into the light
housing.
Closeup of one of the hangar lights with Romex inside PVC conduit.
Closeup of the hangar light I did using armored cable. The black pipe
is the propane plumbing I installed for the hangar heaters. Because the rafter trusses are 8' apart, the
light and the pipe had to share anchoring on the same truss, hence the pipe
dogleg around the light.
 This is what you buy. Only $25 at Home Depot, and the pic even shows
the Home Depot part number. It's a relatively low wattage; 175, just a
bit more than the two 75w bulbs in a standard 4' shop light. So
electricity usage is much less than, say, common 400 watt industrial
lighting. You don't need as many of these as you would with 4' shop
lights, and the light carries down from a high ceiling much better than 4'
florescent shop lights. You just can't do cheaper lighting than this.
This is what you buy. Only $25 at Home Depot, and the pic even shows
the Home Depot part number. It's a relatively low wattage; 175, just a
bit more than the two 75w bulbs in a standard 4' shop light. So
electricity usage is much less than, say, common 400 watt industrial
lighting. You don't need as many of these as you would with 4' shop
lights, and the light carries down from a high ceiling much better than 4'
florescent shop lights. You just can't do cheaper lighting than this.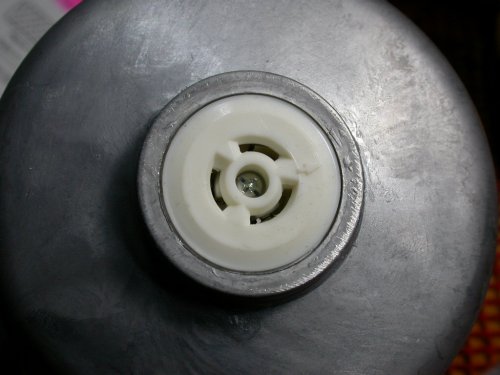 Remove this screw from the light sensor socket.
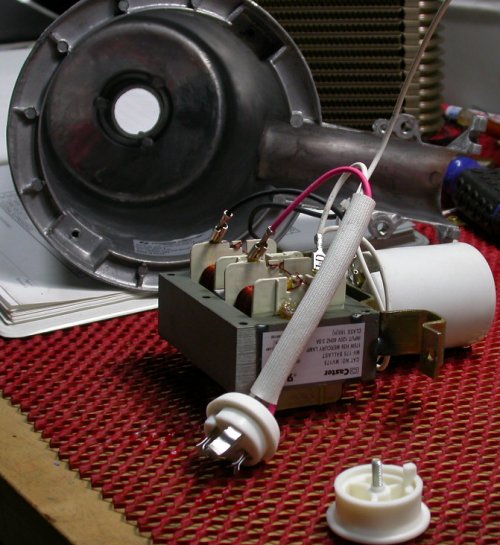 Remove electrics from housing.
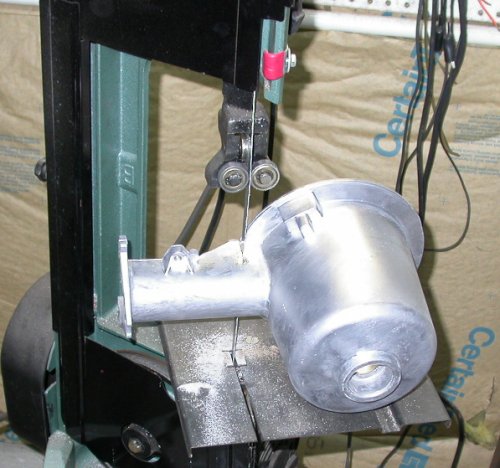 Cut mount arm from housing. The mount arm is for mounting to a
vertical surface, and we will be mounting this to the ceiling. With
the leverage of the arm you're cutting off, you should be able to cut this
freehand by just holding up the arm with your left hand.
Cut mount arm from housing. The mount arm is for mounting to a
vertical surface, and we will be mounting this to the ceiling. With
the leverage of the arm you're cutting off, you should be able to cut this
freehand by just holding up the arm with your left hand.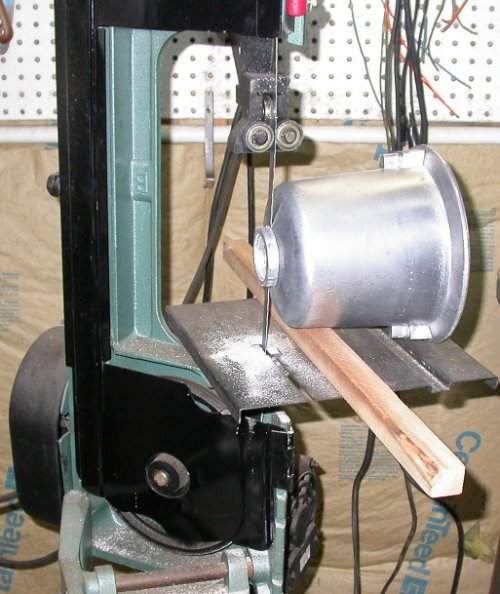 Cut off the light sensor mount boss flush with the top of the housing.
You'll need a piece of wood 7/8" thick to support the edge of the housing as
you make the cut. This isn't an ESSENTIAL step, but the boss is no
longer needed, and this lets you use 6" lag bolts to mount the housing.
6" is usually the maximum length of commonly available 1/4" lag bolts.
If you can get 7" or 8" 1/4" lag bolts, then you can skip this step.
Or, if you're mounting to steel, you can use 1/4" threaded rod of any length
you want and not need this step. I'm mounting to the bottom of wood
trusses, so I am using 6" lag bolts.
Cut off the light sensor mount boss flush with the top of the housing.
You'll need a piece of wood 7/8" thick to support the edge of the housing as
you make the cut. This isn't an ESSENTIAL step, but the boss is no
longer needed, and this lets you use 6" lag bolts to mount the housing.
6" is usually the maximum length of commonly available 1/4" lag bolts.
If you can get 7" or 8" 1/4" lag bolts, then you can skip this step.
Or, if you're mounting to steel, you can use 1/4" threaded rod of any length
you want and not need this step. I'm mounting to the bottom of wood
trusses, so I am using 6" lag bolts.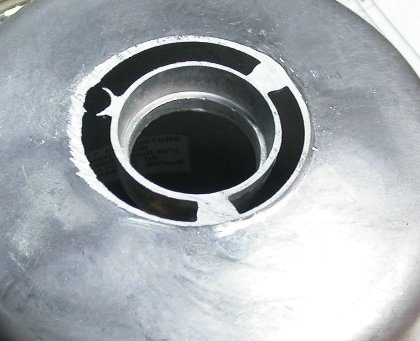 Not essential, but I'd cut out the remaining center with a Dremel cutoff
wheel. Don't try to just knock these out, as the housing is very thin
cheap pot metal, and you might end up knocking out a big chunk.
Not essential, but I'd cut out the remaining center with a Dremel cutoff
wheel. Don't try to just knock these out, as the housing is very thin
cheap pot metal, and you might end up knocking out a big chunk.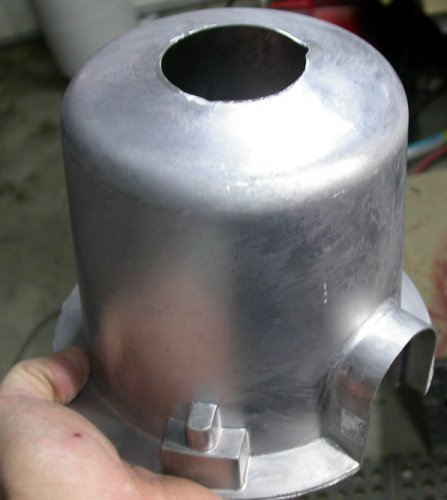 Clean up the cut edges with a Scotchbrite wheel. This is the mostly
completed housing.
Clean up the cut edges with a Scotchbrite wheel. This is the mostly
completed housing.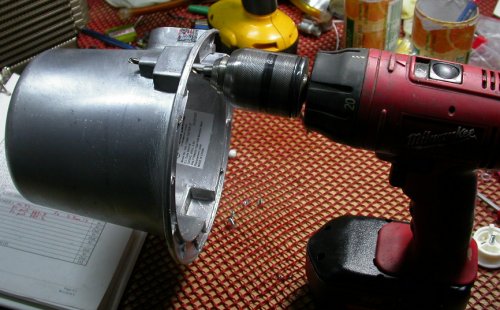 Use a #19 drill to match the diameter of the existing electrics mount holes
(so you retain the existing alignment), and drill all the way through the
housing on each side.
Use a #19 drill to match the diameter of the existing electrics mount holes
(so you retain the existing alignment), and drill all the way through the
housing on each side.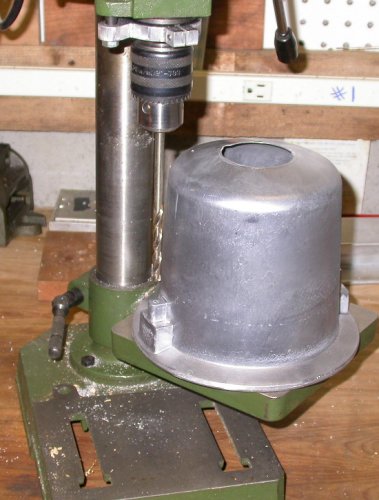 Now that your exit hole is established, use a 6" long 1/4" drill bit in a
drill press to finish the 2 mount holes. Or you could just mark the
center of the top of the cast boss here, and just drill down in one step,
without the #19 pre-drilling.
Now that your exit hole is established, use a 6" long 1/4" drill bit in a
drill press to finish the 2 mount holes. Or you could just mark the
center of the top of the cast boss here, and just drill down in one step,
without the #19 pre-drilling.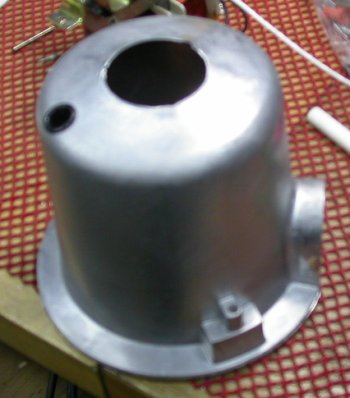 If you're running Romex to your light, cut a hole in the top, out near the
edge, and put in a snap bushing. I used a SB-625-8 busing and drilled
the hole to 5/8". If you can't use Romex, you can use armored flexible
cable and run it to a wire clamp in the upper side of the housing.
Drill as necessary. I did two like this using Romex and one
using armored cable. Pics of the armored cable setup (and the competed
installation) coming soon - next time I get out to the hangar.
If you're running Romex to your light, cut a hole in the top, out near the
edge, and put in a snap bushing. I used a SB-625-8 busing and drilled
the hole to 5/8". If you can't use Romex, you can use armored flexible
cable and run it to a wire clamp in the upper side of the housing.
Drill as necessary. I did two like this using Romex and one
using armored cable. Pics of the armored cable setup (and the competed
installation) coming soon - next time I get out to the hangar.  Here's the fully modified light, ready for installation (it's upside-down in
this pic). I am using 6" long 1/4" lag bolts that go through the
transformer frame, through the light housing, and up into the bottom of wood
trusses. Pics of completed installation coming soon. If you want
to, you can also make a little plate and glue it to where you cut off the
mounting arm, either for aesthetics or to please a building inspector, if
applicable. Also, I don't have pics of it yet, but there isn't room
between the housing and the lag bolt heads to get a socket on the head, so I
cut a slot across the head of each lag bolt and used a flat tip screwdriver
to install the lag bolts.
Here's the fully modified light, ready for installation (it's upside-down in
this pic). I am using 6" long 1/4" lag bolts that go through the
transformer frame, through the light housing, and up into the bottom of wood
trusses. Pics of completed installation coming soon. If you want
to, you can also make a little plate and glue it to where you cut off the
mounting arm, either for aesthetics or to please a building inspector, if
applicable. Also, I don't have pics of it yet, but there isn't room
between the housing and the lag bolt heads to get a socket on the head, so I
cut a slot across the head of each lag bolt and used a flat tip screwdriver
to install the lag bolts.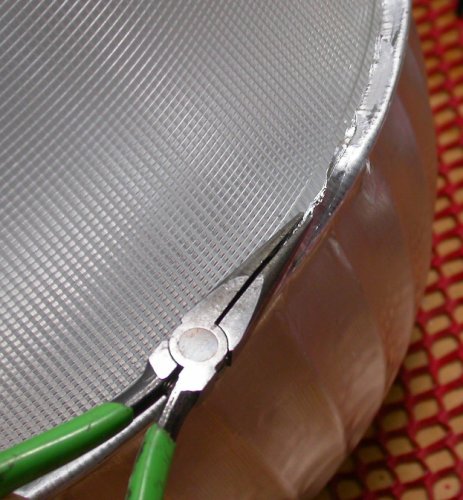 To maximize side light and not diffuse it, you can easily remove the
diffusers, too. They're open at the bottom, so it isn't like they're
sealed or protecting the bulb much, anyway. The aluminum shroud is
about the same gauge as a pie pan, and you can easily unbend the crimp
holding the plastic diffuser to the shroud.
To maximize side light and not diffuse it, you can easily remove the
diffusers, too. They're open at the bottom, so it isn't like they're
sealed or protecting the bulb much, anyway. The aluminum shroud is
about the same gauge as a pie pan, and you can easily unbend the crimp
holding the plastic diffuser to the shroud.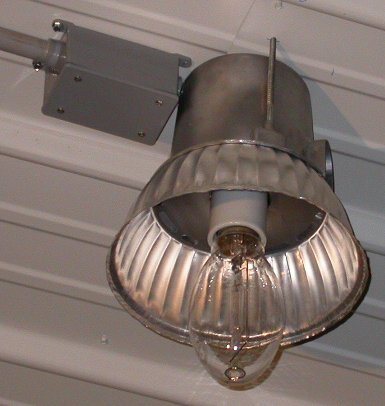 Here is a picture of one of the installed hangar lights. This has
Romex going through the PVC conduit, to a junction box where the Romex
connects to the light wires, then through the snap bushing, into the light
housing.
Here is a picture of one of the installed hangar lights. This has
Romex going through the PVC conduit, to a junction box where the Romex
connects to the light wires, then through the snap bushing, into the light
housing.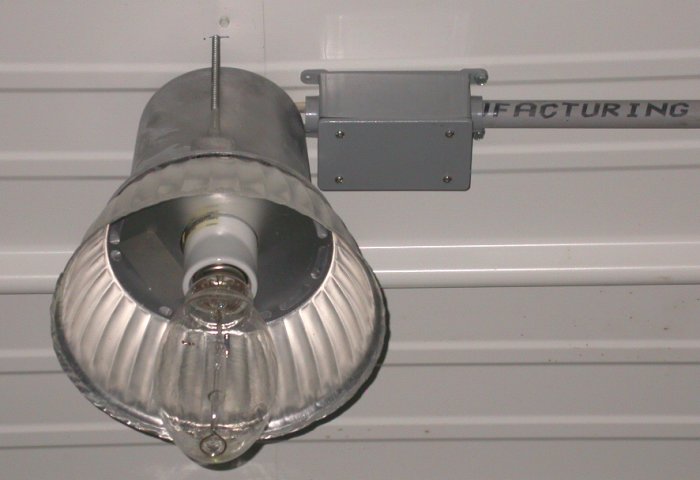 Closeup of one of the hangar lights with Romex inside PVC conduit.
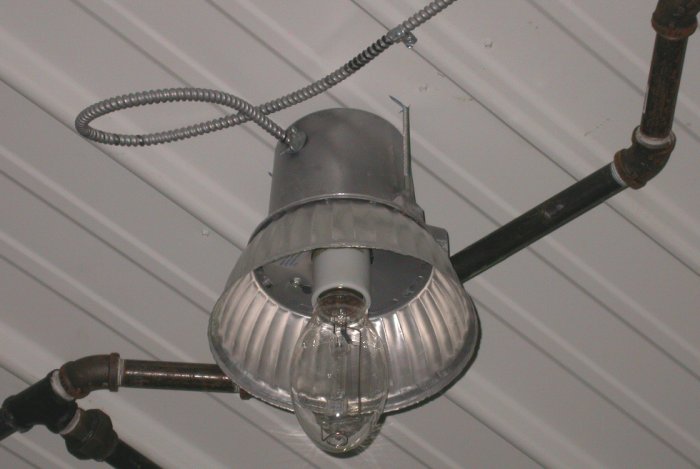 Closeup of the hangar light I did using armored cable. The black pipe
is the propane plumbing I installed for the hangar heaters. Because the rafter trusses are 8' apart, the
light and the pipe had to share anchoring on the same truss, hence the pipe
dogleg around the light.
Closeup of the hangar light I did using armored cable. The black pipe
is the propane plumbing I installed for the hangar heaters. Because the rafter trusses are 8' apart, the
light and the pipe had to share anchoring on the same truss, hence the pipe
dogleg around the light.