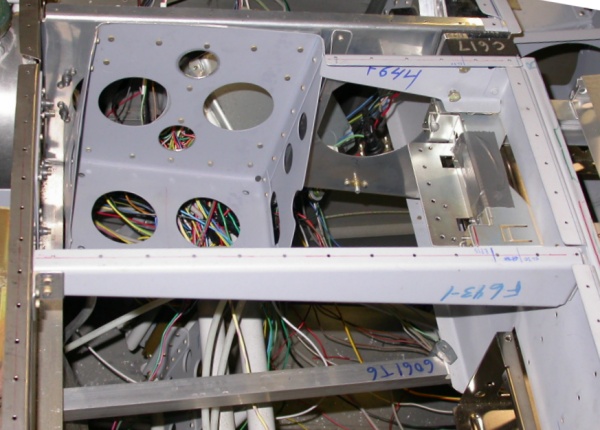
 Here is the GRT AHRS mount bracket, installed on the inboard side of the RT
F745 rib. Will start in on the BMA AHRS/computer mount next.
That's the 6061T6 angle you see clamped in place at the bottom of this pic.
Here is the GRT AHRS mount bracket, installed on the inboard side of the RT
F745 rib. Will start in on the BMA AHRS/computer mount next.
That's the 6061T6 angle you see clamped in place at the bottom of this pic.March, 2006 AVIONICS, ELECTRICS, & CONTROLS
Mar 6 - I haven't worked on the plane at all for a couple weeks. It's been bitter cold and I've been busy with tidying up the house after the flooring job, rearranging my stereo equipment, and other stuff. This cold spell is supposed to break by the end of the week. It is getting warmer (high = 30 now), and the days are sunny, but it's still pretty cold.
Mar 10 - Put lightening holes in GRT AHRS mount bracket & debur. 2.0 hr
Mar 12 - Put nutplates onto GRT bracket, dimple & prime parts. 2.0 hr
Mar 13 - rivet GRT bracket together, drill more lightening holes, fit & rivet to F745R rib 2.5 hr
Here is the GRT AHRS mount bracket, installed on the inboard side of the RT
F745 rib. Will start in on the BMA AHRS/computer mount next.
That's the 6061T6 angle you see clamped in place at the bottom of this pic.
Mar 14 - make subpanel reinforcement angle for LT BMA AHRS mount 0.5 hr
Mar 15 - make LT & RT BMA AHRS mount angles 2.75 hr
Mar 16 - finish RT BMA AHRS mount, make RT subpanel reinforcement, drill for nutplates, debur all. Countersink, prime, and rivet subpanel reinforcements. Found out there is an angle problem, due to the fact that the subpanel is not parallel to the firewall, so I cut the BMA mount brackets and bent them some. 4.5 hr + 0.5 hr doc
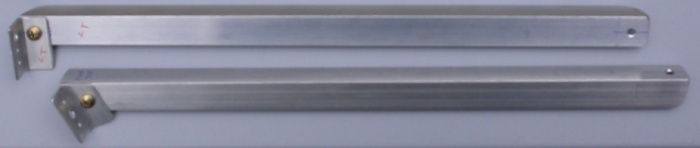 Here are the LT and RT mounting brackets for the Blue Mountain AHRS/computer
box. It's all 6061T6 0.063" angle. The little brackets on the LT
side in the pic will have nutplates installed, and will go against the
firewall. The hole in the back (RT side of pic) is where the bracket
gets fastened to the bottom of the subpanel. The bottom of the
subpanel is being reinforced with two 4" long pieces of 0.063" angle.
On each side, the screw will go up through this angle, through the
reinforcing angle, through the bottom flange of the subpanel, and into a
nutplate. The LT bracket fastens to the flat part of the firewall,
with a screw coming aft through the firewall. The RT bracket fastens
to the firewall cutout, so the end of the bracket fastens at an angle.
Because there's only room for one screw at each point, all screws are #10.
Here are the LT and RT mounting brackets for the Blue Mountain AHRS/computer
box. It's all 6061T6 0.063" angle. The little brackets on the LT
side in the pic will have nutplates installed, and will go against the
firewall. The hole in the back (RT side of pic) is where the bracket
gets fastened to the bottom of the subpanel. The bottom of the
subpanel is being reinforced with two 4" long pieces of 0.063" angle.
On each side, the screw will go up through this angle, through the
reinforcing angle, through the bottom flange of the subpanel, and into a
nutplate. The LT bracket fastens to the flat part of the firewall,
with a screw coming aft through the firewall. The RT bracket fastens
to the firewall cutout, so the end of the bracket fastens at an angle.
Because there's only room for one screw at each point, all screws are #10.
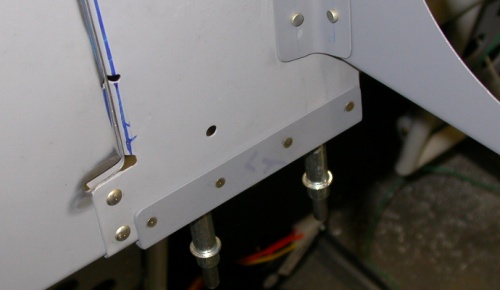 This
shows the LT subpanel brace. I used 0.063" 6061T6 aluminum angle to
stiffen the bottom of the subpanel. This is what each BMA AHRS mount
bracket will bolt to.
This
shows the LT subpanel brace. I used 0.063" 6061T6 aluminum angle to
stiffen the bottom of the subpanel. This is what each BMA AHRS mount
bracket will bolt to.
Mar 17 - TIG welded the cuts I made in one leg of each angle to bend them where they bolt on to the subpanel, as the subpanel is not parallel to the firewall, but the BMA mount brackets are perpendicular to it. The welding didn't go very well at first, but I ended up getting it done OK. I also TIG welded the end brackets (that had been held on with a screw) onto the main brackets. This was because the screw coming through the firewall and fastening to the bracket was interfering with the screw holding the end bracket to the main bracket. 2.0 hr
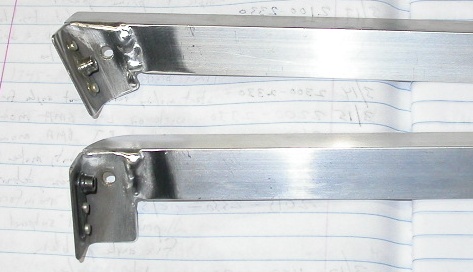 This shows the firewall mount brackets TIG welded to the main BMA mount
brackets. Not the prettiest TIG welding I ever saw, but it will hold.
This shows the firewall mount brackets TIG welded to the main BMA mount
brackets. Not the prettiest TIG welding I ever saw, but it will hold.
Mar 19 - Cleaned up welded angles, removed the temporary screws holding the end brackets onto the main brackets. The high temp for the last week has been about 25 degrees, so it is not a great working environment. Fit the BMA brackets to the firewall and mounted them. Mounted BMA box to mount brackets and tweaked the fit. Installed nutplates to mount brackets. Made radio stack support bracket. 6.5 hr
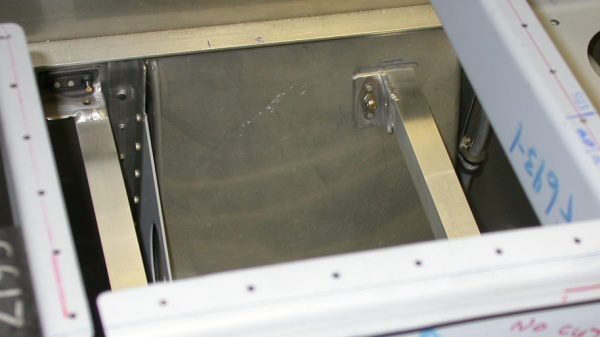 Here is a top view of the 2 installed BMA mount brackets. They are
screwed to the bottom of the subpanel at the aft end, and to the firewall at
the fwd end.
Here is a top view of the 2 installed BMA mount brackets. They are
screwed to the bottom of the subpanel at the aft end, and to the firewall at
the fwd end.
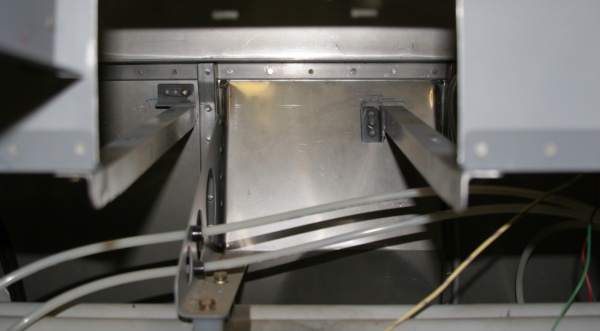 Here is a view of the BMA AHRS mount brackets (and subpanel reinforcement
angles in the foreground) from the aft looking forward toward the firewall.
They're held in place by a #10 screw at each end.
Here is a view of the BMA AHRS mount brackets (and subpanel reinforcement
angles in the foreground) from the aft looking forward toward the firewall.
They're held in place by a #10 screw at each end.
![]() For
working with mounting the BMA AHRS, I strongly recommend removing the
electronics from the box. It comes out easily, then just tape the
cover back on (for checking AHRS removal access clearance). Remove the
taped-on cover for work on mounting the bottom plate to your mount brackets.
Not only does this improve fastener access and make the box a lot lighter
and easier to work with, if you drop it, you aren't out $15,000!
For
working with mounting the BMA AHRS, I strongly recommend removing the
electronics from the box. It comes out easily, then just tape the
cover back on (for checking AHRS removal access clearance). Remove the
taped-on cover for work on mounting the bottom plate to your mount brackets.
Not only does this improve fastener access and make the box a lot lighter
and easier to work with, if you drop it, you aren't out $15,000!
Mar 20 - Update web site 1.0 hr doc
Mar 27 - clean up, ponder placement of BMA A/P controller, start looking at engine wiring again. 1.0 hr
Mar 31 - Vacuum crud & metal chips out of fuselage, layout mount tray for Sandia encoder and BMA AutoPilot controller. 1.75 hr
GO TO APRIL AVIONICS
BACK TO MY RV BUILDER'S HOME
BACK TO BRIAN'S HOME