 Laying
out the aluminum angle for the custom baggage area. There is a 6061T6
3/4x3/4x0.063" vertical angle at each end, and horizontal angles tying them
together at the bottom & top.
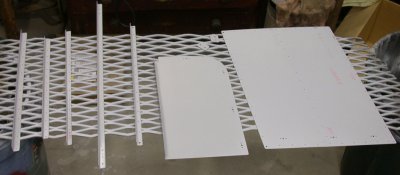
Laying
out the aluminum angle for the custom baggage area. There is a 6061T6
3/4x3/4x0.063" vertical angle at each end, and horizontal angles tying them
together at the bottom & top.CUSTOM EXTENDED BAGGAGE COMPARTMENT
This is a new page that consolidates all the pages and entries related to the custom extended baggage compartment I designed and built for my plane. My main interest in a longer baggage compartment is to be able to carry a rifle case. It's essentially the same if you want to carry a golf bag or fishing poles. Even though New Hampshire is one of the more gun-friendly states, there are not many competition matches here. Most of the nearest ones are in western NY and PA. I've driven to a couple, and it's about a 6+ hour drive each way. So, for me it's important to be able to carry a rifle case with a heavy benchrest rifle in it. This page will provide pics and text describing how I went about building this extended baggage compartment. It's just one way to do it. There are many other ways; here are some links to other methods/designs that I know of. I wanted mine to be as simple and lightweight as possible. My kit is a Quick Build, so it had to be able to be easily added to an existing QB fuse. I didn't want to get involved in heavy duty design changes, like adding ribs to the floor & sides.
Sep 1, 2003 - Decided to start planning and laying out my custom baggage compartment, so it will hold a rifle case. Worked on custom baggage compartment layout. I considered many different designs, involving making some sort of box, but I ended up using the existing structure as much as possible.
Sep 6 - Continue work on custom baggage area; cut, fit, cleco, drill inboard frame. Plan design for outboard part of custom baggage area. Decided to just use a simple piece of tubing over the rudder cable. Ordered tubing and sheet metal for custom baggage area from Aircraft Spruce.
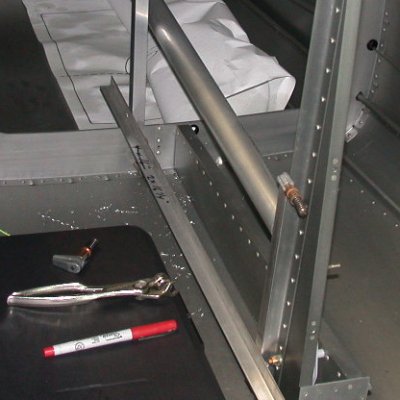
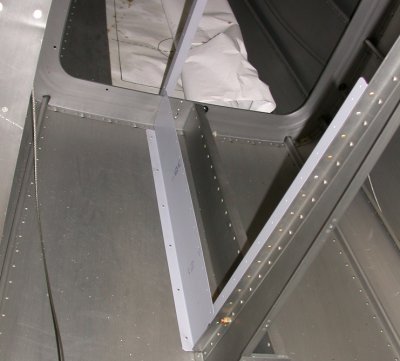
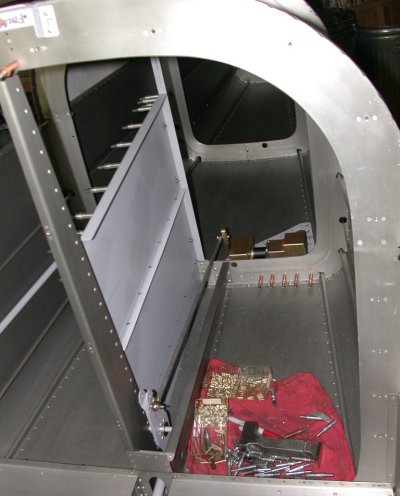
Laying
out the aluminum angle for the custom baggage area. There is a 6061T6
3/4x3/4x0.063" vertical angle at each end, and horizontal angles tying them
together at the bottom & top.
 Here is
the inboard frame, clecoed into place.
Here is
the inboard frame, clecoed into place.
Sep 12 - Receive and put away Aircraft Spruce order for custom baggage area parts. Remove rudder cable yet AGAIN and lay out rudder cable protection tube for custom baggage area. Lay out inboard custom baggage area wall.
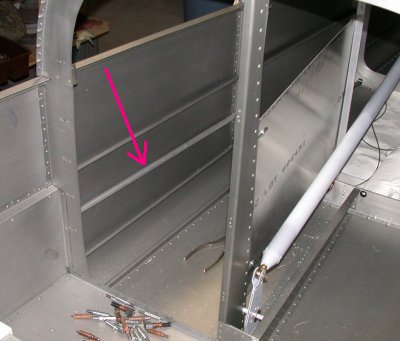 The arrow shows the tubing that goes from one rudder cable hole to the next,
to protect the rudder cable from anything in the baggage area. I was
going to put in a more complicated wall, but then decided this simple tubing
would do the job. After considering various ways of securing the
tubing, I decided a simple and effective way will be to just clamp it in
place with Adel clamps fastened to the bulkhead with small pieces of angle.
The arrow shows the tubing that goes from one rudder cable hole to the next,
to protect the rudder cable from anything in the baggage area. I was
going to put in a more complicated wall, but then decided this simple tubing
would do the job. After considering various ways of securing the
tubing, I decided a simple and effective way will be to just clamp it in
place with Adel clamps fastened to the bulkhead with small pieces of angle.
 Laying out the inboard baggage area wall. It is 0.032" 6061T4,
and will be stiffened with stiffeners made from the same material.
Laying out the inboard baggage area wall. It is 0.032" 6061T4,
and will be stiffened with stiffeners made from the same material.
Sep 19 - Resumed layout, drill, cleco of custom baggage area inboard skin. Phil Cobbin, EAA 740 member who's ordered his RV tail, came by to look at my project. He looked at the custom baggage area & thought I should add a rear panel, just in case anything got loose when I had that area open. Worked on making aft baggage area panel.
 Here's the baggage area, with the inboard panel clecoed into place.
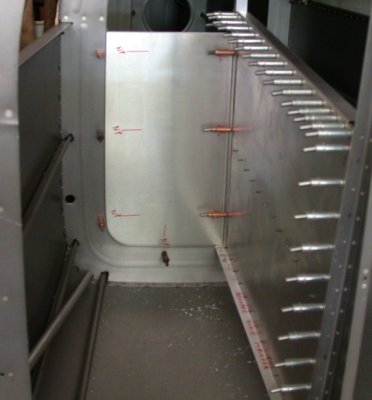 Here's the
rear baggage panel clecoed in place. It will be held in by 7 screws,
as indicated by the "NP" (nutplate) markings, and where the 7
copper clecoes are. The floor will remain open like this. The
rifle case will just lay across the tops of the bulkhead ribs. I can
also use this space to stuff in something high bulk/low weight, like
sleeping bags. The walls and rudder cable tube will keep any contents
from touching any of the flight controls.
Here's the
rear baggage panel clecoed in place. It will be held in by 7 screws,
as indicated by the "NP" (nutplate) markings, and where the 7
copper clecoes are. The floor will remain open like this. The
rifle case will just lay across the tops of the bulkhead ribs. I can
also use this space to stuff in something high bulk/low weight, like
sleeping bags. The walls and rudder cable tube will keep any contents
from touching any of the flight controls.
Sep 20 - Worked on custom baggage area aft panel. Installed nutplates on baggage panels. Dismantled, cleaned, primed baggage area panels and frame.
 Here are
the custom baggage compartment parts primed.
Here are
the custom baggage compartment parts primed.
Sep 21 - Rivet nutplates onto baggage panels. I made the rear panel removable, in case I need a little extra length or access to the rear fuselage. I decided to take Phil's suggestion a step further, and laid out a lower panel to go between the fuselage bottom skin and the lower baggage area frame rail. All I had was the 0.032" 6061T4 I had used for the original inboard panel (and that was PLENTY thick and I probably could have gotten by with 0.025"), so I used it to make the rear panel and the lower panel. After I made the panels, it bugged me a lot that I had used thicker aluminum sheet than I really needed to. I calculated that I wasted about 8 ounces by doing them in 0.032". The rear panel could have been 0.025, possibly even 0.020, and the lower panel could have been 0.020" or possibly even 0.016". The lower panel doesn't do anything, except block any loose floating objects from getting to the elevator bellcrank. Unfortunately, I did a great job when I made the panels (they came out very well and fit quite snugly), so I was loathe to redo them in thinner metal. Oh well - I did order some 2024T3 in 0.032, 0.025, and 0.020 from Aircraft Spruce, so maybe I'll redo one or both of those panels later.
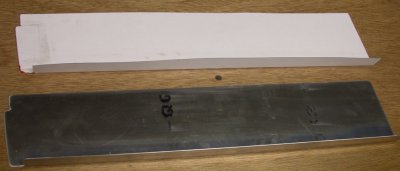 Layout & pattern for the lower panel. In the end, I decided to
redo it in thinner material.
Layout & pattern for the lower panel. In the end, I decided to
redo it in thinner material.
 And here it is clecoed into place under the inboard panel.
Sep 22 - Drill and cleco lower baggage panel in place. Dimple bottom fuselage skin for lower panel. Still considering redoing lower panel in a much lighter gage metal.
Dec 7 - Fabricate bracket for custom baggage rudder cable cover
Dec 13 - Fit rudder cable tubing clamp bracket. Primed all the parts I had ready. Riveted the rudder cable clamp bracket into place. Reinstalled rudder cable yet again.
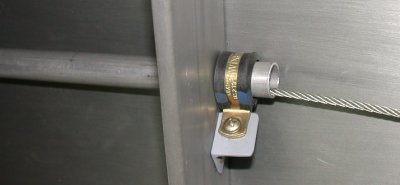 Here
is the completed assembly to protect the rudder cable inside the custom
baggage compartment. The tubing goes from the normal baggage
compartment aft wall, back to the next rib aft. The rudder cable goes
through the tubing, thus protected from anything in the custom baggage
compartment touching it. The clamp holds the tubing in place, and the
bracket holds the clamp in place. Forward is to the left in this
picture.
Here
is the completed assembly to protect the rudder cable inside the custom
baggage compartment. The tubing goes from the normal baggage
compartment aft wall, back to the next rib aft. The rudder cable goes
through the tubing, thus protected from anything in the custom baggage
compartment touching it. The clamp holds the tubing in place, and the
bracket holds the clamp in place. Forward is to the left in this
picture.
Apr 16, 2004 - Prime custom rudder cable tubing. Remake and fit custom lower baggage area panel in .016 aluminum. Rivet baggage frame into place.
Apr 17 - Finish riveting custom baggage frame. Riveted the WRONG (old) lower panel in. Removed wrong panel and primed the correct new one.
 Here
is the custom baggage compartment, with the fwd upright frame (foreground),
aft upright frame (center background), and lower panel all riveted into
place. I had to take out the lower panel and rivet it back in because
I initially grabbed the old (heavier) one by mistake.
Here
is the custom baggage compartment, with the fwd upright frame (foreground),
aft upright frame (center background), and lower panel all riveted into
place. I had to take out the lower panel and rivet it back in because
I initially grabbed the old (heavier) one by mistake.
Apr 18 - Reinstalled correct custom baggage compartment lower panel. Installed rudder cable tube. Installed rudder cable clamps.
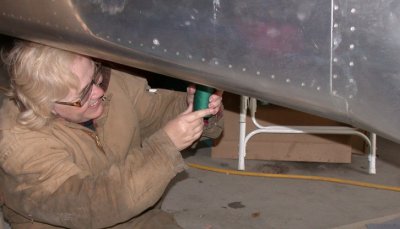 Karla having
fun bucking those rivets for the lower baggage panel. I am using a
back rivet set on the inside of the fuselage.
Karla having
fun bucking those rivets for the lower baggage panel. I am using a
back rivet set on the inside of the fuselage.
Apr 29 - Fabricated custom baggage compartment fwd panel (F751), so it only covers the LT side. I will switch between the stock F751 provided with the kit, and will use the custom version when I am using the custom extended baggage compartment. I needed a F-6114B wear block for the custom F751. Rather than order one from Van's, I made one from a piece of Delrin I had laying around. I later found out that my seat belt anchor kit had them, anyway, even though the stock one was already installed on the stock F751. I finished making the custom F751 and primed it. I
 Here is the replacement F-751 baggage panel I ordered. The QB kit came
with one fully completed, but I needed a second optional one, modified for
use when I need to access the custom baggage area, on the left in this pic.
Here is the replacement F-751 baggage panel I ordered. The QB kit came
with one fully completed, but I needed a second optional one, modified for
use when I need to access the custom baggage area, on the left in this pic.
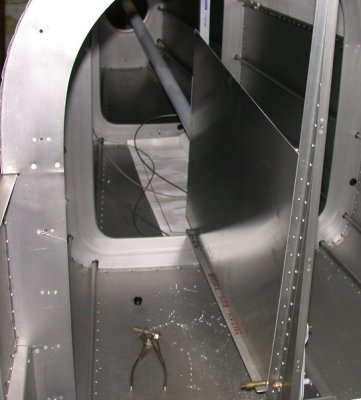
 Here is the
finished custom F-751 baggage bulkhead panel. It is trimmed to allow
access into the custom baggage area. You can see in the custom baggage
area the tubing protecting the rudder cable on the LT, and the lower part of
the frame and the lower custom panel on the RT. The main inboard panel
and aft panel are not installed in this pic. I am waiting to install
my autopilot elevator servo (behind this custom F-751 panel) before I rivet
then custom baggage panels into place. This is jut to ensure I have
all the access to the servo I need to get it installed. I will be
ordering the servos from BMA soon.
Here is the
finished custom F-751 baggage bulkhead panel. It is trimmed to allow
access into the custom baggage area. You can see in the custom baggage
area the tubing protecting the rudder cable on the LT, and the lower part of
the frame and the lower custom panel on the RT. The main inboard panel
and aft panel are not installed in this pic. I am waiting to install
my autopilot elevator servo (behind this custom F-751 panel) before I rivet
then custom baggage panels into place. This is jut to ensure I have
all the access to the servo I need to get it installed. I will be
ordering the servos from BMA soon.
 This is the top of the custom F-751, with the nutplates installed and the F-6114B wear block
installed. I made the wear block from a scrap of Delrin I had laying
around. Later, I found out that, even though the QB kit came with the
F-751 already built, the bag of seat belt anchor hardware had the wear
blocks in it, anyway.
This is the top of the custom F-751, with the nutplates installed and the F-6114B wear block
installed. I made the wear block from a scrap of Delrin I had laying
around. Later, I found out that, even though the QB kit came with the
F-751 already built, the bag of seat belt anchor hardware had the wear
blocks in it, anyway.
June 21 - Cleco custom baggage compartment panels in. Squeeze all the custom baggage compartment rivets I can reach, and drive the rest by myself, by putting the cupped set on a bucking bar and using the back rivet tool on the gun. Karla helped rivet the ones I couldn't do with the 2 previous methods. Two rivets had to be drilled out and replaced with pop rivets.
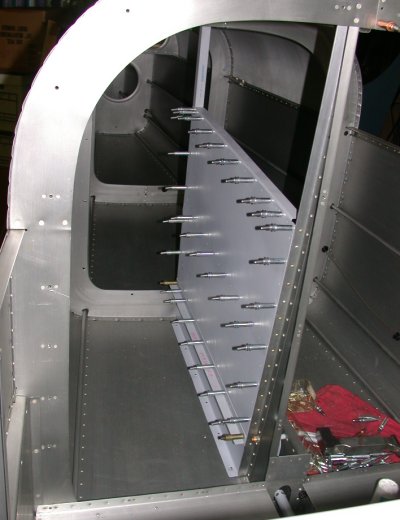
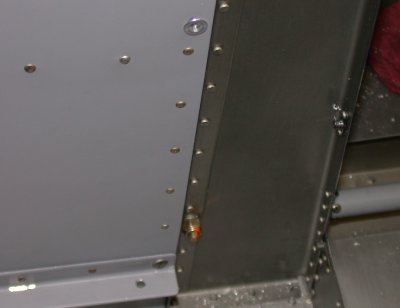
 Here's the LT side of the custom baggage compartment, looking aft, with the
pieces clecoed and ready to rivet. The elevator autopilot servo is in
the background of the LT side (RT in the pic). The light gray round
thing on the far LT in the pic is the rudder cable protection tube, that
keeps anything in the custom baggage compartment from touching the rudder
cable.
Here's the LT side of the custom baggage compartment, looking aft, with the
pieces clecoed and ready to rivet. The elevator autopilot servo is in
the background of the LT side (RT in the pic). The light gray round
thing on the far LT in the pic is the rudder cable protection tube, that
keeps anything in the custom baggage compartment from touching the rudder
cable.
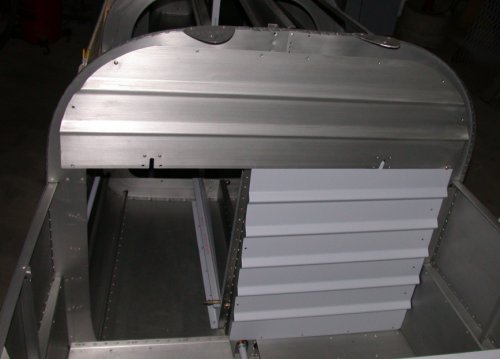
 And
here's the RT side view, looking aft, showing the actual custom baggage
compartment area. The aft portion of the compartment has a panel that
is held in with screws, so it can be removed if necessary. The custom
baggage area doesn't have its own floor - the rifle case I put in here will
just sit on the tops of the ribs, and will be held in place by bungee cords.
And
here's the RT side view, looking aft, showing the actual custom baggage
compartment area. The aft portion of the compartment has a panel that
is held in with screws, so it can be removed if necessary. The custom
baggage area doesn't have its own floor - the rifle case I put in here will
just sit on the tops of the ribs, and will be held in place by bungee cords.
June 23 - Drive 3/8" rivets for custom baggage compartment frame angle intersections. I was originally going to use AN3 bolts there, but after the success using the solid 3/8" rivets on the elevator servo plate flange, I decided to use solid rivets for the intersections.
July 14 - teaching myself how to use the Thread-Sert tool, aka RivNut, for putting in baggage tiedowns.
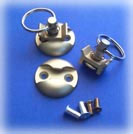
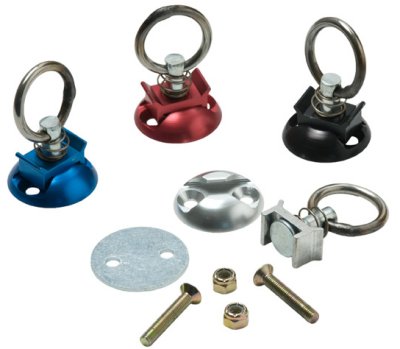 These tiedowns with quick-release rings are available from motorcycle supply
places, such as
HERE. There are also threads on VAF about tiedowns and other
tiedown ideas, such as
THIS one.
These tiedowns with quick-release rings are available from motorcycle supply
places, such as
HERE. There are also threads on VAF about tiedowns and other
tiedown ideas, such as
THIS one.
 They are also available from
Aircraft Spruce.
They are also available from
Aircraft Spruce.
 Here,
I am doing a couple practice runs on the RivNut tool. Very handy, but
do a practice run or 2 with it first. It doesn't come with any
instructions. I believe I got this from Aircraft Tool Supply.
The head has 3 different sets of threads that work in different directions, so
you'll want to understand how it works before using it for real. Be
sure the threads in the tool head are fully into all the threads in the RivNut before squeezing, or you'll rip them out. If you squeeze, then
readjust the head threads IN for more pull, be aware that you are screwing the
threads OUT of the RivNut as you do this. My first practice run tore
out half the RivNut threads because of this.
Here,
I am doing a couple practice runs on the RivNut tool. Very handy, but
do a practice run or 2 with it first. It doesn't come with any
instructions. I believe I got this from Aircraft Tool Supply.
The head has 3 different sets of threads that work in different directions, so
you'll want to understand how it works before using it for real. Be
sure the threads in the tool head are fully into all the threads in the RivNut before squeezing, or you'll rip them out. If you squeeze, then
readjust the head threads IN for more pull, be aware that you are screwing the
threads OUT of the RivNut as you do this. My first practice run tore
out half the RivNut threads because of this.
 Here is a closeup of the results of doing a couple practice RivNut
installs. The second one was good. The first one tore out half
the threads after I readjusted the head to take up slack from the first
squeeze. Taking up the slack unscrewed the tool from half the RivNut
threads, so when I squeezed it again, it tore out all the threads it was
engaged with. Basically, I found you really need to adjust it so you
get it all done in one squeeze. The tool pulls the RivNut body down
over the hole in the material, so it clamps tight to the material, much like
a pop rivet.
Here is a closeup of the results of doing a couple practice RivNut
installs. The second one was good. The first one tore out half
the threads after I readjusted the head to take up slack from the first
squeeze. Taking up the slack unscrewed the tool from half the RivNut
threads, so when I squeezed it again, it tore out all the threads it was
engaged with. Basically, I found you really need to adjust it so you
get it all done in one squeeze. The tool pulls the RivNut body down
over the hole in the material, so it clamps tight to the material, much like
a pop rivet.
July 15 - Install cargo tiedowns. Install K1000-3 10-32 nutplates into F785A for more cargo tiedown eyebolts. Put Rivnut into custom baggage area fwd upright for yet another tiedown eyebolt. Drill holes in RT F760 for tiedown eyebolts.
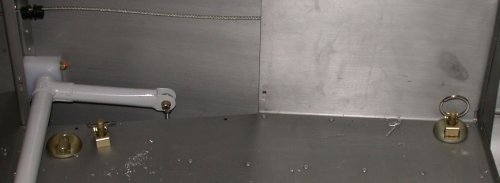 Here are the quick release cargo tiedowns installed on one side of the
baggage compartment.
Here are the quick release cargo tiedowns installed on one side of the
baggage compartment.
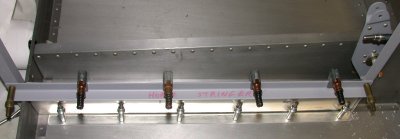
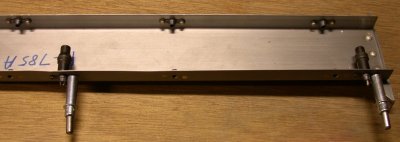 Here, I am putting extra nutplates onto the already-completed F785A, so I
can use AN42B-4 eyebolts as cargo tiedowns with bungee cords. I
particularly laid them out to be able to hold my rifle case securely in the
custom baggage compartment. These here will hold the fwd part of the
case.
Here, I am putting extra nutplates onto the already-completed F785A, so I
can use AN42B-4 eyebolts as cargo tiedowns with bungee cords. I
particularly laid them out to be able to hold my rifle case securely in the
custom baggage compartment. These here will hold the fwd part of the
case.
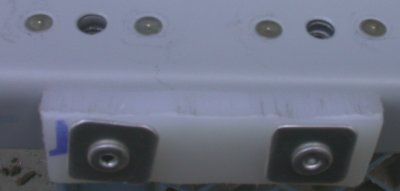
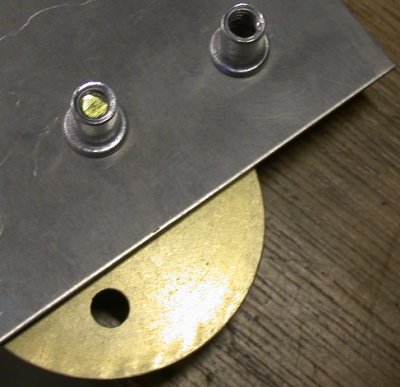
 This part will hold the aft part of the rifle case. The hole in the
angle at the bottom will hold one end of a bungee cord, and the RivNut at
the top center of the pic will hold a little AN42B-4 eyebolt, which will
hold the other end of the bungee cord.
This part will hold the aft part of the rifle case. The hole in the
angle at the bottom will hold one end of a bungee cord, and the RivNut at
the top center of the pic will hold a little AN42B-4 eyebolt, which will
hold the other end of the bungee cord.
see my other CUSTOMIZATIONS
BACK TO MY RV BUILDER'S HOME
BACK TO BRIAN'S HOME