 First,
cut back the insulation 3/8" on the wires to be spliced. Note the
completed splice at the top of the pic. You can see it doesn't take up a
lot more space than the wire itself.
First,
cut back the insulation 3/8" on the wires to be spliced. Note the
completed splice at the top of the pic. You can see it doesn't take up a
lot more space than the wire itself.HOW TO DO BULLETPROOF WIRE SPLICES
This page will show and tell you how to make waterproof wiring splices that are as good and strong as no splice at all. It will also show you how to tie wiring bundles.
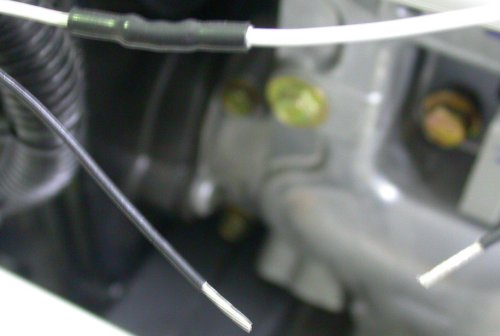
First,
cut back the insulation 3/8" on the wires to be spliced. Note the
completed splice at the top of the pic. You can see it doesn't take up a
lot more space than the wire itself.
 This splicing method uses "parallel connectors", available from
Waytek. While I
haven't been real thrilled about their customer
service, they do have a lot of very handy wiring products that I haven't
found elsewhere. They also have various waterproof connectors, as well as
the "dual wall" heatshrink you'll need to complete these splices. I
use the dual wall heatshrink for most all my wiring. It has a heavier wall
and it has an inside wall made of hot glue, so after you've shrunk it, whatever
is inside is completely protected and encapsulated in plastic. The
parallel connectors come in 3 sizes - the smallest is shown. Medium is p/n
31070 and large is 32070.
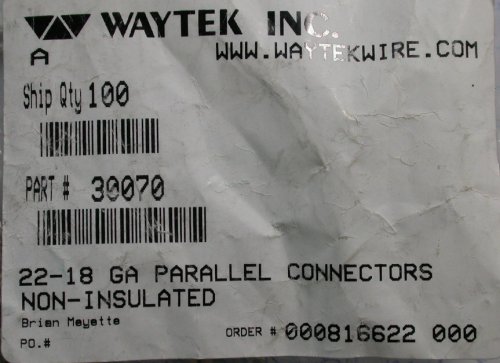
This splicing method uses "parallel connectors", available from
Waytek. While I
haven't been real thrilled about their customer
service, they do have a lot of very handy wiring products that I haven't
found elsewhere. They also have various waterproof connectors, as well as
the "dual wall" heatshrink you'll need to complete these splices. I
use the dual wall heatshrink for most all my wiring. It has a heavier wall
and it has an inside wall made of hot glue, so after you've shrunk it, whatever
is inside is completely protected and encapsulated in plastic. The
parallel connectors come in 3 sizes - the smallest is shown. Medium is p/n
31070 and large is 32070.
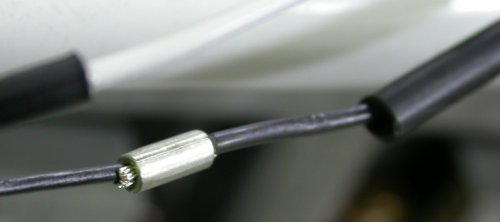
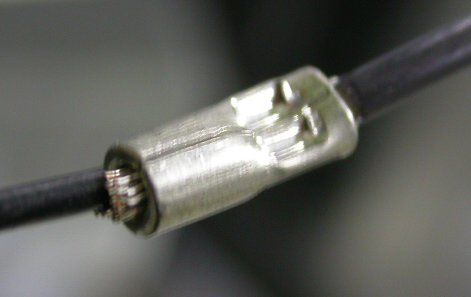
 Put the parallel connector onto one wire, making sure that a bit of stripped
wire is exposed on either end.
Put the parallel connector onto one wire, making sure that a bit of stripped
wire is exposed on either end.
 To avoid ticking yourself off and having to redo a good splice, MAKE SURE YOU
PUT THE HEATSHRINK ONTO ONE OF THE WIRES NOW. Note the heatshrink on the
RT side of the pic. Use dual wall heatshrink, cut to about 1.5" length.
You want to make sure it will go well beyond the splice in both directions.
Waytek part numbers for this stuff include 22202, 22203, 22204, etc, depending
on size. Slide the other wire in from the other end of the connector,
making sure that a wire end is exposed at each end of the connector. Make
sure that all individual wire strands go through the connector, and don't get
hung up at the entrance. Use the smallest connector that you can put
all strands of both wires into. You can also splice multiple wires into
either end, as long as they all will fit. Use the smallest
heatshrink that will fit over the connector.
To avoid ticking yourself off and having to redo a good splice, MAKE SURE YOU
PUT THE HEATSHRINK ONTO ONE OF THE WIRES NOW. Note the heatshrink on the
RT side of the pic. Use dual wall heatshrink, cut to about 1.5" length.
You want to make sure it will go well beyond the splice in both directions.
Waytek part numbers for this stuff include 22202, 22203, 22204, etc, depending
on size. Slide the other wire in from the other end of the connector,
making sure that a wire end is exposed at each end of the connector. Make
sure that all individual wire strands go through the connector, and don't get
hung up at the entrance. Use the smallest connector that you can put
all strands of both wires into. You can also splice multiple wires into
either end, as long as they all will fit. Use the smallest
heatshrink that will fit over the connector.
 These
are the crimpers you can use for this. On the RT is the one I got from
Waytek for it. It's their p/n 464 Metri-Pack (waterproof connectors)
crimping tool. It does a fairly good job of crimping the parallel
connectors. Better is the AMP tool on the LT. It's no longer
made, but I eventually found one on ebay. Part number is 69324.
Waytek also told me I could use most any PIDG crimping tool, but I haven't tried
that, so I can't speak to how well that would work.
These
are the crimpers you can use for this. On the RT is the one I got from
Waytek for it. It's their p/n 464 Metri-Pack (waterproof connectors)
crimping tool. It does a fairly good job of crimping the parallel
connectors. Better is the AMP tool on the LT. It's no longer
made, but I eventually found one on ebay. Part number is 69324.
Waytek also told me I could use most any PIDG crimping tool, but I haven't tried
that, so I can't speak to how well that would work.
 align
the splice with the seam up so you can see it. Center the crimper male
jaws over the seam. Position the crimper axially so the crimp won't
touch either the end or the center of the connector. Before doing this,
make sure your dual wall HEATSHRINK is in place on one of the wires.
align
the splice with the seam up so you can see it. Center the crimper male
jaws over the seam. Position the crimper axially so the crimp won't
touch either the end or the center of the connector. Before doing this,
make sure your dual wall HEATSHRINK is in place on one of the wires.
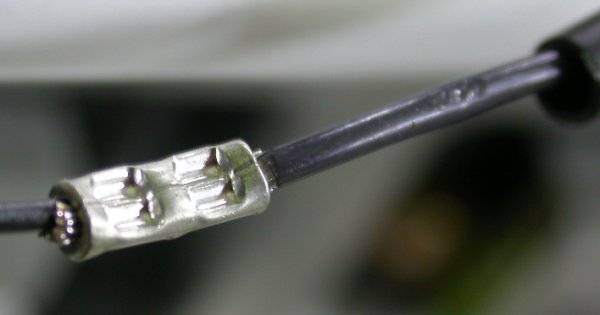 Then
crimp it again on the other end, again avoiding the very end of the connector
and the other crimp. This is what the final crimping will look like.
Then
crimp it again on the other end, again avoiding the very end of the connector
and the other crimp. This is what the final crimping will look like.
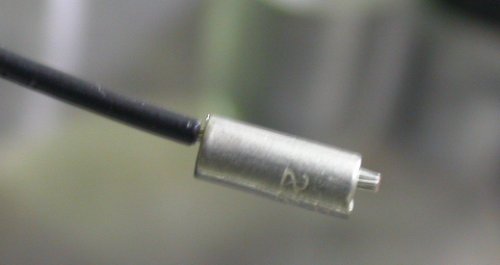
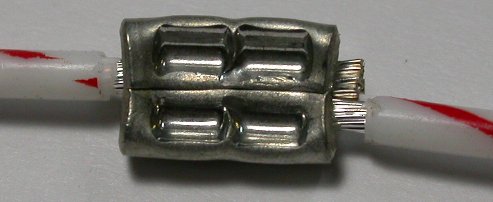 Here's another picture of what the final result should look like, on some larger
wires, before the
dual wall heatshrink goes on. Actually, the bottom wire should have been a
bit more to the LT, so the end is showing on the LT side.
Here's another picture of what the final result should look like, on some larger
wires, before the
dual wall heatshrink goes on. Actually, the bottom wire should have been a
bit more to the LT, so the end is showing on the LT side.
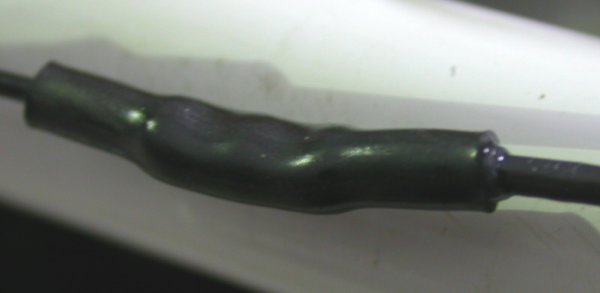 Then slide the dual wall heatshrink down, center it over the connector, and heat
it thoroughly. You can see the plastic glue seeping out from the RT end.
The heatshrink needs to be about 3 times as long as the splice it's covering.
Then slide the dual wall heatshrink down, center it over the connector, and heat
it thoroughly. You can see the plastic glue seeping out from the RT end.
The heatshrink needs to be about 3 times as long as the splice it's covering.
When I first started using this method & these products several years ago, I tested these connections by making a spliced loop of wire about 2 feet in diameter and trying to pull it apart. While I did eventually break it, it took a huge force - like with the loop over a broom handle in my bench vise on one end and another broom handle on the other end, my foot up against the work bench, and pulling with both hands on the broom handle, using all my strength and body weight. The broom handles were necessary because the force required to break it was so great that, even with heavy gloves on, the wire would cut into my hands before I could break the splice. And that testing was done with no heatshrink over the splice. While the dual wall heatshrink is mostly for protecting the splice against corrosion and/or fraying/flexing, as well as the obvious insulating, it also adds some overall strength to the splice.
With my Eggenfellner engine, I had to do dozens of splices to un-f the wiring harness that came from Eggenfellner. After switching to the SDS ECU, I again used these splices to wire the new ECU into existing components like spark plug coil signal & power, injectors power & signal, etc. I have complete confidence in these splices.
This method will not only provide you with the strongest possible splice, it's also the smallest, neatest, and least expensive. It's air-tight and waterproof.
THIS SECTION WILL SHOW YOU HOW TO LACE YOUR WIRING HARNESS:
Get lacing tape from Aircraft Spruce. I'm not sure if I got the polyester or nylon version, nor am I sure of advantages or disadvantages of either. I think mine is the nylon version, but I can't find a record of my order to confirm it.
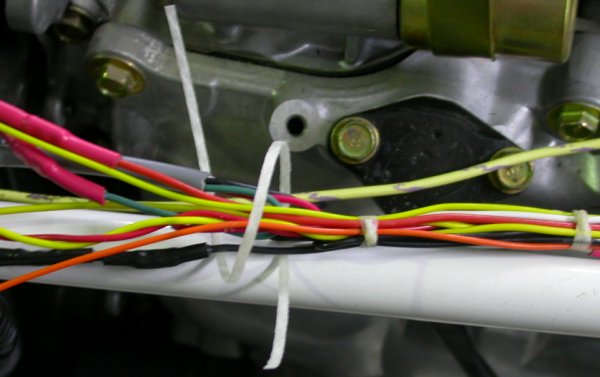 Tie your
wire bundles every couple inches using a clove hitch knot. Keeping
the lacing tape flat & not twisted, wrap a foot-long piece of it loosely around
the bundle as shown here. You can see a couple completed wire
splices on the LT side of the pic, as well as a couple completed ties on the RT
side.
Tie your
wire bundles every couple inches using a clove hitch knot. Keeping
the lacing tape flat & not twisted, wrap a foot-long piece of it loosely around
the bundle as shown here. You can see a couple completed wire
splices on the LT side of the pic, as well as a couple completed ties on the RT
side.
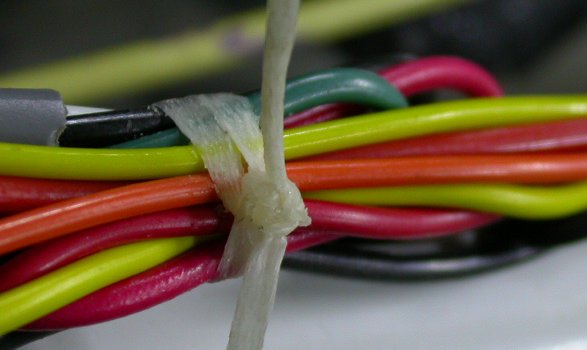
 bring both
ends through the loop in opposite directions
bring both
ends through the loop in opposite directions
 pull it
snug
pull it
snug
 tie it off
in a square knot - remember "left over right, right over left"
tie it off
in a square knot - remember "left over right, right over left"
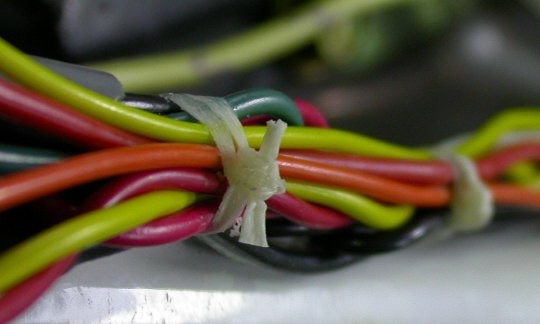 snip off
all but 1/8"-1/4" of the ends, then press the ends down into the knot. The
wax on the lacing will hold the ends in place. Wire cutters don't work
well on this lacing tape. Small sharp scissors work much better.
snip off
all but 1/8"-1/4" of the ends, then press the ends down into the knot. The
wax on the lacing will hold the ends in place. Wire cutters don't work
well on this lacing tape. Small sharp scissors work much better.
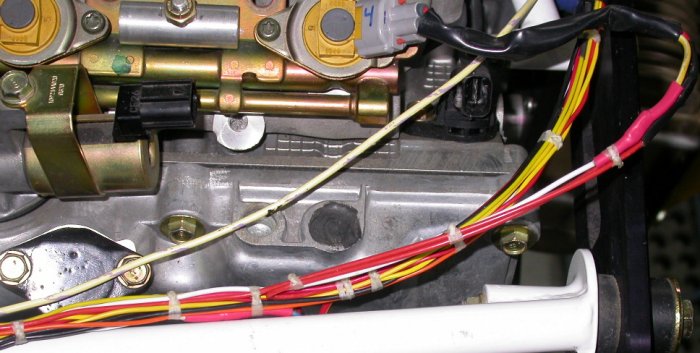 This shows
a partially completed harness, with branches as needed, like to the #4 injector.
The light yellow/purple wire is kept separate because it's the starter wire,
carrying lots of current. Keep noisy/high current wires separate so they
don't introduce problems into your sensitive circuits.
This shows
a partially completed harness, with branches as needed, like to the #4 injector.
The light yellow/purple wire is kept separate because it's the starter wire,
carrying lots of current. Keep noisy/high current wires separate so they
don't introduce problems into your sensitive circuits.
MORE WIRING INFO:
See SteinAir for all your other wiring needs. SteinAir customer service is the VERY BEST. Also B&C is very good. But they don't carry the parts needed to do the above splices, so you'll have to get them from Waytek. Hopefully, your buying experience at Waytek will be good..
The bible for electrical work is Bob Nuckolls' "Aeroelectric Connection" book, available directly from Bob's web site, or from various vendors, such as SteinAir. There is also an "Aeroelectric" Matronics list, where electrical questions and answers are exchanged every day. And Greg Richter, of Blue Mountain Avionics, wrote "Aircraft Wiring For Smart People", available by clicking HERE.
See NASA Workmanship Standards HERE, and especially the the NASA wiring workmanship standards HERE.
BACK TO MY RV BUILDER'S HOME
BACK TO BRIAN'S HOME