 This
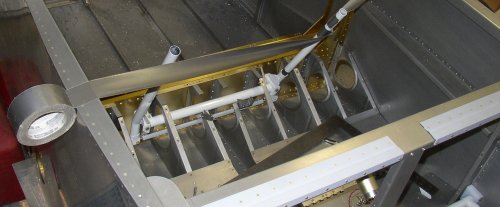
is the RT stick duct taped into vertical position so I can adjust the F-665
control column pushrod to make the LT stick parallel to it.
This
is the RT stick duct taped into vertical position so I can adjust the F-665
control column pushrod to make the LT stick parallel to it. APRIL, 2003 fuselage work - part 2
AUGUST, 2009 UPDATE - If you're going to be installing grips with switches, especially Infinity Aerospace grips that require mods to the stick, BE SURE to do this NOW, not after you've installed the sticks. See August interior page for details
Apr 11 - Finished drilling and deburring the floor panels screw holes to #12 for easier screw access. Installed the F-665 control column pushrod. Tried to install the F-789 elevator fwd pushrod, but it wouldn't go in. I emailed Van's about that. Tightened up various control linkage hardware. Fastened down center flap weldment bearing block. When doing that, I found out the plans call for nutplates on the bolts holding down the bearing block. Rather than remove all the flap actuator parts AGAIN, I just used a couple locknuts to hold them in. There was just barely enough room to use locknuts. Vacuumed out the metal scraps from the cockpit. Put tools away and planned next step. Laid out the F-7110 control stick boot rings. 5.5 hr
This
is the RT stick duct taped into vertical position so I can adjust the F-665
control column pushrod to make the LT stick parallel to it.
 And
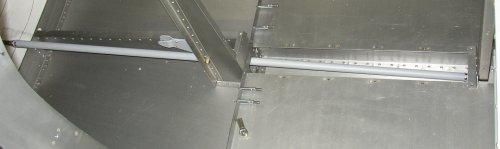
here are the control sticks, aligned and installed.
And
here are the control sticks, aligned and installed.
 Here is the forward elevator control rod ready to insert into
position. It doesn't want to go in, so I wrote to Van's to make sure
it's OK to open the top of the hole in the middle, where the rod passes
through it.
Here is the forward elevator control rod ready to insert into
position. It doesn't want to go in, so I wrote to Van's to make sure
it's OK to open the top of the hole in the middle, where the rod passes
through it.
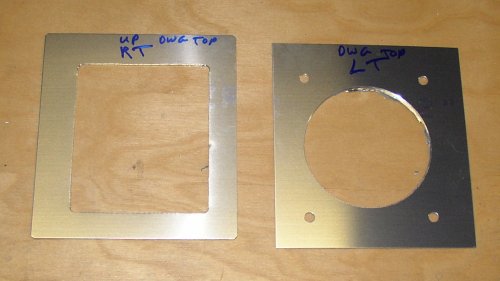 In the process of fabricating the 2 control stick boot rings out of 0.032
sheet. They seem rather thin & flimsy, and I wondered if I should
have maybe done them in 0.040" sheet, but I went ahead with what the
plans specified. I cut them out on the shear, then marked &
drilled the 4 small corner holes. Then I used a hole saw to cut out
most of the middle, then did the rest with the nibbler. Next, they
need a bend in them to match the bend in the floor panels.
In the process of fabricating the 2 control stick boot rings out of 0.032
sheet. They seem rather thin & flimsy, and I wondered if I should
have maybe done them in 0.040" sheet, but I went ahead with what the
plans specified. I cut them out on the shear, then marked &
drilled the 4 small corner holes. Then I used a hole saw to cut out
most of the middle, then did the rest with the nibbler. Next, they
need a bend in them to match the bend in the floor panels.
Apr 12 - Laid out & fabricated the F-7110 control stick boot rings. After that, I inventoried and labeled the remaining parts to be installed, so I can better figure out what to do next. Cleaned up floor & bench. Prepped, countersunk and primed the F-6122 brake bracket. Karla helped with putting in the fwd cabin snap bushings. 4.0 hr
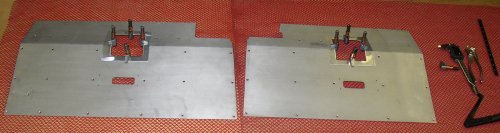 Here are the 2 control stick boots, bent and clamped onto the floor pieces
for match drilling to the holes there.
Here are the 2 control stick boots, bent and clamped onto the floor pieces
for match drilling to the holes there.
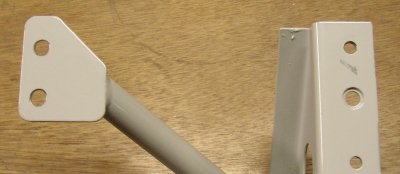
 Here is
the primed brake bracket.
Here is
the primed brake bracket.
Apr 13 - Made holder for dimple die to dimple firewall. Karla helped rivet brake bracket onto firewall. Installed AN fittings on brake and fuel parts, where I could. Mounted fuel control valve to its panel. 3.5 hr
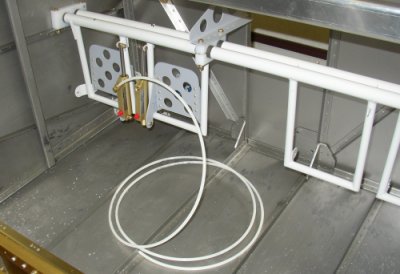
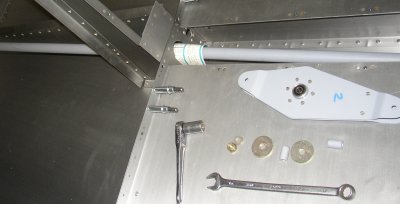
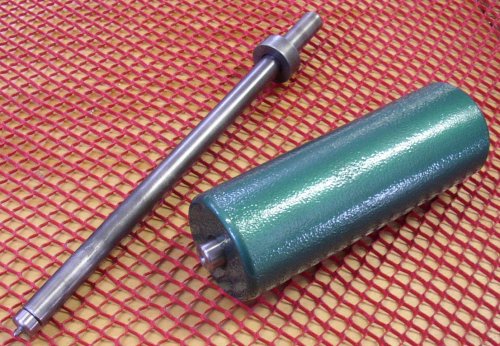 Here
is a setup I made for dimpling the middle of the installed firewall for the
brake line bracket. The rod is from my C-frame. The green thing
is a solid steel bucking bar I had made from 2" bar stock. It's
at least 10 pounds. I drilled a 3/16" hole in the other end of it
and put the female dimple die in there. Then Karla held the female
dimple on the aft side of the firewall while I whacked the male die from the
fwd side.
Here
is a setup I made for dimpling the middle of the installed firewall for the
brake line bracket. The rod is from my C-frame. The green thing
is a solid steel bucking bar I had made from 2" bar stock. It's
at least 10 pounds. I drilled a 3/16" hole in the other end of it
and put the female dimple die in there. Then Karla held the female
dimple on the aft side of the firewall while I whacked the male die from the
fwd side.
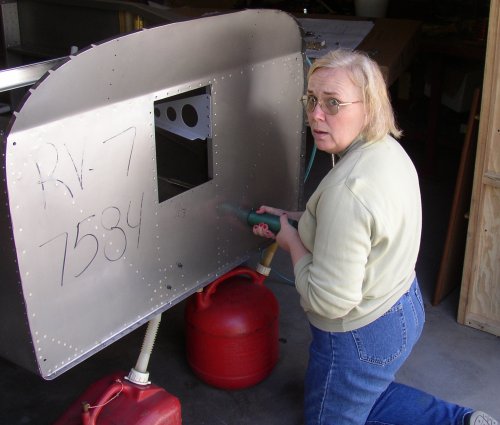 Here
is Karla helping me rivet the brake bracket to the firewall. This was
the first time I used help riveting something. We experimented with
different techniques on scrap, and I decided the safest way was to use a
back rivet set on the shop side while she held the big round bucking bar on
the flush head side. It worked well.
Here
is Karla helping me rivet the brake bracket to the firewall. This was
the first time I used help riveting something. We experimented with
different techniques on scrap, and I decided the safest way was to use a
back rivet set on the shop side while she held the big round bucking bar on
the flush head side. It worked well.
 Here
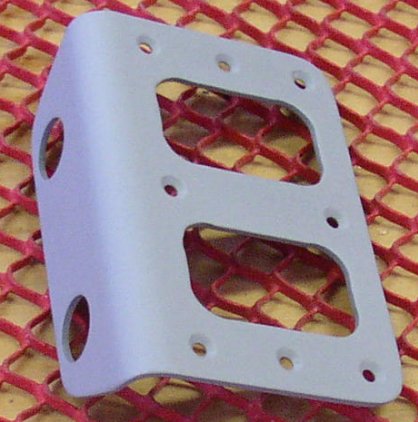
are the brake bracket and AN fittings installed.
Here
are the brake bracket and AN fittings installed.
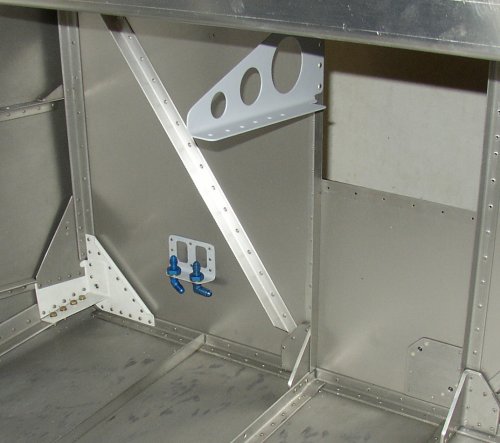
 Here is the fuel control valve mounted to its plate. Right now, I am
waiting to get what the plans call Fuel Lube, for the pipe threads.
Here is the fuel control valve mounted to its plate. Right now, I am
waiting to get what the plans call Fuel Lube, for the pipe threads.
Apr 14 - Spent most of the day working on taxes. The last couple days have reached 60 degrees, so the snow is melting fast. Still a couple feet deep behind my house, though. Started working on brake lines layout. Then started laying out the template for the Gear Mounts. Cut and trimmed gear mount holes. Got the RT hole close to being done. Cut the initial hole on the LT side. Got email reply from Gus at Van's about my F-789 fwd elevator pushrod. He said this:
You can enlarge the holes in the bulkheads a little. You will also find it helps to flex the pushrod as you slide it in to minimize the amount you need to cut away. It will deflect at least 1/2" without permanent deformation.
4.5 hr
 Here
are the installed brake and rudder pedals, with the start of laying out the
brake lines.
Here
are the installed brake and rudder pedals, with the start of laying out the
brake lines.
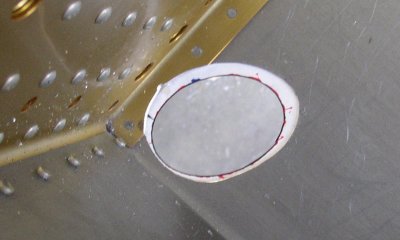
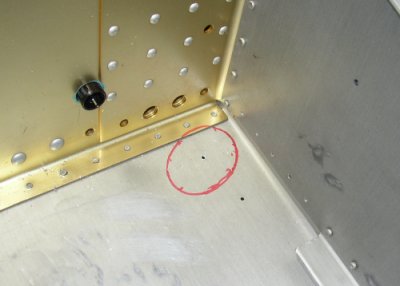 Used the
lower small hole to orient the hole template and marked the hole
layout. the little hole in the center of the red line is the center,
to use a hole saw to cut out the bulk of the middle of the hole.
Used the
lower small hole to orient the hole template and marked the hole
layout. the little hole in the center of the red line is the center,
to use a hole saw to cut out the bulk of the middle of the hole.
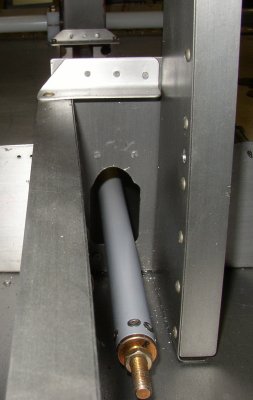
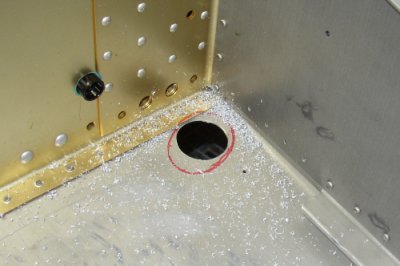 Here's
what it looked like after the initial cut with the hole saw.
Here's
what it looked like after the initial cut with the hole saw.
Apr 15 - Worked all day and evening on the RT gear mount. Then a couple hours updating the web site. I am not logging the web site hours in my "time log". Perhaps I should be. Decided to start using 400 pixel width on photos from now on. 9.0 hr + 2.0 doc
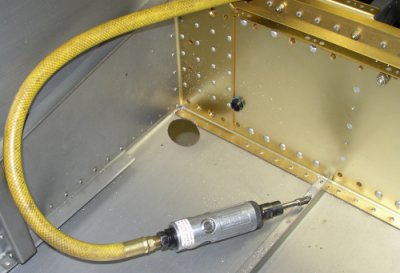 Here's the
hole after using the rotary file to cut it back to the line.
Here's the
hole after using the rotary file to cut it back to the line.
 I had to keep slowly enlarging the hole so the gear mount frame would go
into it. I'd see where the mount weldment was hitting, then trim it a
bit at the point of interference. This
is the hole after finally getting it big enough to get the mount in.
I had to keep slowly enlarging the hole so the gear mount frame would go
into it. I'd see where the mount weldment was hitting, then trim it a
bit at the point of interference. This
is the hole after finally getting it big enough to get the mount in.
 I
had to remove the fwd outboard nutplate on the upper flange of the F-704, to
the gear mount would go in without further cutting.
I
had to remove the fwd outboard nutplate on the upper flange of the F-704, to
the gear mount would go in without further cutting.
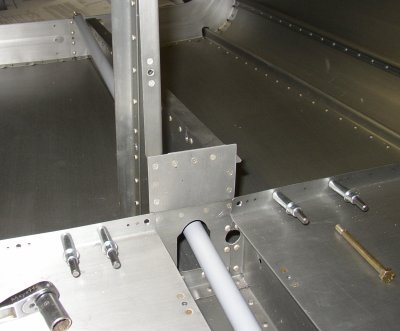
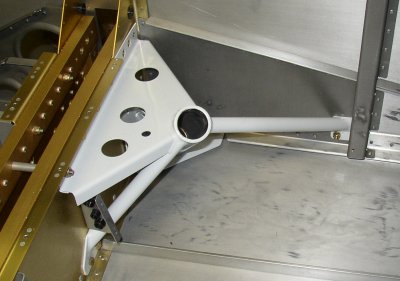
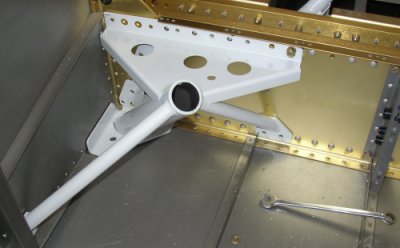 Finally
got the mount into place.
Finally
got the mount into place.
 This is the final hole, with the template taped under it, to show the
difference in size. You can see that the hole cut into the spar bottom
flange and into one of the skin rivets on the spar. I had asked Van's
if this was safe to do, and Gus said "cut away as necessary".
This is the final hole, with the template taped under it, to show the
difference in size. You can see that the hole cut into the spar bottom
flange and into one of the skin rivets on the spar. I had asked Van's
if this was safe to do, and Gus said "cut away as necessary".
 This is the view of the hole from the bottom, after final RT gear mount
installation.
This is the view of the hole from the bottom, after final RT gear mount
installation.
The day wouldn't be compete without a couple screwups:
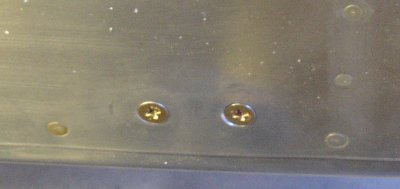 When I
drilled the 2 side mount screws, I drilled the hole at a wrong angle,
perpendicular to the aircraft centerline, rather than perpendicular to this
skin. Then, when I countersunk these holes, the countersinks were not
in line with the screw shank. So, I had to countersink a bit deeper
and have one side of the screw head slightly too deep and one side slightly
too shallow. Once I tightened these screws, the problem was less
noticeable.
When I
drilled the 2 side mount screws, I drilled the hole at a wrong angle,
perpendicular to the aircraft centerline, rather than perpendicular to this
skin. Then, when I countersunk these holes, the countersinks were not
in line with the screw shank. So, I had to countersink a bit deeper
and have one side of the screw head slightly too deep and one side slightly
too shallow. Once I tightened these screws, the problem was less
noticeable.
 Almost
a big problem. The mount holes are 1/4". All the holes were
a bit tight, so I enlarged a couple to 17/64". When I did the 2
holes on the left, somehow I picked up the wrong drill bit, a
21/64". I don't even know why that size was laying on the
workbench. Anyway, it looked bad for awhile. But when I tried
the fit, it turned out these 2 holes on the LT needed to be that big,
because the bolt needed to be tight against the upper part of the hole.
Almost
a big problem. The mount holes are 1/4". All the holes were
a bit tight, so I enlarged a couple to 17/64". When I did the 2
holes on the left, somehow I picked up the wrong drill bit, a
21/64". I don't even know why that size was laying on the
workbench. Anyway, it looked bad for awhile. But when I tried
the fit, it turned out these 2 holes on the LT needed to be that big,
because the bolt needed to be tight against the upper part of the hole.
LATE NOTE: As I found out when I went to put in my fuel lines, I found that it's a major hassle to get them in around the gear weldments. Put your fuel lines in while the weldments are in place, but not bolted. If they aren't bolted in, you can move them around a bit to help get the fuel lines in. See my June 12 fuselage description for details.
HUGELY IMPORTANT NOTE: make damn sure you drill out your tri-gear main gear leg frame holes to clear the wing mount bolt holes BEFORE you install the gear leg frames. Otherwise, you will be VERY sorry when you go to mount the wings
Apr 16 - Spent most of the day on phone and emails related to job leads, interviews. No response yet from Van's on gear mount questions, so I decided to work on something else. I received my back ordered Van's parts, so I started building my F-790 rear elevator pushrod from the AT6-035x1.5 tubing I received. After cutting it to length, I was appalled to find that I had cut it exactly one inch short. I used a steel tape measure to measure it. To ensure accuracy, I started at the one inch line, but, due to getting distracted with other things while I was doing it, I neglected to add one inch at the other end. Never again. I decided to take it to a welding shop in the morning, and get the cut off piece welded back on. I emailed Van's about it, to make sure it was OK. I started working on the fwd elevator pushrod and grinding open the top of the hole it goes through, so I could fit the rod through the hole. I eventually got it squeezed through the hole. I had to reprime some scratches on the rod, from all the screwing around getting it in the hole. Then I installed and adjusted the pushrod. 4.0 hr
 Here's the pushrod through the hole enlarged on top.
 I used a plastic laminated sheet to keep from scratching the rod as I had to
gently flex it up on both ends to get it into place.
I used a plastic laminated sheet to keep from scratching the rod as I had to
gently flex it up on both ends to get it into place.
 Here's the control rod in place. You can see where I opened the hole
on top to get the rod through.
Here's the control rod in place. You can see where I opened the hole
on top to get the rod through.
Apr 17 - Spent much of the day on phone interviews. Took the tubing to welding shop. Still no answer from Van's regarding gear mount questions or on welding question. Decided to forge ahead on the LT gear mount, without further waiting for Van's. Fairly busy throughout the day with several long interviews. Spent all afternoon and evening getting the LT gear mount in. It takes a lot of screwing around to get one in. The hole has to be enlarged, and the bolt holes are very tight. Even after opening most of the 1/4" holes to 9/32", the bolts were a very tight fit. Finally got it all in and torqued the bolts. In the evening, to reply from Van's; they said don't worry about having to open the gear mount access hole. It can be much bigger without hurting anything, due to the fairing that goes over it. They also said NO on welding the rod. I don't understand why not, but I'll go back to the welding shop tomorrow and get the tubing back. I hope they didn't weld it already. 8.0 hr
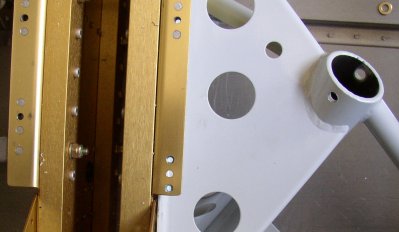
 Here
is the LT gear mount installed.
Here
is the LT gear mount installed.
Apr 18 - I got my tubing back before the welder got to it. Gus at Van's said don't worry about it for now; I may be able to use the 1" short tube anyway. He said wait and see how things develop as I start rigging the controls. I got the job offer this AM, so I spent the day getting ready for that. Lots of planning, canceling things, getting ready to be gone. I have to go to CA Sun night, so I guess getting to work on the plane is over for now. This will probably be my last entry for awhile. I'll be coming home for a weekend every other week, so I won't be working on it much for quite a while. I did work from 2400 to 0200 on the plane; putting in brake lines. 2.0 hr
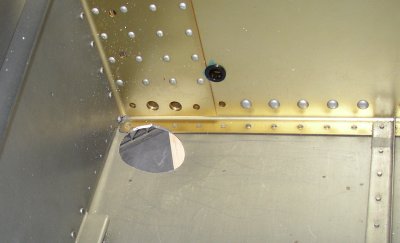
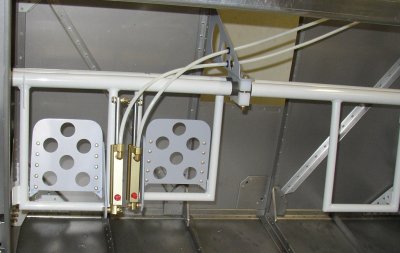 Here's the start of the brake lines installation. Added snap bushings
to rudder pedal brace.
Here's the start of the brake lines installation. Added snap bushings
to rudder pedal brace.
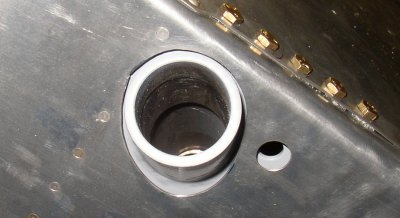
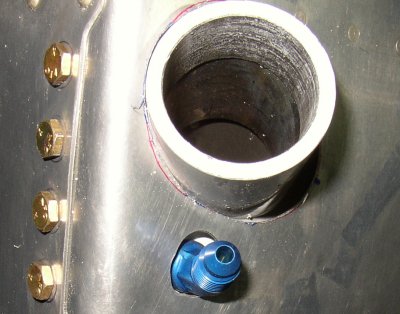
 Here's
where the brake line will exit the fuselage and go down the landing gear leg
to the brakes. Had to drill out gear mount hole to 7/16", then
had to trim hole in floor so AN fitting would clear to get into the gear
mount. The orange sealing paint on each bolt and nut tells me that
bolt has been torqued.
Here's
where the brake line will exit the fuselage and go down the landing gear leg
to the brakes. Had to drill out gear mount hole to 7/16", then
had to trim hole in floor so AN fitting would clear to get into the gear
mount. The orange sealing paint on each bolt and nut tells me that
bolt has been torqued.
 And here's
the bottom view, showing how I had to enlarge one side of the hole. It
also shows the bottom view of the installed gear mount.
And here's
the bottom view, showing how I had to enlarge one side of the hole. It
also shows the bottom view of the installed gear mount.
That's it for a while!!
Go to MAY
BACK TO MY RV BUILDER'S HOME
BACK TO BRIAN'S HOME