Dec 2 - worked on putting
the POH together
4.0 hr doc
Dec 27 - FINALLY got to do some
actual work on the plane. It's cold - about 0 - so first I had to warm
the garage up to about 60 degrees, which took a lot of heat to get it that
warm. Cleaned up the workbench while waiting for the garage to warm up
some. Also, I put the little LP camping heater directly under the
plexi bubble, to get it warmer. Worked on cutting the C702 skin
cutouts for the plexi to pass through. Then, did more work on fitting
canopy to frame, and trimming side bottom edges to match the WD725. I
was feeling quite tired, but I forced myself to keep working.
6.0 hr
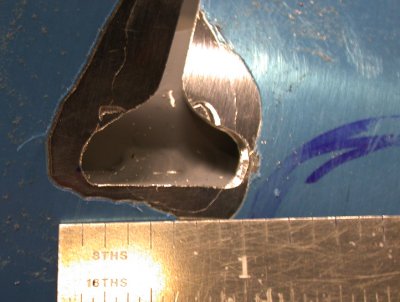
This closeup will give you an idea as to how the slot in the C702 skin needs
to be enlarged to clear the canopy bubble that passes through it. I
later found out this was a waste of time; just cut the ear off horizontally
from the bottom of the slot aft. You still need the oval cut going
forward, though. See here and
here for details.
Here is the bubble, set down into the slot in the C702 skin. Getting
close to the final fit.
Here is a closeup of the bubble sitting in the C702 skin slot, as the fit
gets near to where it needs to be. I still don't see, though, how that
ear sticking up there gets fastened down . There are no fastener holes
in the metal or shown in the plans.
Dec 28 - Again, first spent some time getting the
garage warmed up and cleaning up tools. Resumed trimming and fitting
the canopy plexi bubble. Laid out the bubble fastener spacing. I
had some confusion as to what size to make the fastener holes. The
plans say to use #30, and I have a 1/8" plexi bit, but #6 screws need a #28
hole. The next bigger plexi bit I have is 5/32". I asked about
this on a couple RV support mail lists, as well as Van's Support.
While waiting for the replies to my question, I marked & drilled the plexi
mount holes in the canopy frame, using a #40 starter bit.
4.0 hr
The bubble is now getting close to the final fit. The duct tape pulls
it down tight to the frame. I did a little more trimming of the bottom
edge of the bubble, where it mates with the joggle in the WD725 arm. I
also trimmed a bit off the fwd corners of the bubble, so it sets down into
the C702 skin slots a little better. This is about the final fit.
Dec 29 - The consensus from the answers to my
questions was that I should initially drill the holes in the WD725 and C631A
canopy frame to #40,
then use the 1/8" plexi bit to enlarge the #40 holes to 1/8" while
match-drilling those holes to the plexi. Then drill the metal holes
out to #28, countersink the plexi holes while the hole is still 1/8" (to
match the 1/8" pilot on the #6 countersink cutter), then enlarge the 1/8"
plexi holes to 5/32" (best that the plexi holes are a bit large, anyway),
using the 5/32" plexi bit. So, I did my final fitting and mounting of
the canopy plexi bubble to the canopy frame, then used the 1/8" plexi bit to
match drill the plexi to the #40 holes I'd already drilled in the frame. Fitted the RT C603 canopy skin in
place. 4.0 hr
I finally got the bubble fit pretty good, so I used the #40 holes I'd
already drilled into the frame to match-drill into the plexiglas, using the
1/8" plexi bit, and clecoing each hole as I drilled it. Drill and
cleco the aft holes (along the C631A) first, starting in the middle &
working out on both sides, to help pull the bubble down tight. Then I used a 1/8" plexi
drill bit to match drill the canopy to the WD725 frame side rails, drilling from the inside
and adding copper clecoes from the outside as I went along. Work both
sides at once as you do this. The holes
along the bottom sides, for the canopy attachment to the WD725 side rails, were
drilled from the outside in, to get a better match to the existing #40 pilot
holes in the WD725s.
BTW, if you're following this, you may recall that I
made the canopy frame
all wrong, with regard to the C631A aft frame hoop. To summarize the
mistake, I matched the aft C631As to the cabin frame (roll bar), then
riveted them in place to the rest of the canopy frame, then fitted the bubble to the cabin frame.
You're supposed to leave the C631As until after you get the bubble fitted to
the cabin frame, then fit the C631As up tight against the bubble where it
lays on the cabin frame. I debated redoing the canopy frame C631As,
but the fit between them and the bubble is pretty close, so I will just fill
any gap with ProSeal. I think it's just fine as it is.
Then I
started laying out the C603 side skins. These will go over the bubble,
and sandwich the bubble in between the WD725 frame and C603 side skin. Each
end of the C603s had to be match-cut to the edge of the skins fwd and aft of
it.
Dec 30 - Rented a C-172SP and went flying - a perfect
flying day in the middle of many crappy days. Flew Karla's nephew on a
YE flight, then took Karla up & flew all around the White Mountains.
The air was clear, calm, and smooth as glass, even around the usually ferocious Mt.
Washington. Greased all my landings.
Dec 31 - Lay out RT C603. The plans say it
should be 2 3/4" wide (it's 3" now), but 2 13/16" or 2 7/8" looks like it's
better to match the top edge of the WD725. Left it at 3", at least for
now, as it can be trimmed along the top any time. Laid out & drilled the
LT C603, match-drilled both C603s to the WD725. Drilled plexi mount
screw holes in WD725 and C631 cabin frame out to #28. Fabricated &
fitted the C731 canopy lift handle. Shaped & countersunk the C731. Deburred & dimpled the C603s. Deburred the WD725 holes.
5.25 hr
Here
is the RT C603 canopy side skin clecoed to the WD725 frame. It is cut
to fit exactly between the skins fwd and aft of it. After taking this
picture, I match drilled the C603s for the plexi mount holes along the top
of the WD725 canopy frame rails by getting inside the cockpit and drilling
from the inside out.
Here
are both C603 canopy side skins, drilled, dimpled, deburred, and ready for
primer. The little piece at the bottom of the picture is the C731
canopy lift handle, which I match drilled to the lower aft rivet holes on
the C603.
 This closeup will give you an idea as to how the slot in the C702 skin needs
to be enlarged to clear the canopy bubble that passes through it. I
later found out this was a waste of time; just cut the ear off horizontally
from the bottom of the slot aft. You still need the oval cut going
forward, though. See here and
here for details.
This closeup will give you an idea as to how the slot in the C702 skin needs
to be enlarged to clear the canopy bubble that passes through it. I
later found out this was a waste of time; just cut the ear off horizontally
from the bottom of the slot aft. You still need the oval cut going
forward, though. See here and
here for details.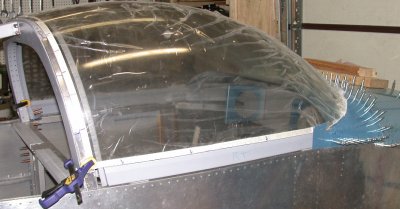 Here is the bubble, set down into the slot in the C702 skin. Getting
close to the final fit.
Here is the bubble, set down into the slot in the C702 skin. Getting
close to the final fit.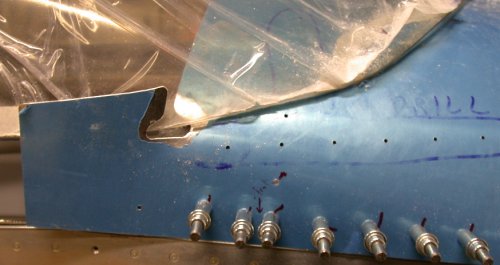 Here is a closeup of the bubble sitting in the C702 skin slot, as the fit
gets near to where it needs to be. I still don't see, though, how that
ear sticking up there gets fastened down . There are no fastener holes
in the metal or shown in the plans.
Here is a closeup of the bubble sitting in the C702 skin slot, as the fit
gets near to where it needs to be. I still don't see, though, how that
ear sticking up there gets fastened down . There are no fastener holes
in the metal or shown in the plans.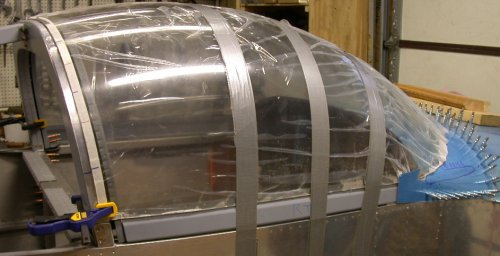 The bubble is now getting close to the final fit. The duct tape pulls
it down tight to the frame. I did a little more trimming of the bottom
edge of the bubble, where it mates with the joggle in the WD725 arm. I
also trimmed a bit off the fwd corners of the bubble, so it sets down into
the C702 skin slots a little better. This is about the final fit.
The bubble is now getting close to the final fit. The duct tape pulls
it down tight to the frame. I did a little more trimming of the bottom
edge of the bubble, where it mates with the joggle in the WD725 arm. I
also trimmed a bit off the fwd corners of the bubble, so it sets down into
the C702 skin slots a little better. This is about the final fit.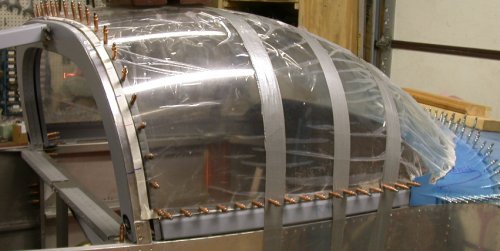 I finally got the bubble fit pretty good, so I used the #40 holes I'd
already drilled into the frame to match-drill into the plexiglas, using the
1/8" plexi bit, and clecoing each hole as I drilled it. Drill and
cleco the aft holes (along the C631A) first, starting in the middle &
working out on both sides, to help pull the bubble down tight. Then I used a 1/8" plexi
drill bit to match drill the canopy to the WD725 frame side rails, drilling from the inside
and adding copper clecoes from the outside as I went along. Work both
sides at once as you do this. The holes
along the bottom sides, for the canopy attachment to the WD725 side rails, were
drilled from the outside in, to get a better match to the existing #40 pilot
holes in the WD725s.
I finally got the bubble fit pretty good, so I used the #40 holes I'd
already drilled into the frame to match-drill into the plexiglas, using the
1/8" plexi bit, and clecoing each hole as I drilled it. Drill and
cleco the aft holes (along the C631A) first, starting in the middle &
working out on both sides, to help pull the bubble down tight. Then I used a 1/8" plexi
drill bit to match drill the canopy to the WD725 frame side rails, drilling from the inside
and adding copper clecoes from the outside as I went along. Work both
sides at once as you do this. The holes
along the bottom sides, for the canopy attachment to the WD725 side rails, were
drilled from the outside in, to get a better match to the existing #40 pilot
holes in the WD725s.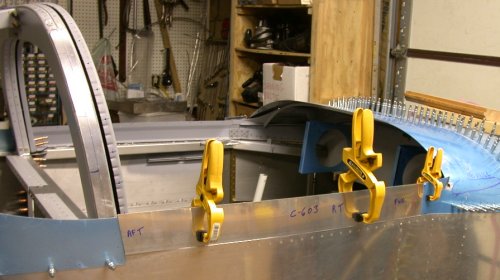 Then I
started laying out the C603 side skins. These will go over the bubble,
and sandwich the bubble in between the WD725 frame and C603 side skin. Each
end of the C603s had to be match-cut to the edge of the skins fwd and aft of
it.
Then I
started laying out the C603 side skins. These will go over the bubble,
and sandwich the bubble in between the WD725 frame and C603 side skin. Each
end of the C603s had to be match-cut to the edge of the skins fwd and aft of
it. 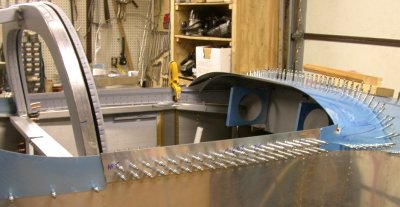 Here
is the RT C603 canopy side skin clecoed to the WD725 frame. It is cut
to fit exactly between the skins fwd and aft of it. After taking this
picture, I match drilled the C603s for the plexi mount holes along the top
of the WD725 canopy frame rails by getting inside the cockpit and drilling
from the inside out.
Here
is the RT C603 canopy side skin clecoed to the WD725 frame. It is cut
to fit exactly between the skins fwd and aft of it. After taking this
picture, I match drilled the C603s for the plexi mount holes along the top
of the WD725 canopy frame rails by getting inside the cockpit and drilling
from the inside out.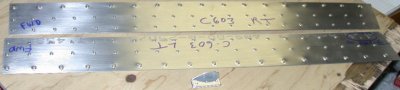 Here
are both C603 canopy side skins, drilled, dimpled, deburred, and ready for
primer. The little piece at the bottom of the picture is the C731
canopy lift handle, which I match drilled to the lower aft rivet holes on
the C603.
Here
are both C603 canopy side skins, drilled, dimpled, deburred, and ready for
primer. The little piece at the bottom of the picture is the C731
canopy lift handle, which I match drilled to the lower aft rivet holes on
the C603.