Sep 1 - The plexiglas calls for
2.5" fastener spacing, so I laid that out (so I'd know where not to
flute), then fluted the canopy frame aft F31As, so they're straight
again. Got out my WD725 weldments, cleaned up the edges, and started
laying them out. Also looking at making the C723 wedges, used with the
C613 splice plate to tie the WD725 weldment to the WD716 weldment. Fabricate
shim to replace F697 on my F643-1. Prep C613 splice plates. 5.0
hr
After a few minutes
of playing with the Avery Vise-Grip fluting tool (no way could you do this
on 0.063" with one of those wimpy plier-type fluting tools), I had it
laying perfectly straight on this table. The red lines are where I
first marked out where the fasteners would go. Then I fluted between
those marks.
Here's the layout for the
WD725 aft canopy frame weldments.
The F721A/B
junction & angle change is here, where the arrow is. Now, why in
the world wouldn't they make the WD725/WD716 junction and angle change occur
at the same place??? This way, the space for the seal,
under the WD725, does not stay the same. It closes up here, where the
arrow is. If you're changing angles along the fuselage, and the canopy
is following the fuselage lines, then why not do the angle change at the
same place, and get a good, even gap where the seal will go? I dunno,
and not much I can do about it, but it's weird.
The arrow shows where the
C723 wedge is supposed to go. Personally, I think this whole wedge
thing, and especially the way they call for it to be made, is weird as
hell. I don't know why text I add to these pics looks nice & clear
when I am editing the photo, then later on the web they look all fuzzy.
The plans call for making
these tiny wedges out of 2 giant hunks of aluminum bar. The plans say
to make them from 1.5"x3/4" bar. I don't have anything like
that. I do have 2 of this 1.25"x5/8" bar. I called
Van's to make sure this is the bar to use, and they said it is. I
didn't want to cut the bar up and then find out I need it for something else
later down the line. However, I'm not even going to use a wedge
here. I'm going to just split the C613, bend it to fit the angle
between the WD716 and WD725, and tie it together with a splice plate
backer. Much faster and easier, and at least as strong as the wedgie
thing.
Sep 2 - at NHIS again for another
5 day racing weekend. Sometimes, it's 6 weeks between events.
For the last 6 weeks, it's been an event every other weekend. For two
of those event weekends,
I was here for 5 days, and once for 4 days. And I have the final 5 day
(for me) event coming up in 4 more weeks. Updating the web site,
(process pics, add captions), and doing more followup on the Avionics.
10.0 hr doc
Here's a cool SCCA
car that was here at the track for practice this morning. Cars run in
the AM & bikes go in the PM on Thursdays, so I was just hanging out
& chatting a bit with the drivers. SRF is Spec Racing Ford, a spec
class that the SCCA made up to give the drivers a good level playing
field. Of course, when it was time for bikes to practice, one of the
cars had done about 2 laps while leaking oil, so that involved a big cleanup
and delay. Incredibly perfect day today. Not hot, not cold, not
raining. Gotta love it when it happens occasionally around here.
For pics on what I do here at the track, click here.
Meanwhile, back to why you're here; the plane.
Sep 4 - Updating the web site
during down time at the track. Doing the daily text. Doing all
this web site work can get very TEDIOUS, and it consumes a GREAT deal of
time. I am again tempted to bag it, or at least just go to captioned
photos and nothing more. Trouble is, I like to do things 100%, so I
feel compelled to do it as completely as I can. I could get into even
MORE detail, but I try to get this stuff done as quickly as I can, so I can
move on to something else. 6.0 hr doc
Sep 5 - More web site
updating from NHIS. I am done with the pics & captions, and nearly done with
the daily text. Just the index remains.
2.5 hr doc
Sep 7 - worked a bit on bending
the WD725s to better match the fuselage curve.
1.0 hr
Sep 8 - fabricated custom C613s
and custom backing plates for them, instead of using the C723 wedges.
Fit canopy frame side rails & aft channels.
4.5 hr
These
are the custom split C613s and backing plates. They will replace the
stock C613 and C723 wedge.
Here's the inside view of the RT custom split C613 clamped in place, tying
the WD725 and WD716 together.
Here's the outside view of the RT WD725, WD716, C613 all clamped together
for drilling and clecoing.
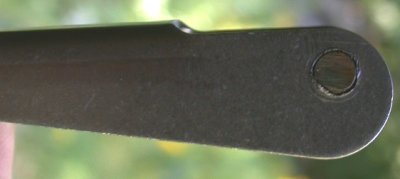
This may be a bit hard to see, but this is the aft end of the WD725, where
the angle at the aft end is bent and the angle web sticks out a bit. I
ground & filed it down, so it's smooth and flush here.
Sep 10 - Received my new C702
skin from Van's. It was quite carefully packed. Worked on aft
canopy frame F631As, getting them flush with the cabin frame 631As. I
later found out I should not have done this now, but we'll see what turns
out. Anyway, I got the 631As aligned and ground & filed the vertex for
the angle at the aft WD725, so it's flush with the rest of the angle leg and
the aft WD725. I moved the 2 outboard holes inboard some. Called
Van's about one of my WD622 canopy latch lugs missing a weld. They
will send me a new one. Laid out where the WD622 lugs should go to be
centered over the latches, which is a bit different from where the plans say
to locate them. Drill the holes for the RT F631A.
3.5 hr
I later found out all this work I did on the F631 at the aft end of the
WD725 is the wrong way to do it, but this is how I did it.
I had to mark on the angle the most outboard that the holes could be without
being too close to the flange of the F631A.
The big red mark on the LT in this pic is where the edge of the F631A is.
The little blue mark is where the plans said to put the rivet hole, but it's
too close to the flange of the F631A. You can just barely see the red
mark (made in previous pic) on the fwd edge at the LT, just RT of the heavy
red line. So, I moved the rivet hole point the the RT a bit, as marked
with the 2 little red lines crossing the blue lines.
Here, I am using the laser level to mark exactly where on the F631A the
WD622 canopy lugs should go to align vertically with the cutouts for the aft
canopy latches.
I also had to mark (with red circle) where the tooling hole is on the F631A.
The little blue line at the top shows where the center of the lug should be.
The middle 2 cross lines show where the plans say the holes should be.
I wanted to make the 2 holes for the lug as close as possible to where
they'd best line up, while not actually hitting the tooling hole.
I needed to make sure the F725 rail was aligned both at the bottom (with the
fuse skin) and at the joggle (with the F631A) before drilling the holes
between the WD725 aft angle and the F631A aft canopy frame, so I clamped on
these pieces.
Sep 11-12 - gone to Fulton, NY
for RV Forums
Sep 13 - The RT side of the
canopy frame is about done. Started working on the LT side. Did
the RT C613 layout. I muffed the hole on the aft LT canopy frame
(WD716) that goes to the C613. I didn't have it aligned right when I
drilled the first hole. Rather than screw with it, I just made a new
LT custom C613 from my discarded stock C704. Set up LT side canopy frame rail
WD725. 3.0 hr
Sep 14 - match drill WD716, WD725, C613s, backing
plates, WD725 aft angles, F631As, then drill everything out to #30.
Take everything apart and debur. Clean, polish, & prep all the parts
for primer. Still had to countersink a few more holes on the bottom of
the C704. Make C608 block and attach it.
8.0 hr
This shows everything clamped in place and ready to match drill the F631A to
the WD725 aft angle.
This shows how the holes in the RT side of the F631A came out.
Normally, being so close to the tooling hole would not be good, but in this
case the F631A is just clamped between 2 other pieces (the aft angle on the
WD725 and the WD622 canopy frame lug), so it really doesn't matter.
One of the canopy lugs (WD622) was not welded on one side. Probably OK
anyway, but I called Van's, and they shipped me a new one.
With the initial holes to match on this custom C704 being on the INside of
the F631A, you need to make a matching plate that will go on the OUTside, so
you can drill the matching holes through the F631A. I just used a
piece of 0.063" scrap.
Here is the hole matching plate on the outside of the F631A. You drill
the first hole (in 3/32") from the back side, when the F631A is off the
plane, to get the initial hole right. Then you put the F631A back on
the fuselage, get all the alignment just right, and drill out all the holes.
Drill to 3/32" first, then go for #30 when you're sure it's right.
Here is the custom C704 drilled and clecoed on the inside of the F631A.
Later, I will just fill in where I made that big hole in the F631A by
mistake.
Here is the RT F725 aft angle drilled and clecoed to the F531A
This is a closeup of the RT custom C613 and reinforcing plate, all drilled
and clecoed. I think this is a much better, easier, stronger way to go
than the wedgie thing.
Here's the custom C613 on the LT side.
This is how the holes for the LT side F631A came out. On the outboard
holes, I forgot to bring them in further than the plans specified, as I had
done on the RT, so I drilled a couple more rivet holes just inboard of that.
Outboard is to the RT in this pic. Again, I cleared the tooling hole
just enough so the bit wasn't getting hung up in the edge of it.
Here are all the canopy frame parts, finally done, prepped, countersunk, and
ready for primer.
Sep 16 - Spent some time screwing around with
respirator filters, then primed all the canopy frame pieces. Assembled
the F631As and WD725s in place in the fuselage, to make sure the F631As were
aligned properly. Rivet F631As & custom C704 splice plate. Rivet
WD725s to F631As. Get ready to rivet WD716 to WD725.
4.5 hr
I
fabricated the C608 center canopy latch and match drilled it to the center
of the F631A before riveting the F631A together with the custom C704 plate.
Here is the C608, F631As, and C704, all in place and ready to rivet.
The
F631A is riveted together, and I am about to rivet the completed F631A to
the WD725 rails.
Sep 17 - Cleco & rivet WD716,
WD725s, custom C613s. Rivet canopy frame bottom rivets. Prep
cabin frame for epoxying the shims on. Spent some time on the phone
with ProSeal people (Flamemaster Corp, Sun Valley, CA 818-982-1650).
The "tech" sounded a bit retarded. I wanted to know what the ProSeal
shelf life was in the refrigerator. The package has an expiration
date, but I wanted to know how much that could be extended by refrigeration,
as suggested on the package. He said he didn't know, and that they'd never tested it. He
did say that what expires is the CURE TIME, so I should just try mixing up
some & see if it cures. I ended up saying to hell with it, and using Devcon clear epoxy instead of ProSeal. Epoxied RT side shims.
4.0 hr
Sep 18 - Epoxied LT side shims.
1.0 hr
Here's the whole canopy frame riveted together. The aft part of it is
being held up by a string tied to the garage door. I am doing all
these pics after the fact. This is NOT how this is supposed to be
done, I found out afterward. You are supposed to rivet the FRONT parts
of the canopy frame together, and do the F631A part AFTER you get the canopy
bubble fitted to the cabin frame. I may be able to save this, or I may
have to remove the F631A and redo it and its attachment to the WD725s.
I may even need to buy all new F631As, WD725s, and C704. We will see,
once I get the bubble fitted.
Here is the completed canopy frame being held up while I epoxy the cabin
frame shim strips to the canopy frame, to fix an earlier screwup.
There sure are a lot of screwups in this plane. I don't think any will
have any effect on flight safety, but there are many screwups & fixes
involved in making this plane.
Sep 26 - With the blocks removed from the back of
the canopy frame, the F631As at the back of the canopy frame tip back some
at the top, into the cabin frame. Bent & tweaked the canopy frame
F631As so there's a gap now. Cleco new C702 skin on. Adjust C702
fit, match drill new C702, add 0.025" shim to front of C702 for better
vertical match to F771 skin in the center.
3.0 hr
I
got my new C702 skin from Van's and fitted it to the canopy frame. NO
filing on that front edge. My advice when you're fitting the frame and
skin - DO NOT FILE THE FWD EDGE OF THE C702 SKIN. If it doesn't fit
right, you're probably doing something else wrong.
Tape down those sharp ears, so you don't scratch either the bubble or your
skin.
Sep 27 - The 0.025" shim I put
under the C702 tested a bit too low in the center, but ended up being too
high after I got it installed. It's still slightly too low over the
hinges. Disassembled & deburred everything. It helped some, but
the center is still a bit too high, compared to the F771 fwd skin.
Started getting the bubble ready for the initial trim cut. Measured &
marked the centerline. I was pondering how to deal with the clecoes in
the way of the bubble. I was able to remove the top clecoes on the
F632A, but I still have them in the way on the C702 skin. Should I
rivet the C702 skin now? I also filed the tops of the pop rivet heads
on the aft part of the cabin frame, so they'll be nice & smooth under the
plexiglas. 2.5 hr
File down all the pop rivet heads on the aft half of the F631A cabin frame,
so they're nice & smooth. We want the bubble sitting on a nice smooth
surface. Fwd is up in this pic.
Sep 28 - Prep the plexiglas
bubble for trimming. Turn it over and reattach all the protective
liner that has fallen off. Mark 1.75" on C702 and 1.5" on F632A as the
final contact points. Moved bubble to deck, trimmed it quickly &
easily, then moved it into the garage for more trimming & fitting later on.
3.5 hr
With all the prep done, I am FINALLY ready to deal with the bubble! With the sun fast fading for the day, I wanted to work on the bubble initial
trimming in the sun, where it would be as warm as possible, so my parents
came up & helped me move the bubble from the spare bedroom to the deck.
Looks like this is the end of the day's sun. It was in the low 70s at
this point.
I packed both wings up onto one wing holder, and moved it over to the side,
to allow room for the canopy bubble's new home in one bay of the garage.
And
here's the other garage bay, with the fuselage.
I was VERY nervous working on the canopy today. It's about 70 degrees,
which is about as warm as it's going to get for the next 9 months. So, I
was paranoid about the slightest movement cracking the canopy. Well,
when I was done trimming off the ends, I tried to break them in half, so they'd
fit better into the trash can. As you can see here, I bent it double,
without causing it any harm. And this cut-off piece has had NO
trimming, filing, smoothing, etc. I should still be careful working on
the bubble, but apparently it isn't as brittle as I'd feared from all the
warnings.
Sep 29 - Back at NHIS again for
another 5
days of racing and updating the web site. I never did get the index
updated the last time I updated the web site.
Process & copy in pics.
4.0 hr doc
Sep 30 - spent an hour working on
INSURANCE issues. Work on web site, adding pic captions.
I am NOT feeling very motivated to keep putting all this work into the web
site, especially documenting steps I later found out were wrong.
3.0 hr doc
well, that's it for another month. Follow me to the
OCTOBER CANOPY page.
 After a few minutes
of playing with the Avery Vise-Grip fluting tool (no way could you do this
on 0.063" with one of those wimpy plier-type fluting tools), I had it
laying perfectly straight on this table. The red lines are where I
first marked out where the fasteners would go. Then I fluted between
those marks.
After a few minutes
of playing with the Avery Vise-Grip fluting tool (no way could you do this
on 0.063" with one of those wimpy plier-type fluting tools), I had it
laying perfectly straight on this table. The red lines are where I
first marked out where the fasteners would go. Then I fluted between
those marks.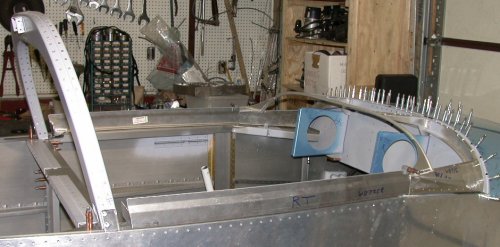 Here's the layout for the
WD725 aft canopy frame weldments.
Here's the layout for the
WD725 aft canopy frame weldments.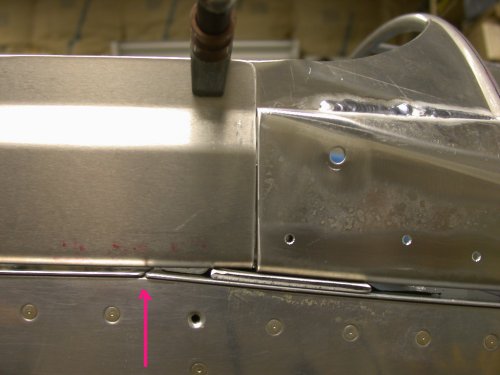 The F721A/B
junction & angle change is here, where the arrow is. Now, why in
the world wouldn't they make the WD725/WD716 junction and angle change occur
at the same place??? This way, the space for the seal,
under the WD725, does not stay the same. It closes up here, where the
arrow is. If you're changing angles along the fuselage, and the canopy
is following the fuselage lines, then why not do the angle change at the
same place, and get a good, even gap where the seal will go? I dunno,
and not much I can do about it, but it's weird.
The F721A/B
junction & angle change is here, where the arrow is. Now, why in
the world wouldn't they make the WD725/WD716 junction and angle change occur
at the same place??? This way, the space for the seal,
under the WD725, does not stay the same. It closes up here, where the
arrow is. If you're changing angles along the fuselage, and the canopy
is following the fuselage lines, then why not do the angle change at the
same place, and get a good, even gap where the seal will go? I dunno,
and not much I can do about it, but it's weird.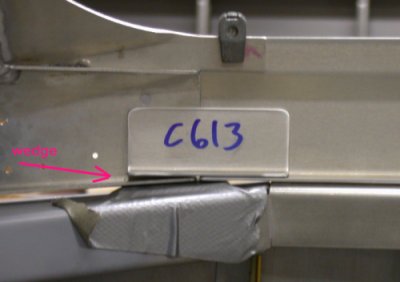 The arrow shows where the
C723 wedge is supposed to go. Personally, I think this whole wedge
thing, and especially the way they call for it to be made, is weird as
hell. I don't know why text I add to these pics looks nice & clear
when I am editing the photo, then later on the web they look all fuzzy.
The arrow shows where the
C723 wedge is supposed to go. Personally, I think this whole wedge
thing, and especially the way they call for it to be made, is weird as
hell. I don't know why text I add to these pics looks nice & clear
when I am editing the photo, then later on the web they look all fuzzy. The plans call for making
these tiny wedges out of 2 giant hunks of aluminum bar. The plans say
to make them from 1.5"x3/4" bar. I don't have anything like
that. I do have 2 of this 1.25"x5/8" bar. I called
Van's to make sure this is the bar to use, and they said it is. I
didn't want to cut the bar up and then find out I need it for something else
later down the line. However, I'm not even going to use a wedge
here. I'm going to just split the C613, bend it to fit the angle
between the WD716 and WD725, and tie it together with a splice plate
backer. Much faster and easier, and at least as strong as the wedgie
thing.
The plans call for making
these tiny wedges out of 2 giant hunks of aluminum bar. The plans say
to make them from 1.5"x3/4" bar. I don't have anything like
that. I do have 2 of this 1.25"x5/8" bar. I called
Van's to make sure this is the bar to use, and they said it is. I
didn't want to cut the bar up and then find out I need it for something else
later down the line. However, I'm not even going to use a wedge
here. I'm going to just split the C613, bend it to fit the angle
between the WD716 and WD725, and tie it together with a splice plate
backer. Much faster and easier, and at least as strong as the wedgie
thing.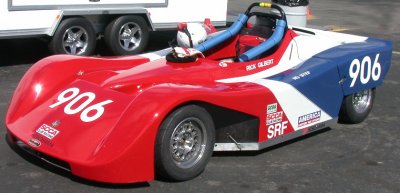 Here's a cool SCCA
car that was here at the track for practice this morning. Cars run in
the AM & bikes go in the PM on Thursdays, so I was just hanging out
& chatting a bit with the drivers. SRF is Spec Racing Ford, a spec
class that the SCCA made up to give the drivers a good level playing
field. Of course, when it was time for bikes to practice, one of the
cars had done about 2 laps while leaking oil, so that involved a big cleanup
and delay. Incredibly perfect day today. Not hot, not cold, not
raining. Gotta love it when it happens occasionally around here.
For pics on what I do here at the track, click
Here's a cool SCCA
car that was here at the track for practice this morning. Cars run in
the AM & bikes go in the PM on Thursdays, so I was just hanging out
& chatting a bit with the drivers. SRF is Spec Racing Ford, a spec
class that the SCCA made up to give the drivers a good level playing
field. Of course, when it was time for bikes to practice, one of the
cars had done about 2 laps while leaking oil, so that involved a big cleanup
and delay. Incredibly perfect day today. Not hot, not cold, not
raining. Gotta love it when it happens occasionally around here.
For pics on what I do here at the track, click 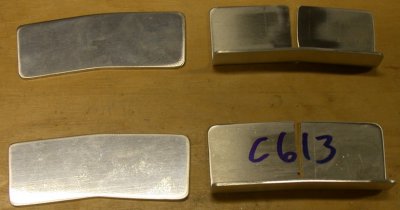 These
are the custom split C613s and backing plates. They will replace the
stock C613 and C723 wedge.
These
are the custom split C613s and backing plates. They will replace the
stock C613 and C723 wedge. 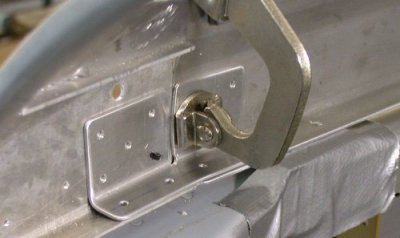 Here's the inside view of the RT custom split C613 clamped in place, tying
the WD725 and WD716 together.
Here's the inside view of the RT custom split C613 clamped in place, tying
the WD725 and WD716 together.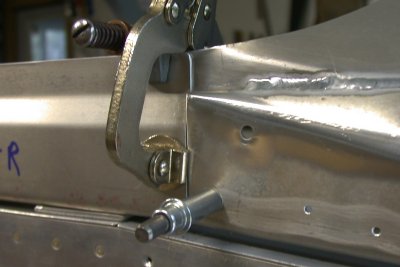 Here's the outside view of the RT WD725, WD716, C613 all clamped together
for drilling and clecoing.
Here's the outside view of the RT WD725, WD716, C613 all clamped together
for drilling and clecoing.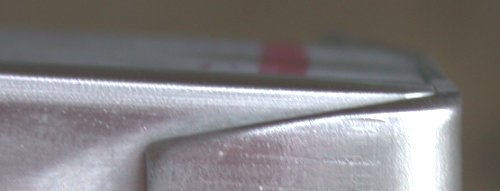 This may be a bit hard to see, but this is the aft end of the WD725, where
the angle at the aft end is bent and the angle web sticks out a bit. I
ground & filed it down, so it's smooth and flush here.
This may be a bit hard to see, but this is the aft end of the WD725, where
the angle at the aft end is bent and the angle web sticks out a bit. I
ground & filed it down, so it's smooth and flush here.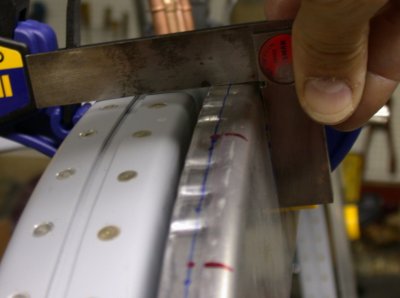 I later found out all this work I did on the F631 at the aft end of the
WD725 is the wrong way to do it, but this is how I did it.
I later found out all this work I did on the F631 at the aft end of the
WD725 is the wrong way to do it, but this is how I did it.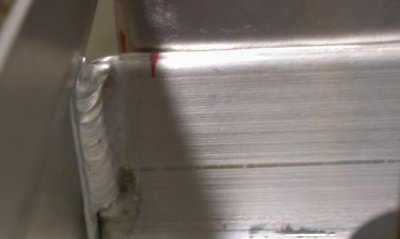 I had to mark on the angle the most outboard that the holes could be without
being too close to the flange of the F631A.
I had to mark on the angle the most outboard that the holes could be without
being too close to the flange of the F631A.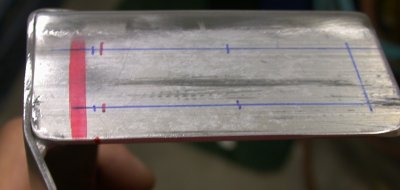 The big red mark on the LT in this pic is where the edge of the F631A is.
The little blue mark is where the plans said to put the rivet hole, but it's
too close to the flange of the F631A. You can just barely see the red
mark (made in previous pic) on the fwd edge at the LT, just RT of the heavy
red line. So, I moved the rivet hole point the the RT a bit, as marked
with the 2 little red lines crossing the blue lines.
The big red mark on the LT in this pic is where the edge of the F631A is.
The little blue mark is where the plans said to put the rivet hole, but it's
too close to the flange of the F631A. You can just barely see the red
mark (made in previous pic) on the fwd edge at the LT, just RT of the heavy
red line. So, I moved the rivet hole point the the RT a bit, as marked
with the 2 little red lines crossing the blue lines.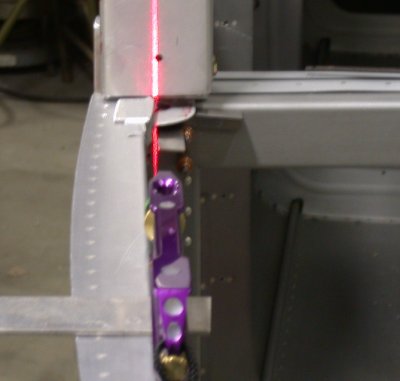 Here, I am using the laser level to mark exactly where on the F631A the
WD622 canopy lugs should go to align vertically with the cutouts for the aft
canopy latches.
Here, I am using the laser level to mark exactly where on the F631A the
WD622 canopy lugs should go to align vertically with the cutouts for the aft
canopy latches.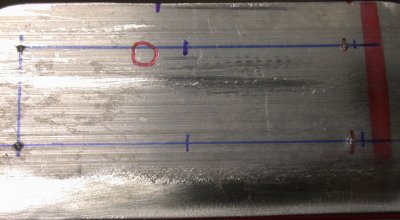 I also had to mark (with red circle) where the tooling hole is on the F631A.
The little blue line at the top shows where the center of the lug should be.
The middle 2 cross lines show where the plans say the holes should be.
I wanted to make the 2 holes for the lug as close as possible to where
they'd best line up, while not actually hitting the tooling hole.
I also had to mark (with red circle) where the tooling hole is on the F631A.
The little blue line at the top shows where the center of the lug should be.
The middle 2 cross lines show where the plans say the holes should be.
I wanted to make the 2 holes for the lug as close as possible to where
they'd best line up, while not actually hitting the tooling hole.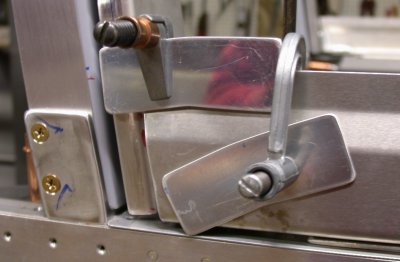 I needed to make sure the F725 rail was aligned both at the bottom (with the
fuse skin) and at the joggle (with the F631A) before drilling the holes
between the WD725 aft angle and the F631A aft canopy frame, so I clamped on
these pieces.
I needed to make sure the F725 rail was aligned both at the bottom (with the
fuse skin) and at the joggle (with the F631A) before drilling the holes
between the WD725 aft angle and the F631A aft canopy frame, so I clamped on
these pieces.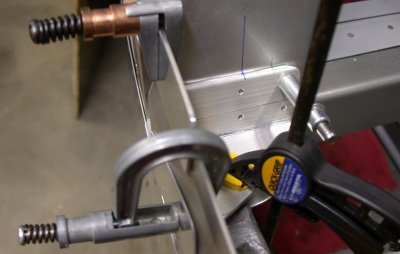 This shows everything clamped in place and ready to match drill the F631A to
the WD725 aft angle.
This shows everything clamped in place and ready to match drill the F631A to
the WD725 aft angle.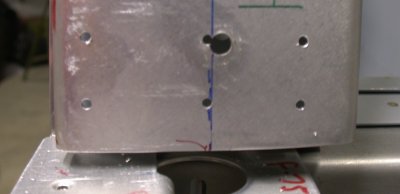 This shows how the holes in the RT side of the F631A came out.
Normally, being so close to the tooling hole would not be good, but in this
case the F631A is just clamped between 2 other pieces (the aft angle on the
WD725 and the WD622 canopy frame lug), so it really doesn't matter.
This shows how the holes in the RT side of the F631A came out.
Normally, being so close to the tooling hole would not be good, but in this
case the F631A is just clamped between 2 other pieces (the aft angle on the
WD725 and the WD622 canopy frame lug), so it really doesn't matter.
 One of the canopy lugs (WD622) was not welded on one side. Probably OK
anyway, but I called Van's, and they shipped me a new one.
One of the canopy lugs (WD622) was not welded on one side. Probably OK
anyway, but I called Van's, and they shipped me a new one.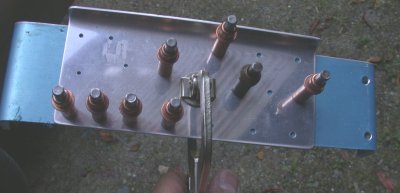 With the initial holes to match on this custom C704 being on the INside of
the F631A, you need to make a matching plate that will go on the OUTside, so
you can drill the matching holes through the F631A. I just used a
piece of 0.063" scrap.
With the initial holes to match on this custom C704 being on the INside of
the F631A, you need to make a matching plate that will go on the OUTside, so
you can drill the matching holes through the F631A. I just used a
piece of 0.063" scrap.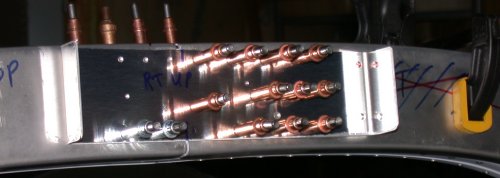 Here is the hole matching plate on the outside of the F631A. You drill
the first hole (in 3/32") from the back side, when the F631A is off the
plane, to get the initial hole right. Then you put the F631A back on
the fuselage, get all the alignment just right, and drill out all the holes.
Drill to 3/32" first, then go for #30 when you're sure it's right.
Here is the hole matching plate on the outside of the F631A. You drill
the first hole (in 3/32") from the back side, when the F631A is off the
plane, to get the initial hole right. Then you put the F631A back on
the fuselage, get all the alignment just right, and drill out all the holes.
Drill to 3/32" first, then go for #30 when you're sure it's right.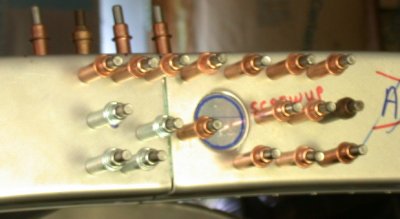 Here is the custom C704 drilled and clecoed on the inside of the F631A.
Later, I will just fill in where I made that big hole in the F631A by
mistake.
Here is the custom C704 drilled and clecoed on the inside of the F631A.
Later, I will just fill in where I made that big hole in the F631A by
mistake.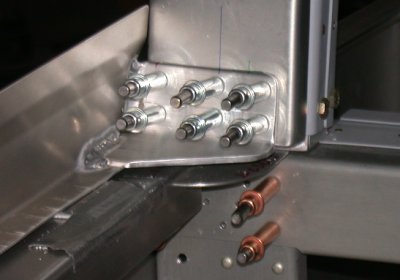 Here is the RT F725 aft angle drilled and clecoed to the F531A
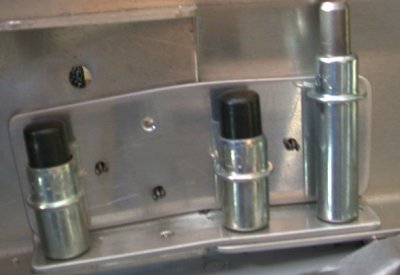 This is a closeup of the RT custom C613 and reinforcing plate, all drilled
and clecoed. I think this is a much better, easier, stronger way to go
than the wedgie thing.
This is a closeup of the RT custom C613 and reinforcing plate, all drilled
and clecoed. I think this is a much better, easier, stronger way to go
than the wedgie thing.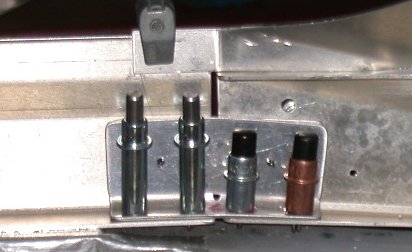 Here's the custom C613 on the LT side.
 This is how the holes for the LT side F631A came out. On the outboard
holes, I forgot to bring them in further than the plans specified, as I had
done on the RT, so I drilled a couple more rivet holes just inboard of that.
Outboard is to the RT in this pic. Again, I cleared the tooling hole
just enough so the bit wasn't getting hung up in the edge of it.
This is how the holes for the LT side F631A came out. On the outboard
holes, I forgot to bring them in further than the plans specified, as I had
done on the RT, so I drilled a couple more rivet holes just inboard of that.
Outboard is to the RT in this pic. Again, I cleared the tooling hole
just enough so the bit wasn't getting hung up in the edge of it.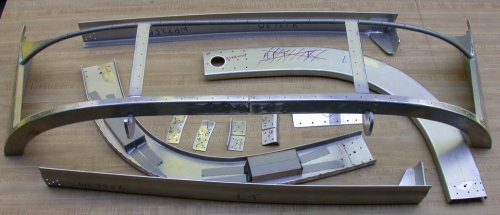 Here are all the canopy frame parts, finally done, prepped, countersunk, and
ready for primer.
Here are all the canopy frame parts, finally done, prepped, countersunk, and
ready for primer.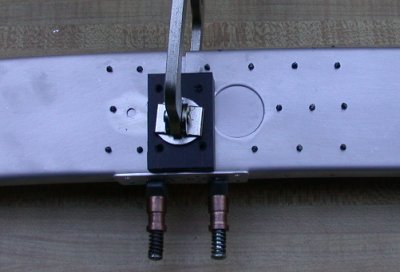 I
fabricated the C608 center canopy latch and match drilled it to the center
of the F631A before riveting the F631A together with the custom C704 plate.
I
fabricated the C608 center canopy latch and match drilled it to the center
of the F631A before riveting the F631A together with the custom C704 plate.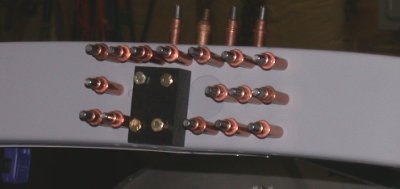 Here is the C608, F631As, and C704, all in place and ready to rivet.
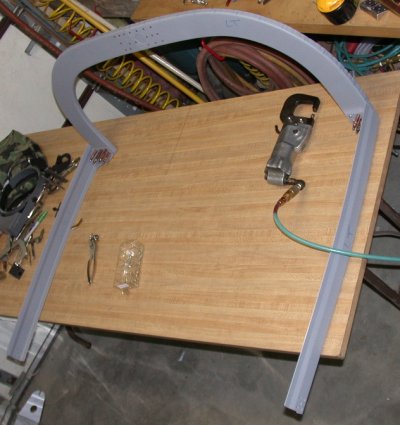 The
F631A is riveted together, and I am about to rivet the completed F631A to
the WD725 rails.
The
F631A is riveted together, and I am about to rivet the completed F631A to
the WD725 rails.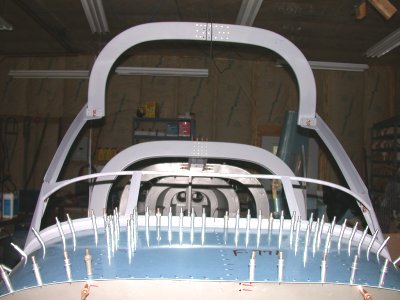 Here's the whole canopy frame riveted together. The aft part of it is
being held up by a string tied to the garage door. I am doing all
these pics after the fact. This is NOT how this is supposed to be
done, I found out afterward. You are supposed to rivet the FRONT parts
of the canopy frame together, and do the F631A part AFTER you get the canopy
bubble fitted to the cabin frame. I may be able to save this, or I may
have to remove the F631A and redo it and its attachment to the WD725s.
I may even need to buy all new F631As, WD725s, and C704. We will see,
once I get the bubble fitted.
Here's the whole canopy frame riveted together. The aft part of it is
being held up by a string tied to the garage door. I am doing all
these pics after the fact. This is NOT how this is supposed to be
done, I found out afterward. You are supposed to rivet the FRONT parts
of the canopy frame together, and do the F631A part AFTER you get the canopy
bubble fitted to the cabin frame. I may be able to save this, or I may
have to remove the F631A and redo it and its attachment to the WD725s.
I may even need to buy all new F631As, WD725s, and C704. We will see,
once I get the bubble fitted.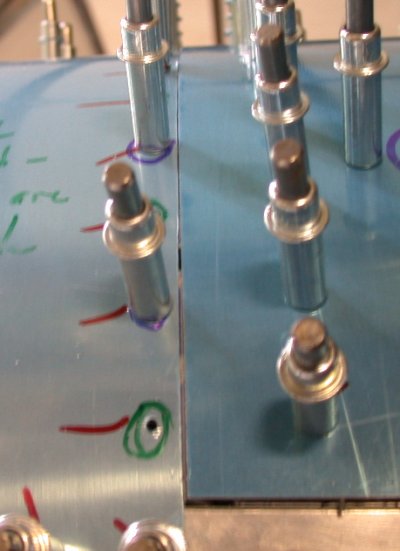 I
got my new C702 skin from Van's and fitted it to the canopy frame. NO
filing on that front edge. My advice when you're fitting the frame and
skin - DO NOT FILE THE FWD EDGE OF THE C702 SKIN. If it doesn't fit
right, you're probably doing something else wrong.
I
got my new C702 skin from Van's and fitted it to the canopy frame. NO
filing on that front edge. My advice when you're fitting the frame and
skin - DO NOT FILE THE FWD EDGE OF THE C702 SKIN. If it doesn't fit
right, you're probably doing something else wrong.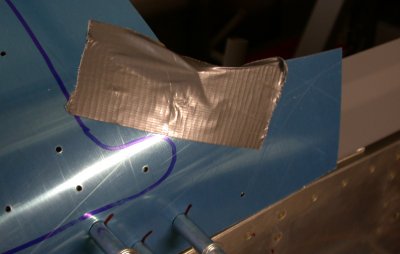 Tape down those sharp ears, so you don't scratch either the bubble or your
skin.
Tape down those sharp ears, so you don't scratch either the bubble or your
skin.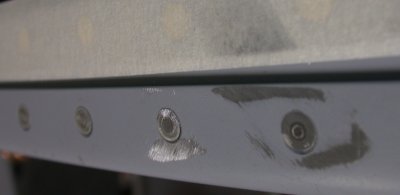 File down all the pop rivet heads on the aft half of the F631A cabin frame,
so they're nice & smooth. We want the bubble sitting on a nice smooth
surface. Fwd is up in this pic.
File down all the pop rivet heads on the aft half of the F631A cabin frame,
so they're nice & smooth. We want the bubble sitting on a nice smooth
surface. Fwd is up in this pic.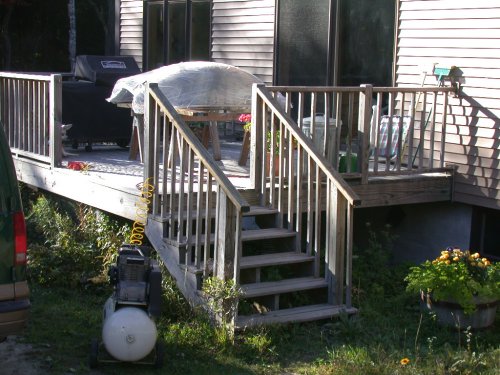 With all the prep done, I am FINALLY ready to deal with the bubble! With the sun fast fading for the day, I wanted to work on the bubble initial
trimming in the sun, where it would be as warm as possible, so my parents
came up & helped me move the bubble from the spare bedroom to the deck.
Looks like this is the end of the day's sun. It was in the low 70s at
this point.
With all the prep done, I am FINALLY ready to deal with the bubble! With the sun fast fading for the day, I wanted to work on the bubble initial
trimming in the sun, where it would be as warm as possible, so my parents
came up & helped me move the bubble from the spare bedroom to the deck.
Looks like this is the end of the day's sun. It was in the low 70s at
this point. I packed both wings up onto one wing holder, and moved it over to the side,
to allow room for the canopy bubble's new home in one bay of the garage.
I packed both wings up onto one wing holder, and moved it over to the side,
to allow room for the canopy bubble's new home in one bay of the garage.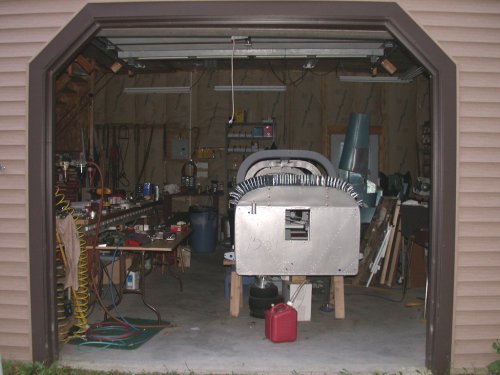 And
here's the other garage bay, with the fuselage.
And
here's the other garage bay, with the fuselage.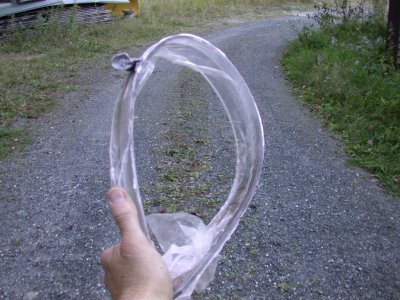 I was VERY nervous working on the canopy today. It's about 70 degrees,
which is about as warm as it's going to get for the next 9 months. So, I
was paranoid about the slightest movement cracking the canopy. Well,
when I was done trimming off the ends, I tried to break them in half, so they'd
fit better into the trash can. As you can see here, I bent it double,
without causing it any harm. And this cut-off piece has had NO
trimming, filing, smoothing, etc. I should still be careful working on
the bubble, but apparently it isn't as brittle as I'd feared from all the
warnings.
I was VERY nervous working on the canopy today. It's about 70 degrees,
which is about as warm as it's going to get for the next 9 months. So, I
was paranoid about the slightest movement cracking the canopy. Well,
when I was done trimming off the ends, I tried to break them in half, so they'd
fit better into the trash can. As you can see here, I bent it double,
without causing it any harm. And this cut-off piece has had NO
trimming, filing, smoothing, etc. I should still be careful working on
the bubble, but apparently it isn't as brittle as I'd feared from all the
warnings.