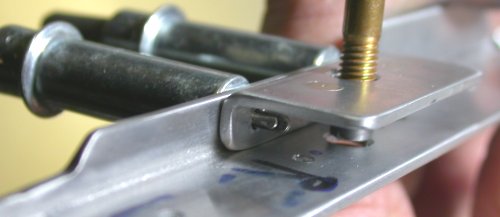
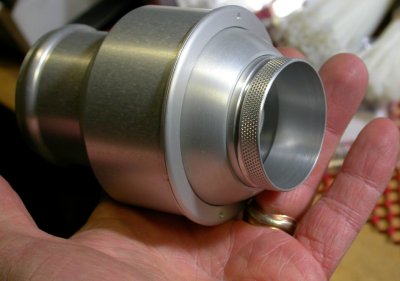
 This is the side mount nutplate adapter assembly for the quadrant mount in
the console. The notch in the angle, at pic lower LT, is to clear the
throttle mount bracket I installed onto the quadrant.
This is the side mount nutplate adapter assembly for the quadrant mount in
the console. The notch in the angle, at pic lower LT, is to clear the
throttle mount bracket I installed onto the quadrant.December, 2006 fuselage work
I am continuing to work on the console to support getting the engine and related wiring ready, so I can start the engine.
Dec 1 - update web site 0.5 hr doc
Dec 5 - continue fitting console parts Bryan at Xtreme Products has been most helpful in answering my questions about the install. Work on quadrant nutplates to 0245. 2.75 hr
This is the side mount nutplate adapter assembly for the quadrant mount in
the console. The notch in the angle, at pic lower LT, is to clear the
throttle mount bracket I installed onto the quadrant.
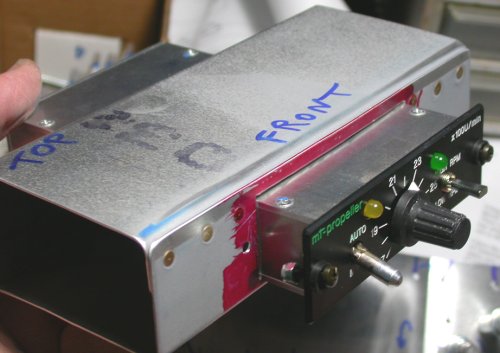
Dec 6 - Install top quadrant nutplate to console. Quadrant fit to console is perfect. Try to find a place to install the MT prop controller. Unfortunately, it's too wide to go in the console, as I'd envisioned installing it. I considered various options, such as turning it sideways to fit in the console. I think I will have to put it in the space between the top of the console and the bottom of the instrument panel. Worked to 0200.Update web site 1.5 hr + 0.5 hr doc
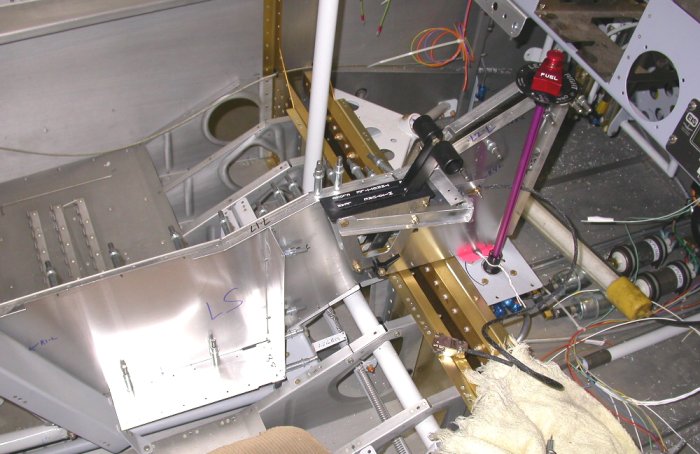 Here is the console LT side temporarily installed with the quadrant
installed and the Andair extension in place so I can see where the Andair
control knob will go and where to trim the Andair extension.
Here is the console LT side temporarily installed with the quadrant
installed and the Andair extension in place so I can see where the Andair
control knob will go and where to trim the Andair extension.
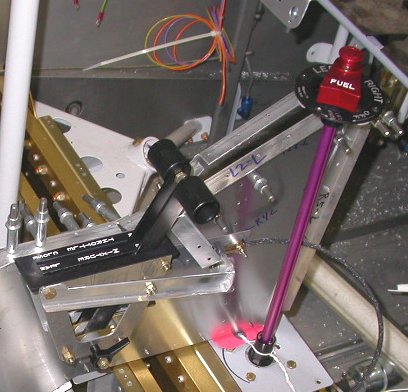 This closeup shows the throttle quadrant and the Andair fuel valve control.
It looks like the best place for the MT prop controller is going to be in
the 1.5" space between the top of the console and the bottom of the
instrument panel (space partially obscured here by the Andair legend plate).
This closeup shows the throttle quadrant and the Andair fuel valve control.
It looks like the best place for the MT prop controller is going to be in
the 1.5" space between the top of the console and the bottom of the
instrument panel (space partially obscured here by the Andair legend plate).
Dec 7 - make box bracket to go between console and instrument panel, and to hold the MT prop controller. 4.5 hr
 I
was looking around the Internet for some 1.5" U-channel or rectangular box
tubing to put in the1.5" space between the top of the console and the bottom
of the instrument panel. I finally did find some 1.5" x 3" rectangular
tubing, but it was 0.125" thick, far overkill for this. So, I decided
to just make my own box from 0.031" sheet. This will bolt in between
the console and panel, and it will also house the MT prop controller.
Being a box (as opposed to a U shape) will allow the back of it to support
the back of the MT prop controller. I had initially planned to have
the seam in the back, but having it in the front (where the contact will be
between console and panel) allowed me to precisely set the height for a
perfect fit between console and panel.
I
was looking around the Internet for some 1.5" U-channel or rectangular box
tubing to put in the1.5" space between the top of the console and the bottom
of the instrument panel. I finally did find some 1.5" x 3" rectangular
tubing, but it was 0.125" thick, far overkill for this. So, I decided
to just make my own box from 0.031" sheet. This will bolt in between
the console and panel, and it will also house the MT prop controller.
Being a box (as opposed to a U shape) will allow the back of it to support
the back of the MT prop controller. I had initially planned to have
the seam in the back, but having it in the front (where the contact will be
between console and panel) allowed me to precisely set the height for a
perfect fit between console and panel.
Dec 9 - continue with console work; match-drilling all the holes. Trim Andair valve extension to length. Also had a nice visit from fellow NH RV-7A/Eggenfellner builder Carsten Schanke. Carsten is at roughly the same stage of completion as me. 4.0 hr
Dec 11 - update web site 0.5 hr doc
Dec 12 - no work on plane last couple days. Spare time has been busy trying to finalize hangar size, so I can get that on order.
Dec 13 - debur console parts drilled holes 1.75 hr
Dec 14 - 54 degrees at LEB! I can live with this global warming! I'd hate to own a ski area, though. Usually, the ground has been frozen solid for a month by now. Uncommonly warm Nov and now Dec. Debur console parts edges. Man, that console sure has a lot of parts! 1.25 hr
Dec 15 - added StatCounter to my web pages. It is far better than the hokey old counter I used to have. I was surprised at the traffic I am seeing. Within minutes of installing it, I started getting hits from all over. I guess more people read this than I'd realized.
Dec 21 - I had forgotten about my interior page. All this console stuff should have gone into the "interior" page, but it's too much trouble to change it now. The console is ready to start assembling, but I have been busy with engine and wiring. It was a bit cold (night into the teens) a couple days ago, but temps are back up to nearly 50 degrees today. Clean up bench some. Start dimpling and countersinking console L1s, top skin, B1-B4 parts. 3.0 hr
Dec 22 - more console parts deburring 0.25 hr
Dec 23 - dimple & countersink console parts. Debating whether or not I should bother to prime the parts. Doubtful it needs it, but I ended up deciding to do it anyway. Also debating whether or not I should assemble the console as designed or should I eliminate the L2s and have the skin follow the L1s? It would be a much better console if the side skins follow the L1s, but the current side skins won't be a great fit that way. OTOH, strength isn't important, and if upholstered, it won't be noticeable. Still debating that question. Prime console L1s, top skin, and B1-B4 pieces. 4.0 hr
Dec 25 - Merry Christmas! Assemble console top skin, L1s, and B1-B4 parts, and rivet together. Not my best riveting, but it is just a console. Countersink R2s, F1s, and B8. Dimple compartment skins, prime all. 5.0 hr
 Here is the console top skin, riveted together.
Dec 26 - update web site 2.0 hr doc
Dec 27 - rivet console R2s, F1s, B8, compartment skins. Countersink, prep, and prime R3s, R5s. Drill, prep, prime NPAs. Dimple, prep, prime side skins 2.5 hr
 This
porcupine has been hanging out lately in a hemlock tree outside our kitchen
window. It eats the bark and needles. When I was a kid, there
was actually a bounty on these, as well as most carnivores. But no
longer. It was cool watching him.
This
porcupine has been hanging out lately in a hemlock tree outside our kitchen
window. It eats the bark and needles. When I was a kid, there
was actually a bounty on these, as well as most carnivores. But no
longer. It was cool watching him.
Dec 28 - back-rivet console R5s and R3s. I had a terrible time with the LT side; probably mainly because I put the R3-L on OK, but then realized I'd forgotten to rivet on the NPA-S first, so I had to remove the R3-L to attach the NPA-S. I guess that enlarged the already-too-large holes, and things went downhill from there. I redid the R3-L rivets, then redid a couple of them again with oops rivets, then redid one in CherryMax. By then, that one hole was so screwed up I didn't even trust the CherryMax, so I added 2 more additional holes (in 1/8") at each end, and put in 470-4-5 rivets there. I need that bracket to be quite secure, as it is one of two attach points for the throttle quadrant. The RT side went without a hitch, and all good rivet heads. I spent 2 hours doing the R5 and R3 on the left side and half an hour doing them on the RT side. Maybe part of it was that I haven't done any back-riveting for years, so the LT side one was more like "practice". Also, even though I use #41 for -3 holes, not #40, and I even used a new #41 reamer from Avery on this console, instead of the usual drill bit, all the holes had gotten a bit enlarged, so the rivet fit was sloppy. I'm not sure why. Then I riveted on the R1s with no problems. Countersunk the F2s, then prepped, cleaned, and primed them. As mentioned, this console has a LOT of parts (and I'm not even using them all). Still debating whether or not to use the L2s or try to make the side skins follow the L1s instead. 4.0 hr + 1.0 hr doc
Dec 29 - received air vents from SteinAir. They look pretty good.
 Here is
one of the air vents I got from SteinAir.
They are surplus from airliners or military. A tad large, but very
nice.
Here is
one of the air vents I got from SteinAir.
They are surplus from airliners or military. A tad large, but very
nice.
Dec 30 - Ready to rivet R2s. Found side skins are dimpled in wrong direction for F2s; redimpled side skins for that. Rivet F2s onto side skins. Rivet compartment to LT skin. Make commitment to eliminate L2s. Make S-bends in F2s for better fit. Found that side skins now actually fit the L1s better after bending the F2, so I will be able to use most of the existing fwd L1 holes, after redrilling them to 1/8". Spent lots of time screwing around getting F2s bent properly, so fwd floor mount screw holes line up. 3.25 hr
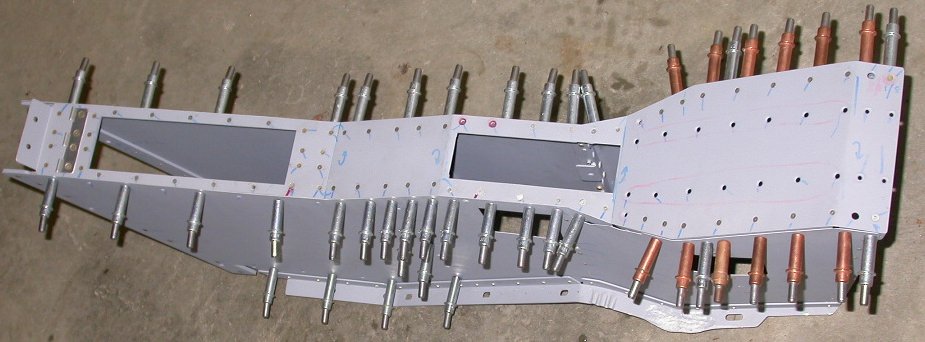 Here is the console all clecoed together, ready for final riveting. I
decided to eliminate the L2 pieces, and just wrapped the side skins around
the L1s (upper frame angles). The fwd holes were meant to go on the
L2, so they didn't line up perfectly with the holes in the L1s, but it was
close enough that, by redrilling all them to 1/8", the fit was good.
Here is the console all clecoed together, ready for final riveting. I
decided to eliminate the L2 pieces, and just wrapped the side skins around
the L1s (upper frame angles). The fwd holes were meant to go on the
L2, so they didn't line up perfectly with the holes in the L1s, but it was
close enough that, by redrilling all them to 1/8", the fit was good.
GO TO JANUARY, '07 INTERIOR PAGE FOR MORE ON CONSOLE
GO TO August, 2009 interior page for details on installing the Infinity Aerospace grips
BACK TO MY RV BUILDER'S HOME
BACK TO BRIAN'S HOME