Oct 6 - It's been quite difficult
to get back to working on the plane. I've been busy, plus it's hard to
get back into it when I'm not really doing anything; just still pondering
how to deal with mounting the 3 magnetometers. I also found out today
that the Claremont City jerkoffs first said it'd be another month before
they'd accept my plans to build a hangar, then later in the day, they said
it'd be more like another 2 months. I was ready to go on this
back in May, and they've been jerking me around ever since then.
Worked some more on trying different layouts for the 3 magnetometers.
The problem is they have to be mounted where they are not near any steel,
and where their attitude can be adjusted after they're installed.
I looked into putting the Dynon in the tail, under the fiberglass fairing
there. But I was concerned about water getting in there under the
fairing. 1.25 hr
Oct 8 - Still trying to figure out
where & how to mount the magnetometers so they can be adjusted. I
finally found a clean simple solution. I moved the mount plate over
from the RT side to the LT side. This gives me more room
left-to-right, and it places them further from the custom baggage
compartment. I will probably have to cut an access panel in the top
skin, though. I also still have to design the adjustable mounting
mechanism. Laid out and marked pieces to form the mount bracket.
1.5 hr
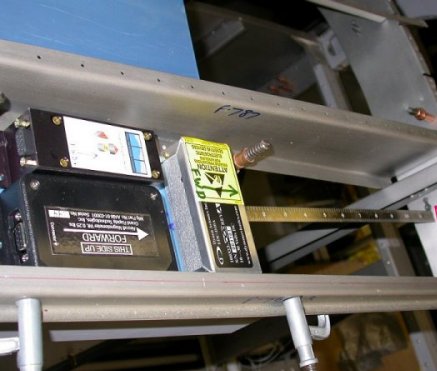
For some unknown reason, I'd originally laid out the mags on the RT side, as
shown here. Eventually, I figured out that I'd have more usable space
(L-R) if I mounted the plate on the LT side, as I'd no longer have the
flange on the bottom of the F787 coming into my usable space, as you can see
here. I also realized that if I did the mount plate in one piece, I'd
also no longer have mount space wasted by the 3/4" aluminum angle at
the intersection of the horizontal & vertical pieces.
Oct 10 - Made wheel chocks.
Decided that I can now make a single piece mount bracket after doing the
original layout with 3 pieces. Fabricated mount bracket and fine-tuned the fit.
Did the magnetometer layout on the bracket. Made mount plates for the GRT mag, so it has 4 mount points for adjustability, rather than the 2 it
came with. Countersunk & primed the 2 GRT mag plates.
4.25 hr
some
simple wheel chocks I made from scrap 2x4 pieces (from my engine crate)
When I laid this out, I was using 2 plates connected together by a piece of
3/4" angle, but then I made it out of one piece. This gave me more
room to mount the mags, without interference from the angle. This
shows how the 3 magnetometers mount on the plate. It also shows the 2
little plates I made to attach to the GRT mag (black one on the LT) so it
will have mount points at 4 corners, rather than the 2 end mount points it
comes with. The plate will mount to the upper ribs behind the
baggage compartment. It worked out well in the layout that the fwd
Dynon mag has its connector on the fwd end, and the other 2 both have their
connectors on the aft end. Now, I need to come up with some design to
mount the mags to the plate in a way that I can easily adjust their mounting
attitude.
Oct 11 - update web site
1.0 hr doc
Oct 12 - rivet mount plates onto
GRT mag. Calculate length of screws needed for mounting scheme.
I was thinking of using nutplates, then I realized I have to remember to use
only non-ferrous fasteners on this. I think I will forget the
"screw-adjustable" idea, and just go back to a simple bolt-down with one
screw, one nut, and flat washers as needed, to make the mags' alignment as
needed. 1.0 hr
Oct 15 - Lay out and mount mags
to plate. Lay out and drill plate lightening holes.
3.0 hr
Oct 16 - try fit of mounting
hardware I got locally. It's been impossible to find round head brass
machine screws anywhere around here. I will probably have to go with
stainless steel screws. I'm trying to decide between using screws or
rivets to mount the plate. Should I make the plate removable with
screws and/or make a top access panel? Making the top access
panel will be tricky, as I have little space L-R in which to make it.
If the plate is removable, then perhaps I won't need the access panel.
Lay out plate mounting. 2.25 hr
Oct 19 - update web site.
With so much uncertainty and pondering to do (as opposed to just cranking
away on work), it has been VERY difficult to get out into the garage & work
on the plane. I've really GOT to work on it more regularly!
Tried to work on plane later in the evening, but ended up just analyzing what I need for s/s
and brass screws, and placing Wicks and ACS orders. It's most
odd that ACS doesn't carry the L08 dimpled nutplates for access panels, so I
had to get them from Wicks. 1.5 hr + 1.0 hr
doc
Oct 23 - Finish making lightening
holes in mag mount plate. Drill #29 holes for #6 screws in mag plate
and F787 fuse rib. Mount mags to plate. Started looking at cabin
lighting to got on F632A roll bar brace. ACS had some Whelen interior
lights, but they are awful expensive; $135-250 for a *&^%$ dome light!
I will check the auto parts stores to see what they have; probably just
Chinese junk. I'd like to find some happy medium. Started
working on tipup canopy Service Bulletin to brace the F774 aft top skin and
F632A roll bar brace. Fabricated F732G spacer. Cleco & drill top
F774 aft top skin holes. Cleco & drill F732G spacer to skin and roll
bar brace. 4.0 hr
Here are the 3 magnetometers mounted to the plate. The Dynon is tipped
forward 8 degrees because it has to match the attitude of the EFIS unit in
the instrument panel. Due to the shape and configuration of the F787
top fuselage rib (tips up 4 degrees) and the attitude of the instrument
panel (tips down 4 degrees), I had to make the Dynon mag match the angle of
the EFIS. The other 2 only have to match the angle of their respective
control boxes, and they will all be fine-tuned later for that. You can
also see on the GRT mag (wide black one) how I added a little mount plate to
the bottom of it, so it will mount with 4 screws, rather than the 2 (at each
end, in the center) it was designed with. The BMA is in the
foreground.
After getting the mag mount (to go under F774 aft top skin) squared away, I
started in on the skin and related parts, including the Service Bulletin
bracing that goes at the fwd top edge of the F774 skin (attached by the
copper 1/8" clecoes here). I also started match drilling and clecoing
the F774 skin in place. Below the skin, you can see the LT custom
access panel, used to access the batteries and the autopilot elevator servo.
In fact, you can see the servo in the pic, looking through the access panel
cutout.
Here
is a closeup from the last pic, showing the F732G brace plate. It is
presently interfering with the angle below it, so I will have to trim one or
both of them, so the F732G lays flat on the F632A roll bar brace channel.
Here is the magnetometer mount and the F774 aft top skin clecoed in place,
as viewed from inside, from the LT baggage compartment.
Oct 24 - update web site
1.0 hr doc
Oct 25 - hammered by remnants of
Hurricane Wilma plus a nor'easter. Can't even get to or from my house
with a car for 2 days. Pics HERE.
Oct 27 - clean up workbench, put
away ACS s/s & brass screws order. Called ACS to return some of the
brass screws that were 12 cents in the catalog and they charged me almost a
dollar each for them. They were rather snotty about it. I
don't think much at all of Aircraft Spruce's customer service attitude.
Sometimes, when I am placing an order, they act like I am bothering them and
I should hurry up. I should write a letter to Jim & Nanci Irwin, the
owners, about it. 0.5 hr
Oct 30 - Testing a 50w DC halogen
bulb I got from Home Depot. Trying to come up with good cockpit
lighting, without having to spend $150+ on one made for aircraft.
I looked at some automotive ones in a parts store, but they look cruddy.
Plus, I think a red one would be more useful than the white ones.
Somewhere, I have an old Air Force cockpit light, which would probably be
great, but I searched all over and can't find it. It's red or white,
swivels, and has a detachable head, so it'd be great, if I could find it.
I got out my electronic catalogs and started looking at LED solutions.
1.5 hr
I got
this pack of halogen bulbs at Home Depot. I hooked up one to a 12v
battery. It worked OK, but was VERY bright (more than I'd need, I
think), and at 50w, that's about 4 amps; really a bit much for a simple
cabin light. I think I'll do something with red LEDs.
Oct 31 - More looking at LED
cabin lighting solutions in electronics catalogs. They have so many
choices and options in there, it's hard to figure it all out. Did some
experimenting with 2 big 10mm red LEDs I got from Radio Shack; one is 300
mcd and one is 5000. If I use a few of those 5000 mcd LEDs, that
should be fine. They're quite bright. The Allied catalog even
has some that go as high as 11,000 mcd. 1.0
hr
 For some unknown reason, I'd originally laid out the mags on the RT side, as
shown here. Eventually, I figured out that I'd have more usable space
(L-R) if I mounted the plate on the LT side, as I'd no longer have the
flange on the bottom of the F787 coming into my usable space, as you can see
here. I also realized that if I did the mount plate in one piece, I'd
also no longer have mount space wasted by the 3/4" aluminum angle at
the intersection of the horizontal & vertical pieces.
For some unknown reason, I'd originally laid out the mags on the RT side, as
shown here. Eventually, I figured out that I'd have more usable space
(L-R) if I mounted the plate on the LT side, as I'd no longer have the
flange on the bottom of the F787 coming into my usable space, as you can see
here. I also realized that if I did the mount plate in one piece, I'd
also no longer have mount space wasted by the 3/4" aluminum angle at
the intersection of the horizontal & vertical pieces.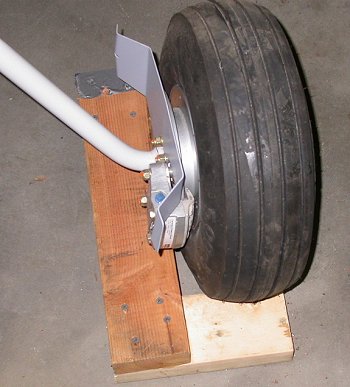 some
simple wheel chocks I made from scrap 2x4 pieces (from my engine crate)
some
simple wheel chocks I made from scrap 2x4 pieces (from my engine crate)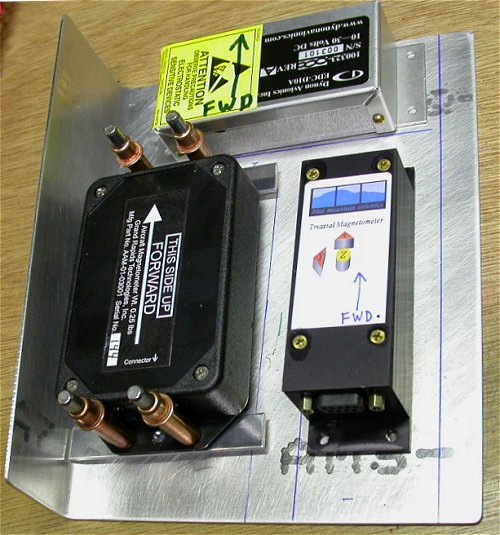 When I laid this out, I was using 2 plates connected together by a piece of
3/4" angle, but then I made it out of one piece. This gave me more
room to mount the mags, without interference from the angle. This
shows how the 3 magnetometers mount on the plate. It also shows the 2
little plates I made to attach to the GRT mag (black one on the LT) so it
will have mount points at 4 corners, rather than the 2 end mount points it
comes with. The plate will mount to the upper ribs behind the
baggage compartment. It worked out well in the layout that the fwd
Dynon mag has its connector on the fwd end, and the other 2 both have their
connectors on the aft end. Now, I need to come up with some design to
mount the mags to the plate in a way that I can easily adjust their mounting
attitude.
When I laid this out, I was using 2 plates connected together by a piece of
3/4" angle, but then I made it out of one piece. This gave me more
room to mount the mags, without interference from the angle. This
shows how the 3 magnetometers mount on the plate. It also shows the 2
little plates I made to attach to the GRT mag (black one on the LT) so it
will have mount points at 4 corners, rather than the 2 end mount points it
comes with. The plate will mount to the upper ribs behind the
baggage compartment. It worked out well in the layout that the fwd
Dynon mag has its connector on the fwd end, and the other 2 both have their
connectors on the aft end. Now, I need to come up with some design to
mount the mags to the plate in a way that I can easily adjust their mounting
attitude.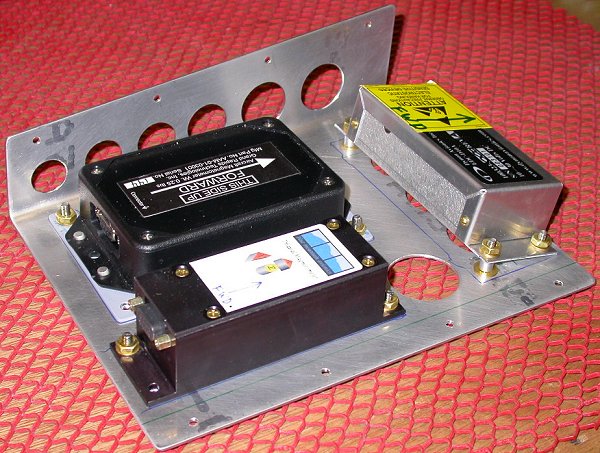 Here are the 3 magnetometers mounted to the plate. The Dynon is tipped
forward 8 degrees because it has to match the attitude of the EFIS unit in
the instrument panel. Due to the shape and configuration of the F787
top fuselage rib (tips up 4 degrees) and the attitude of the instrument
panel (tips down 4 degrees), I had to make the Dynon mag match the angle of
the EFIS. The other 2 only have to match the angle of their respective
control boxes, and they will all be fine-tuned later for that. You can
also see on the GRT mag (wide black one) how I added a little mount plate to
the bottom of it, so it will mount with 4 screws, rather than the 2 (at each
end, in the center) it was designed with. The BMA is in the
foreground.
Here are the 3 magnetometers mounted to the plate. The Dynon is tipped
forward 8 degrees because it has to match the attitude of the EFIS unit in
the instrument panel. Due to the shape and configuration of the F787
top fuselage rib (tips up 4 degrees) and the attitude of the instrument
panel (tips down 4 degrees), I had to make the Dynon mag match the angle of
the EFIS. The other 2 only have to match the angle of their respective
control boxes, and they will all be fine-tuned later for that. You can
also see on the GRT mag (wide black one) how I added a little mount plate to
the bottom of it, so it will mount with 4 screws, rather than the 2 (at each
end, in the center) it was designed with. The BMA is in the
foreground. After getting the mag mount (to go under F774 aft top skin) squared away, I
started in on the skin and related parts, including the Service Bulletin
bracing that goes at the fwd top edge of the F774 skin (attached by the
copper 1/8" clecoes here). I also started match drilling and clecoing
the F774 skin in place. Below the skin, you can see the LT custom
access panel, used to access the batteries and the autopilot elevator servo.
In fact, you can see the servo in the pic, looking through the access panel
cutout.
After getting the mag mount (to go under F774 aft top skin) squared away, I
started in on the skin and related parts, including the Service Bulletin
bracing that goes at the fwd top edge of the F774 skin (attached by the
copper 1/8" clecoes here). I also started match drilling and clecoing
the F774 skin in place. Below the skin, you can see the LT custom
access panel, used to access the batteries and the autopilot elevator servo.
In fact, you can see the servo in the pic, looking through the access panel
cutout.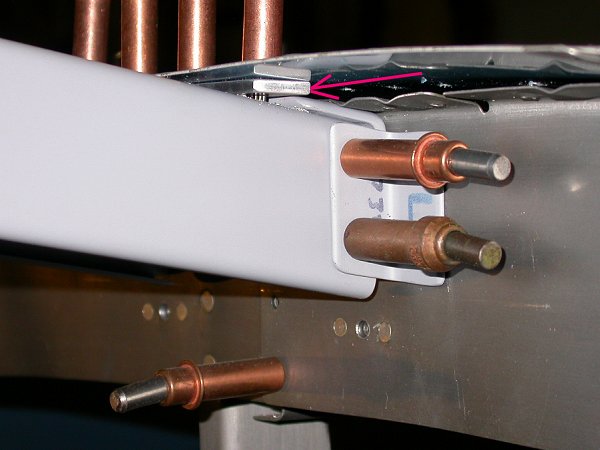 Here
is a closeup from the last pic, showing the F732G brace plate. It is
presently interfering with the angle below it, so I will have to trim one or
both of them, so the F732G lays flat on the F632A roll bar brace channel.
Here
is a closeup from the last pic, showing the F732G brace plate. It is
presently interfering with the angle below it, so I will have to trim one or
both of them, so the F732G lays flat on the F632A roll bar brace channel.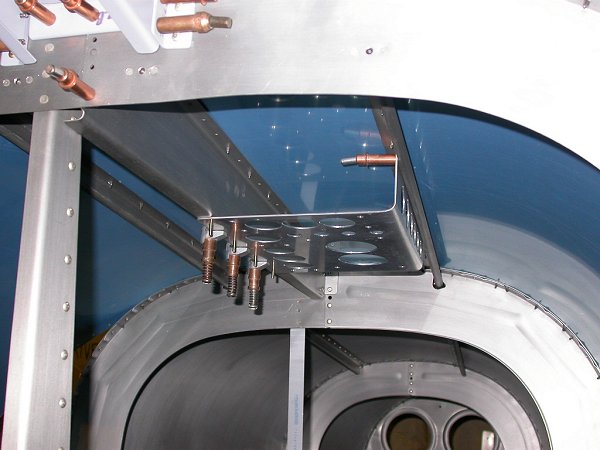 Here is the magnetometer mount and the F774 aft top skin clecoed in place,
as viewed from inside, from the LT baggage compartment.
Here is the magnetometer mount and the F774 aft top skin clecoed in place,
as viewed from inside, from the LT baggage compartment.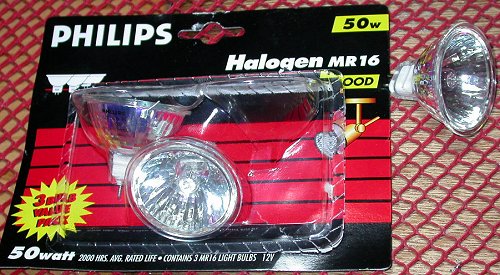 I got
this pack of halogen bulbs at Home Depot. I hooked up one to a 12v
battery. It worked OK, but was VERY bright (more than I'd need, I
think), and at 50w, that's about 4 amps; really a bit much for a simple
cabin light. I think I'll do something with red LEDs.
I got
this pack of halogen bulbs at Home Depot. I hooked up one to a 12v
battery. It worked OK, but was VERY bright (more than I'd need, I
think), and at 50w, that's about 4 amps; really a bit much for a simple
cabin light. I think I'll do something with red LEDs.