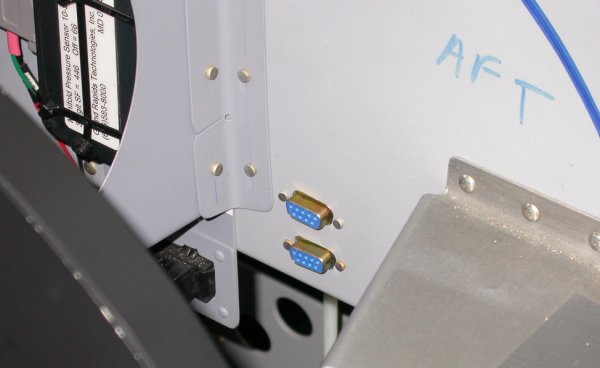
 PC interface ports DB-9 connectors riveted in place on the subpanel.
JULY, 2007 AVIONICS, ELECTRICS, & CONTROLS
July 1 - finished low coolant rewiring, worked on landing and taxi light indicators and switches. 3.0 hr
July 4 - wiring taxi light switch, indicator, and flasher. Install DB-9 connectors for PC ports for Sandia and Dynon. 2.0 hr
PC interface ports DB-9 connectors riveted in place on the subpanel.
July 5 - install remainder of lighting switches onto switches panel, update web 1.5 hr + 1.0 hr doc
July 7 - receive Allied switch order. Install and wire 2TL1-1 DPDT switch for landing light. Lots of distractions keep me from working on the plane as much as I should be. 1.5 hr
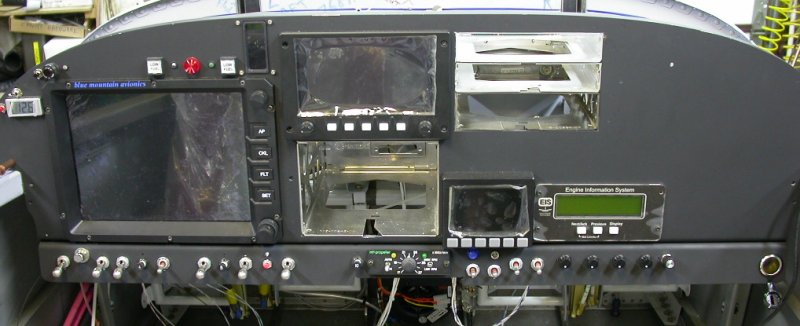 Switches panel is fully populated, with all switches known at this time.
I left room for a few more, in case I overlooked any switches I might later
need. The switches are in groups, from LT to RT; engine control, DC
control, prop control, exterior lighting, interior lighting. Main
panel is also fully populated now, except Garmin instruments are not in
their trays, and I still need to get the trays wired and all the
interconnections. There is also unused panel space on the RT side for
expansion or things I didn't think of yet.
Switches panel is fully populated, with all switches known at this time.
I left room for a few more, in case I overlooked any switches I might later
need. The switches are in groups, from LT to RT; engine control, DC
control, prop control, exterior lighting, interior lighting. Main
panel is also fully populated now, except Garmin instruments are not in
their trays, and I still need to get the trays wired and all the
interconnections. There is also unused panel space on the RT side for
expansion or things I didn't think of yet.
July 13 - gosh, it's been over a week since I worked on the plane. Lots of distractions & other things to do. Received my AMP 69324 crimper after searching ebay for one for a couple YEARS. Tested how it does the crimps on the Waytek parallel connectors. It does a SUPER job; very nice, strong, clean-looking crimps, with less connector distortion than the crimpers I got from Waytek for these terminals. Worked on making longer screws for the landing and taxi light switches where I'll have more than one terminal under the screw. Wired power to taxi and landing light switches. 4.75 hr
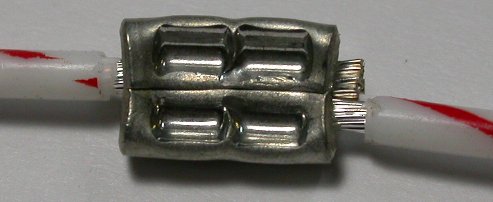 This is the great quality crimp I get on the parallel splice connectors with
the new AMP 69324 crimper. Cover this with dual wall heatshrink and
you've got a bulletproof splice. The AMP crimper should also work well
for the usual PIDG terminals, although I already have a couple good crimpers
for that.
This is the great quality crimp I get on the parallel splice connectors with
the new AMP 69324 crimper. Cover this with dual wall heatshrink and
you've got a bulletproof splice. The AMP crimper should also work well
for the usual PIDG terminals, although I already have a couple good crimpers
for that.
July 14 - checked nav and strobe lights current requirements. Strobe takes about 10a, so I'll use 16ga and a 15a fuse. The nav light takes about 7a, so 18ga and 10a fuse there. Wired nav and strobe lights. Re-tie harness and wire light switches to fuse blocks. Plan junction block for under main floor for lighting wires to wings. 4.75 hr
lighting/wing junction blocks will need:
strobe +, strobe gnd, nav + RT, nav + LT, nav + center, nav gnd RT, nav gnd LT, nav gnd center, landing +, landing gnd, taxi + , taxi gnd (12)
July 15 - Remove instrument panel for access, and wire grounds for taxi/landing light indicators. Reinstall main panel. Clean up bench, and test lighting. Wasted a couple hours troubleshooting why my taxi light/indicator wasn't working right. Very strange symptoms. The indicator LED worked OK, but the lamp wouldn't light. I had 12v at the switch, but it dropped out as soon as I connected the lamp. Eventually figured out it was due to the trick fuses I am using. They will light up when they are blown. I'd installed a blown one, and hadn't noticed it. So, it would provide enough power through the blown fuse's "self indicator" part to light the landing light indicator LED and to show me I had 12v at the switch, but no power for anything else. That's something to remember! 2.75 hr
July 17 - Remove BMA & GRT EFISs for access to wiring harness. .Wire Dynon D-10A EFIS power & ground. Reinstall BMA & GRT EFISs. Test all OK. 1.75 hr
July 18 - wire Dynon EFIS to Dynon PC port 0.25 hr
July 19 - finish wiring Dynon EFIS to PC port. Look at wiring Sandia PC port, but can't find any reference in Sandia manual to a PC port. What other avionics was it that had a DB-9 PC port?? Not the SL-30. I thought it was the Sandia, but apparently not. Oh well, it'll turn up eventually. 2.0 hr
OFF TO AIRVENTURE OSHKOSH!!!
July 28 - back from a week at AirVenture Oshkosh, and trying to get unpacked, reorganized, and back into the swing of things. Lots of fun at OSH. At the RV BBQ, I got to meet several people who've been very friendly and helpful to me; Matt & Sandi Brandes, Doug Reeves, Bob Collins, Darwin Barrie, Walter Tondu, as well as many other nice folks. At AirVenture, I also happened to meet the brother of the person who started the Cavanaugh Museum in Texas.
July 30 - Receive, look over, and test the camlocks order I got from Milspec Products, in a group buy through Van's Air Force. I'm still trying to find out what that other DB-9 PC interface was for. I coulda sworn there were 2 devices that had a PC port, and I thought one was for the Sandia encoder. Oh well, the connector is in, and if I need it, it's there. Because I was in the Sandia manual, I looked at LEDs and switches to use for the Sandia AIM (altitude monitoring & warning feature). I think I'll get some more red & green LEDs for this. 1.25 hr
July 31 - talked to Sandia support to clarify how the AIM lights work. I will need 2 separate LEDs. I was thinking of using one of those red/green LEDs, but I need 2 separate lights. Went to Radio Shack and got a selection of various brightness LEDs for this. In the evening, tested various brightness red & green LEDs for use in my AIM application. 1.0 hr
GO TO AUGUST, 2007 AVIONICS
BACK TO MY RV BUILDER'S HOME
BACK TO BRIAN'S HOME