April 2 - finally got back to
plane - been on vacation in SoCal, dirt biking in the desert, seeing the
sights, visiting The Tonight Show, and enjoying the weather. Trying to
fit the aluminum tubing and cast elbow into the very tight space for air to
get into the supercharger. Dicked around for several hours on that,
finally deciding on a plan and cutting and fitting metal parts to be TIG
welded together. 5.0 hr
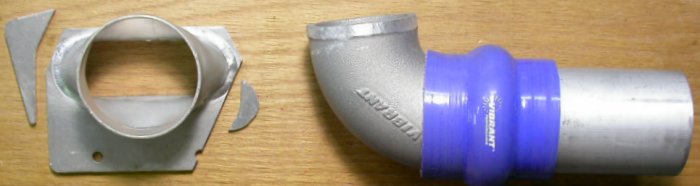
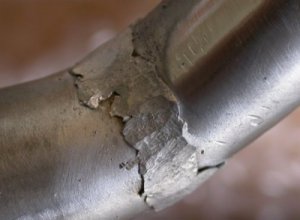
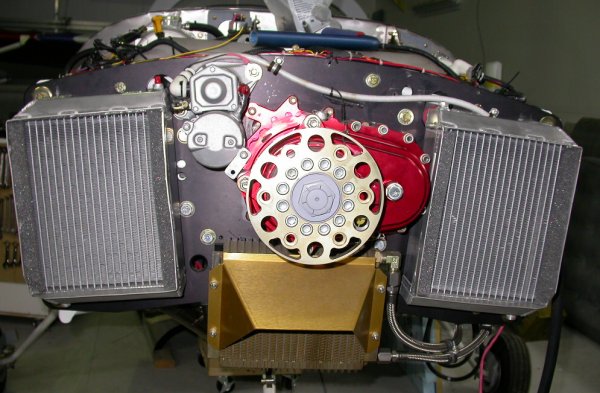
This pic shows the straight "silver" SC inlet adapter that Jan had sent me a
long time ago. While it won't fit onto the supercharger at all (hits
the outboard engine frame rail), its shape is closer to what I need than
either the downward-facing (to clear the outboard engine frame rail) gold
one that came on the engine or the entirely different black one that some
STi owners received. In order to clear the outboard engine frame rail,
it needs to be shifted inboard about 3/4". So, here I've cut
some off the plate on one side and plan to weld it back onto the other side.
The little half moon piece will get welded onto the RT (in pic) portion of
the oval opening, to cover that when the plate is shifted over. The
only problem with all this is that the oval opening then won't really match
the SC opening. I may ditch this idea and fabricate an entirely new
offset inlet adapter that matches the SC inlet. You can also see
where I've ground the lip off the 2.5" cast aluminum elbow. This gets
inserted into the 2.75" round part of the adapter and welded.
I
also have this extensively modified inlet plate from Randy Crothers.
It's about what I need - offset inboard an inch or so - but the round part
tips up and I need it going straight fwd. Also, the round part is 3",
and I'm already down the planning road toward 2.75". For one
thing, I wanted to keep the inlet tubing diameter as small as I could and
still get airflow, to make it easier to thread this tubing through the 3
engine frame rails. I could also modify this one, but I think it's
best if I just make a new one from scratch to fit what I need.
April 3 - dubbed off on web site &
fixing details associated with changing to new domain all day & didn't get
any plane work done.
April 6 - received my new custom
radiators from Mac's Radiators. I can hardly wait to start installing
them. Also ordered aluminum tubing, via UPS 3-Day Select, from
ACS and Burns Stainless, to fabricate the air inlet and for coolant
plumbing. Hoping for Thur delivery. One of the STi owners
on the subenews mail list was talking about how he'd found his
Eggenfellner-supplied alternator to be inadequate and how he'd gotten a
different alternator and fabricated new pulleys and mounts to make that
work. The idea of having to do all that additional work is very
discouraging. I guess I'll stick with the alternator I have, at
least until it fails. People on the subenews list are also talking
about the inadequate exhaust header design, which I had noticed and thought
about early on, but didn't want to open that can of worms, too. Will
the hell of this Eggenfellner engine nightmare never end???
Here
are the new custom radiators from Mac's Radiators. Another $700+ into this bottomless
Eggenfellner pit. I'll start installing them ASAP.
April 7 - went to local welding
shop & got some 3/16" aluminum plate for making new supercharger air inlet.
April 8 - fabricate new
supercharger air inlet plate. Make brackets to mount new radiators.
Fit radiators to plane. Super great engineering job by John Moody!
They fit perfectly, use up all available space, and don't hit anything.
I just need to make some small adjustments to the lower 2 hose fittings, for
a better angle. The quality of Mac's Radiators' beading on the upper 2
hose fittings was TERRIBLE. It looked like they'd tried a couple times
to do it, flattened it & retried it, work-hardening and stress-fracturing
the metal in the process. Removed the flares they left on the ends of
the lower hose fittings. Cut into lower hose fittings for better
angles. 5.0 hr
This is the "bead" put onto one of the upper hose fittings by Mac's
Radiators. Insufficient bead, flared end, stress fractured all around.
The other one was even worse. Here, I've cut off the
flared end and polished it. Massive stress fracturing in the metal along the bead. If I
go around this with my TIG welder, that should fix it and perhaps add some
body to the bead.
The LT lower hose fitting after I cut into it to give it a bit tighter
angle, to better clear one of the engine mount frame tubes. The gap
will be pressed closed, then welded into place
Here's the RT lower hose fitting. It needed to be aimed downward after
going through the engine mount plate. The wedge cut left kind of a
large gap, due to imperfections in my planning & cutting technique.
You can also see here that the bottom hose fittings were properly beaded.
April 9 - Fabricated new inlet
plate. Worked on making and trying to line up parts for new
supercharger air inlet, but things not going well.
3.0 hr
I made this new plate from 3/16" 6061T6.
April 10 - Welded and ground down
welds on radiators' hose fittings. Worked on SC inlet air adapters
5.0 hr
Because it's difficult (at least for me) to fill a gap (see last
Apr 8 pic above)
using TIG welding, I used my aluminum MIG setup to make these welds. I
had the wire feed a bit too high, so I ended up with more fill than planned,
but at least it's all well filled and no burn-through. It really is
better than it looks. I will grind
away the excess aluminum, then TIG weld it.
This is the same fitting, after grinding away the excess aluminum.
Now, I'll take this home and TIG it up nice.
Here are some of the parts I am trying to use to make the supercharger air
inlet adapter. I cut off part of the adapter from Randy (see ring in
upper RT corner), but still didn't like the way it lined up. On the
9th, I had tried to figure out how to weld up a transition from the plate to
the 1" long 2.75" ring in the lower center of the pic, but it just didn't
work out. Finally, I decided the best way is to do it sort of like how
Randy did his. Instead of making an transition, then welding the cast
elbow into that, I will simply weld the elbow directly to the plate, as
shown in the lower RT of pic. Then I will come in at 45 degrees from
the LT of the plate with the 1.5" tubing shown in upper center of pic,
blending it into the elbow similar to how Randy did it.
April 15 - worked on supercharger
air inlet 2.0 hr
To make the parts to go on the new supercharger air inlet adapter plate, I
cut 1.5" aluminum tubing at a 45 degree angle at each end, then split it and
opened it up to fit against the cast aluminum elbow.
Here is the split tubing fitting pretty nicely against the cast elbow.
Funny - once the tubing was split and opened up, the 45 degree cut was no
longer straight. I straightened the plate end of the tubing on a disk
sander, but the curve in the cut at the other end actually fits very nicely
around the cast elbow; better than I could have planned it. There
isn't nearly as much of a gap at the bottom as I expected I'd have to fill.
Here is how it will all fit together on the aluminum plate.
This shows the material to be removed from the elbow.
Here is the elbow, with most of the material removed where it will mate up
against the shaped tubing piece.
April 16 - finished grinding and
shaping opening in cast aluminum elbow. Final fit for shaped tubing &
elbow. MIG welded tubing to elbow.
2.5 hr
April 17 - Disk-sand base of elbow/tubing
combination, fit to air inlet plate, and MIG weld them together.
Received my K&N Apollo air filter/airbox unit. It's HUGE, and
it's also made of PLASTIC! Not a pleasant surprise. Will
let others on subenews know about it, as I think several others there were
ordering this. Emailed Mac's Radiators about quality problems.
Randy also emailed Mac's about quality problems with his beads (not as
bad as mine) and with problems with general weld quality (Randy's a
professional welder, so he ought to know). No response from
Mac's to either email.
0.5 hr
Here's the supercharger inlet air adapter, all welded up. I'll go over
the welds with the TIG at home to clean them up. The elbow is pointing
slightly down, at just the right angle to clear the engine frame tubes and
the coolant line.
This is the
K&N Apollo air filter. It's about 7" long (without any of the plastic
adapters). It's made of a shiny, hard plastic, which I suspect
may be susceptible to breaking, cracking, and/or melting from the engine
heat under the cowl. I'd assumed this was anodized aluminum.
What was K&N thinking? I believe the answer is "profit".
It's also
about 7" in diameter
view from the
other end
quite a
handful to stuff in under the cowl somewhere - I may well ditch this, get an
oval filter, and fabricate my own airbox from sheet aluminum.
Then, there's
another cheap plastic piece that slips onto the intake end, making the whole
thing about 9.5 inches long. This also then makes the inlet and outlet
2.75" diameter.
This is the
box it came in.
April 19 - TIG welded supercharger inlet air
adapter, cuts & bends on both radiators' lower hose fittings, and bead
fractures on both radiators' upper hose fittings.
2.5 hr
April 21 - finish TIG welding one
of the bad radiator hose fitting beads. They seem fine now.
0.5 hr
April 22 - at hangar, I don't see
how the K&N Apollo airbox is going to work - it's such a large diameter,
plus the plastic means I can't put it near the exhaust. I need
something metal and that is shorter and wider, to fit under the cowl.
I think I'll have to fabricate a custom airbox, and get a different filter -
probably an oval one. Fit radiators and supercharger. Grind
inlet air adapter and file plate, as it isn't perfectly flat.
1.0 hr
More quality problems with Mac's Radiators - Randy reported
that 2 of his sensor/venting bungs had been totally mangled in the
fabrication process. Instead of cutting the bad ones out and welding
new ones in, Mac's apparently just put a bushing and o-ring into the mangled
threads of the bung. Randy reports it isn't a tight fit and he,
rightfully, doesn't trust it. My bungs seem OK. Also,
Mac's hasn't bothered to respond to the emails both Randy and I have sent
them about the shoddy quality of some aspects of the work on the
radiators.
Refer back to the April 10 pic for what this looked
like before rewelding it with the TIG.
And this is what the bead looks like now, after TIG welding up the badly
stress-fractured bead produced by Mac's Radiators. See
April 8 pic for the "before".
This shows the new radiators set into place. Great engineering & planning by
John Moody! Perfect fit.
This pic shows how I tightened the angle on the LT radiator hose fitting, so
it's parallel with the engine frame tube it's so close to. The end of
the fitting had been right up next to the tube and would have been a fit problem
with the hose.
This is the reworked hose fitting on the RT radiator. It points
downward, so it's aimed at the hose from the water pump housing. The
end of the hose is the little blue & red in the LT center of the pic.
You can also see the mounted supercharger inlet air adapter in the lower LT
of the pic. Great fit, aimed perfectly between the engine tubes.
The only problem with it is that the plate doesn't fit great to the
supercharger, so I'll fix that. The plate either didn't start off
perfectly flat, or it got warped a bit in the welding. Easy
enough to fix; just weld some more material on the low part & mill it smooth
& flat.
April 23 - Fit radiators
and radiator tubing. I made a 90 degree fitting for the LT side
plumbing, to go with the one
salvaged from the Eggenfellner plumbing, but it doesn't look like it will
flow very well. Inquired about it on subenews list; consensus is
that Egg's 1" diameter is already marginal (big surprise), so best to not
restrict flow by making a hard 90 degree turn. Add more MIG weld
metal to part of supercharger inlet air plate surface so I can machine it
flat. File down the high spots. 4.0 hr
In order to reuse one of Egg's 90 degree pieces, I'd have had to do another
90 degree turn to make the dogleg, plus it needs to go off to the RT 45
degrees. Much better to ditch all this and do it with two 45s.
April 24 - worked on plane a
little. Made remaining brackets to attach radiators and started
fitting them. Ordered 4 pieces of 45 degree mandrel bent 1" aluminum
tubing from
Columbia River Mandrel Bending for my radiator plumbing.
They had 45s in 1", which Burns Stainless did not, and their prices are less
than half Burns'. Also ordered K&N RU-1830 oval air filter from
Amazon. When I get it, I'll make sure it's going to work better than
the Apollo, then return the Apollo. 0.5 hr
Took Challenger out flying
twice; at noon and in the evening. Today was the first time in about 7
months that the temperature has hit the 70s, and it was clear, calm, and
beautiful, so lots of people out flying.
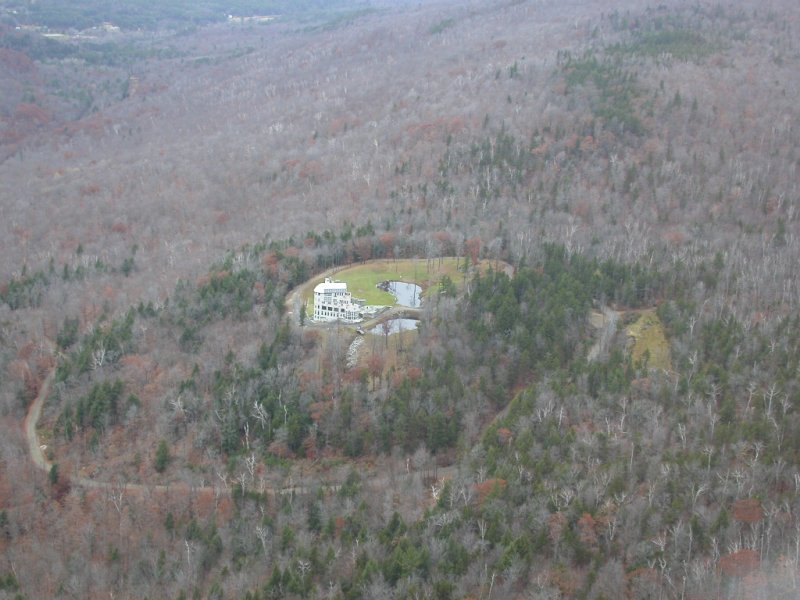
HERE is a pic of someone's castle on the
ridge west of the airport.
Randy had the mangled
sensor/vent bungs cut out of his radiators and new ones welded in. No
response from Mac's Radiators on our complaints about quality.
April 26 - more TIG cleanup of
MIG welds and filling voids on supercharger mating surface of the inlet air
adapter plate. It was going to be too much trouble to mount it to my
mill, due to its odd shape, so I mostly filed the plate's mounting surface
flat with a vixen file, then held it up to my 12" disk sander, for the final
flat finish. I've got so much labor into this thing by now it's
becoming a work of art. I should frame it and put it up on the wall!
1.5 hr
April 27 - received my 1" 45
degree mandrel bent alum tubing from
Columbia
River Mandrel Bending. Great service, considering this is Mon AM &
I ordered them Friday afternoon and shipping was only $14. Very well
packed, too.
April 29 - fit & drill radiator
mount brackets, final-mount radiators. Installed all coolant plumbing
for RT radiator - one of the 45 degree pieces I got worked very well as-is.
Worked to 0200 on that and trying to line up coolant lines for LT radiator.
Also went out flying twice; once at noon and once in the evening.
Noon flight was pretty hairy - winds high single digits & gusting to 15; my
personal max and for good reason - bounced around a lot. Wild landing
approach. Evening flight smooth as silk with perfect landing.
6.5 hr
New radiators completely mounted. Upper hoses installed.
April 30 - more work on LT
radiator lower coolant plumbing - trying various options. I re-routed
Eggenfellner's coolant lines layout, to make sure I can change oil filter
without any interference from coolant lines.
4.5 hr
Lots of talk on the subenews list these days about the propellers
Eggenfellner was supposed to deliver with the 6 cylinder engines. Some people have paid for
their prop over 2 years ago, and are still waiting for a prop. Everyone
seems to be getting lots of (the usual) double-talk from Eggenfellner on it.
time to go to the MAY, 2009 page of
the never-ending engine saga
 This pic shows the straight "silver" SC inlet adapter that Jan had sent me a
long time ago. While it won't fit onto the supercharger at all (hits
the outboard engine frame rail), its shape is closer to what I need than
either the downward-facing (to clear the outboard engine frame rail) gold
one that came on the engine or the entirely different black one that some
STi owners received. In order to clear the outboard engine frame rail,
it needs to be shifted inboard about 3/4". So, here I've cut
some off the plate on one side and plan to weld it back onto the other side.
The little half moon piece will get welded onto the RT (in pic) portion of
the oval opening, to cover that when the plate is shifted over. The
only problem with all this is that the oval opening then won't really match
the SC opening. I may ditch this idea and fabricate an entirely new
offset inlet adapter that matches the SC inlet. You can also see
where I've ground the lip off the 2.5" cast aluminum elbow. This gets
inserted into the 2.75" round part of the adapter and welded.
This pic shows the straight "silver" SC inlet adapter that Jan had sent me a
long time ago. While it won't fit onto the supercharger at all (hits
the outboard engine frame rail), its shape is closer to what I need than
either the downward-facing (to clear the outboard engine frame rail) gold
one that came on the engine or the entirely different black one that some
STi owners received. In order to clear the outboard engine frame rail,
it needs to be shifted inboard about 3/4". So, here I've cut
some off the plate on one side and plan to weld it back onto the other side.
The little half moon piece will get welded onto the RT (in pic) portion of
the oval opening, to cover that when the plate is shifted over. The
only problem with all this is that the oval opening then won't really match
the SC opening. I may ditch this idea and fabricate an entirely new
offset inlet adapter that matches the SC inlet. You can also see
where I've ground the lip off the 2.5" cast aluminum elbow. This gets
inserted into the 2.75" round part of the adapter and welded.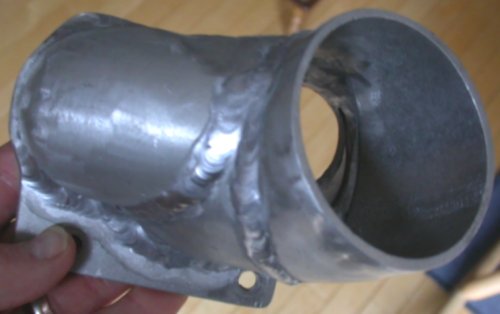 I
also have this extensively modified inlet plate from Randy Crothers.
It's about what I need - offset inboard an inch or so - but the round part
tips up and I need it going straight fwd. Also, the round part is 3",
and I'm already down the planning road toward 2.75". For one
thing, I wanted to keep the inlet tubing diameter as small as I could and
still get airflow, to make it easier to thread this tubing through the 3
engine frame rails. I could also modify this one, but I think it's
best if I just make a new one from scratch to fit what I need.
I
also have this extensively modified inlet plate from Randy Crothers.
It's about what I need - offset inboard an inch or so - but the round part
tips up and I need it going straight fwd. Also, the round part is 3",
and I'm already down the planning road toward 2.75". For one
thing, I wanted to keep the inlet tubing diameter as small as I could and
still get airflow, to make it easier to thread this tubing through the 3
engine frame rails. I could also modify this one, but I think it's
best if I just make a new one from scratch to fit what I need.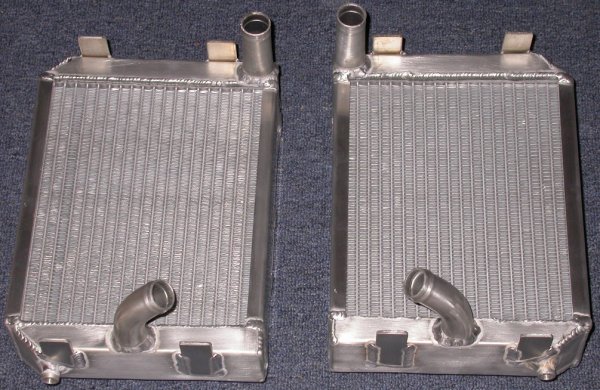 Here
are the new custom radiators from Mac's Radiators. Another $700+ into this bottomless
Eggenfellner pit. I'll start installing them ASAP.
Here
are the new custom radiators from Mac's Radiators. Another $700+ into this bottomless
Eggenfellner pit. I'll start installing them ASAP.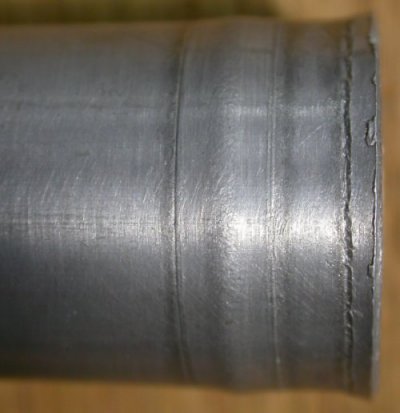 This is the "bead" put onto one of the upper hose fittings by Mac's
Radiators. Insufficient bead, flared end, stress fractured all around.
This is the "bead" put onto one of the upper hose fittings by Mac's
Radiators. Insufficient bead, flared end, stress fractured all around.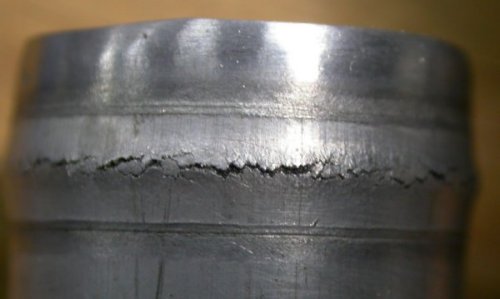 The other one was even worse. Here, I've cut off the
flared end and polished it. Massive stress fracturing in the metal along the bead. If I
go around this with my TIG welder, that should fix it and perhaps add some
body to the bead.
The other one was even worse. Here, I've cut off the
flared end and polished it. Massive stress fracturing in the metal along the bead. If I
go around this with my TIG welder, that should fix it and perhaps add some
body to the bead. The LT lower hose fitting after I cut into it to give it a bit tighter
angle, to better clear one of the engine mount frame tubes. The gap
will be pressed closed, then welded into place
The LT lower hose fitting after I cut into it to give it a bit tighter
angle, to better clear one of the engine mount frame tubes. The gap
will be pressed closed, then welded into place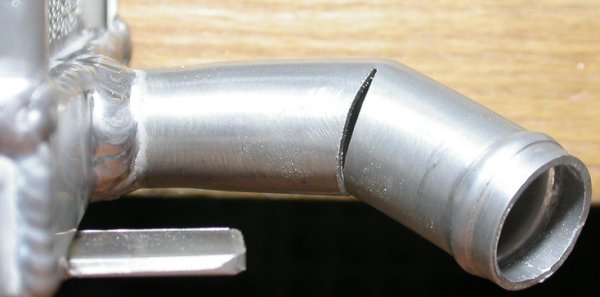 Here's the RT lower hose fitting. It needed to be aimed downward after
going through the engine mount plate. The wedge cut left kind of a
large gap, due to imperfections in my planning & cutting technique.
You can also see here that the bottom hose fittings were properly beaded.
Here's the RT lower hose fitting. It needed to be aimed downward after
going through the engine mount plate. The wedge cut left kind of a
large gap, due to imperfections in my planning & cutting technique.
You can also see here that the bottom hose fittings were properly beaded.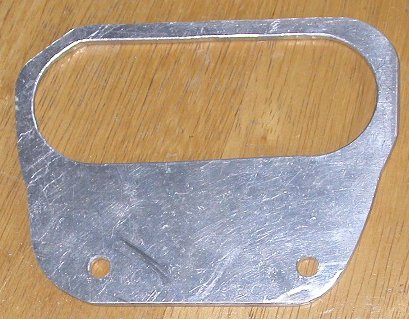 I made this new plate from 3/16" 6061T6.
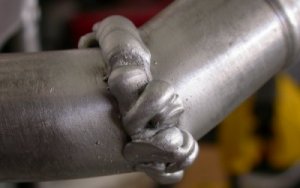 Because it's difficult (at least for me) to fill a gap (see last
 This is the same fitting, after grinding away the excess aluminum.
Now, I'll take this home and TIG it up nice.
This is the same fitting, after grinding away the excess aluminum.
Now, I'll take this home and TIG it up nice.  Here are some of the parts I am trying to use to make the supercharger air
inlet adapter. I cut off part of the adapter from Randy (see ring in
upper RT corner), but still didn't like the way it lined up. On the
9th, I had tried to figure out how to weld up a transition from the plate to
the 1" long 2.75" ring in the lower center of the pic, but it just didn't
work out. Finally, I decided the best way is to do it sort of like how
Randy did his. Instead of making an transition, then welding the cast
elbow into that, I will simply weld the elbow directly to the plate, as
shown in the lower RT of pic. Then I will come in at 45 degrees from
the LT of the plate with the 1.5" tubing shown in upper center of pic,
blending it into the elbow similar to how Randy did it.
Here are some of the parts I am trying to use to make the supercharger air
inlet adapter. I cut off part of the adapter from Randy (see ring in
upper RT corner), but still didn't like the way it lined up. On the
9th, I had tried to figure out how to weld up a transition from the plate to
the 1" long 2.75" ring in the lower center of the pic, but it just didn't
work out. Finally, I decided the best way is to do it sort of like how
Randy did his. Instead of making an transition, then welding the cast
elbow into that, I will simply weld the elbow directly to the plate, as
shown in the lower RT of pic. Then I will come in at 45 degrees from
the LT of the plate with the 1.5" tubing shown in upper center of pic,
blending it into the elbow similar to how Randy did it.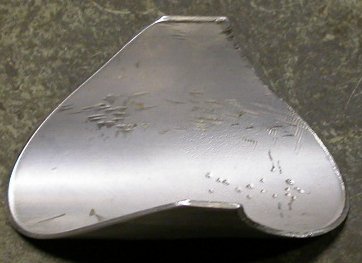 To make the parts to go on the new supercharger air inlet adapter plate, I
cut 1.5" aluminum tubing at a 45 degree angle at each end, then split it and
opened it up to fit against the cast aluminum elbow.
To make the parts to go on the new supercharger air inlet adapter plate, I
cut 1.5" aluminum tubing at a 45 degree angle at each end, then split it and
opened it up to fit against the cast aluminum elbow.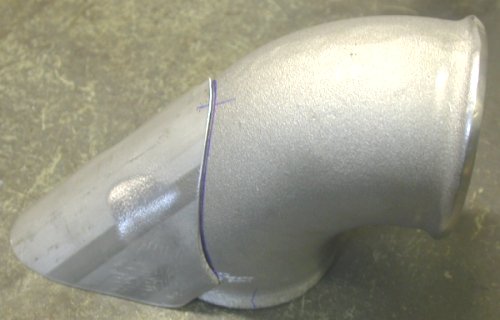 Here is the split tubing fitting pretty nicely against the cast elbow.
Funny - once the tubing was split and opened up, the 45 degree cut was no
longer straight. I straightened the plate end of the tubing on a disk
sander, but the curve in the cut at the other end actually fits very nicely
around the cast elbow; better than I could have planned it. There
isn't nearly as much of a gap at the bottom as I expected I'd have to fill.
Here is the split tubing fitting pretty nicely against the cast elbow.
Funny - once the tubing was split and opened up, the 45 degree cut was no
longer straight. I straightened the plate end of the tubing on a disk
sander, but the curve in the cut at the other end actually fits very nicely
around the cast elbow; better than I could have planned it. There
isn't nearly as much of a gap at the bottom as I expected I'd have to fill.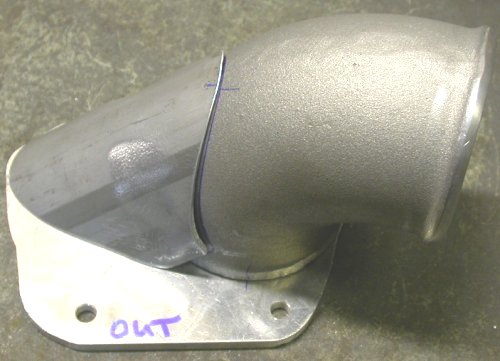 Here is how it will all fit together on the aluminum plate.
 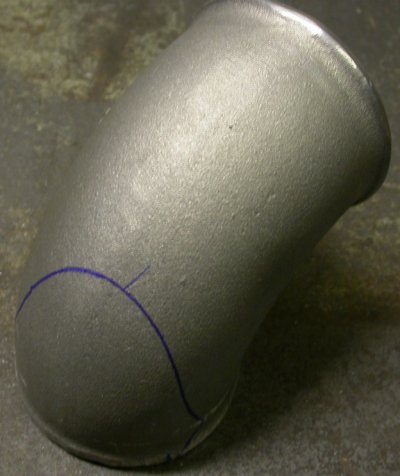 This shows the material to be removed from the elbow.
 Here is the elbow, with most of the material removed where it will mate up
against the shaped tubing piece.
Here is the elbow, with most of the material removed where it will mate up
against the shaped tubing piece.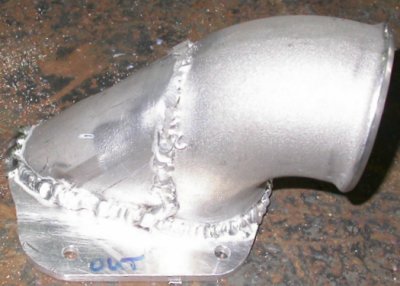 Here's the supercharger inlet air adapter, all welded up. I'll go over
the welds with the TIG at home to clean them up. The elbow is pointing
slightly down, at just the right angle to clear the engine frame tubes and
the coolant line.
Here's the supercharger inlet air adapter, all welded up. I'll go over
the welds with the TIG at home to clean them up. The elbow is pointing
slightly down, at just the right angle to clear the engine frame tubes and
the coolant line. This is the
K&N Apollo air filter. It's about 7" long (without any of the plastic
adapters). It's made of a shiny, hard plastic, which I suspect
may be susceptible to breaking, cracking, and/or melting from the engine
heat under the cowl. I'd assumed this was anodized aluminum.
What was K&N thinking? I believe the answer is "profit".
This is the
K&N Apollo air filter. It's about 7" long (without any of the plastic
adapters). It's made of a shiny, hard plastic, which I suspect
may be susceptible to breaking, cracking, and/or melting from the engine
heat under the cowl. I'd assumed this was anodized aluminum.
What was K&N thinking? I believe the answer is "profit". It's also
about 7" in diameter
It's also
about 7" in diameter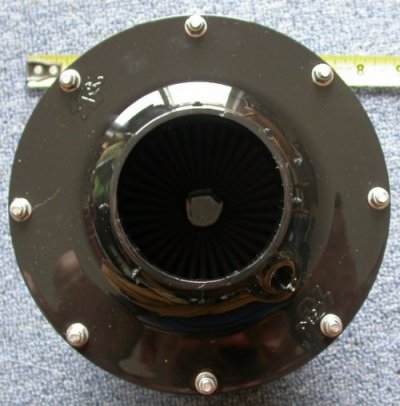 view from the
other end
view from the
other end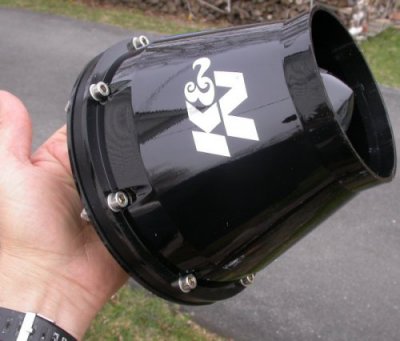 quite a
handful to stuff in under the cowl somewhere - I may well ditch this, get an
oval filter, and fabricate my own airbox from sheet aluminum.
quite a
handful to stuff in under the cowl somewhere - I may well ditch this, get an
oval filter, and fabricate my own airbox from sheet aluminum. 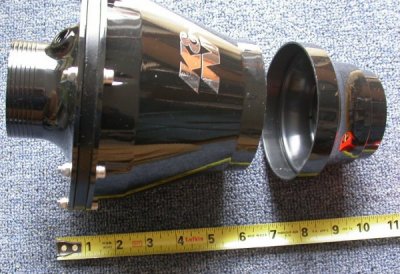 Then, there's
another cheap plastic piece that slips onto the intake end, making the whole
thing about 9.5 inches long. This also then makes the inlet and outlet
2.75" diameter.
Then, there's
another cheap plastic piece that slips onto the intake end, making the whole
thing about 9.5 inches long. This also then makes the inlet and outlet
2.75" diameter.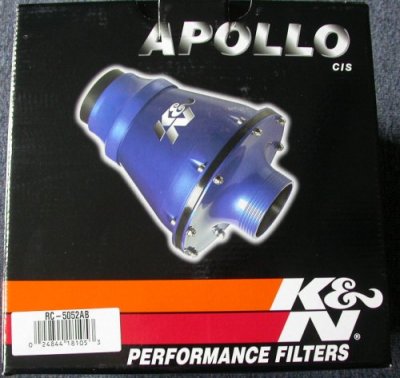 This is the
box it came in.
This is the
box it came in.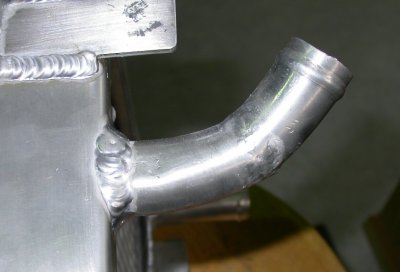 Refer back to the
 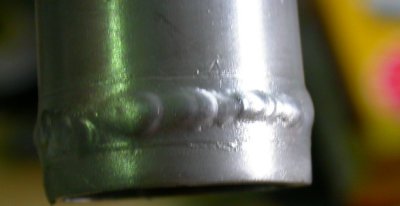 And this is what the bead looks like now, after TIG welding up the badly
stress-fractured bead produced by Mac's Radiators. See
And this is what the bead looks like now, after TIG welding up the badly
stress-fractured bead produced by Mac's Radiators. See
 This shows the new radiators set into place. Great engineering & planning by
John Moody! Perfect fit.
This shows the new radiators set into place. Great engineering & planning by
John Moody! Perfect fit.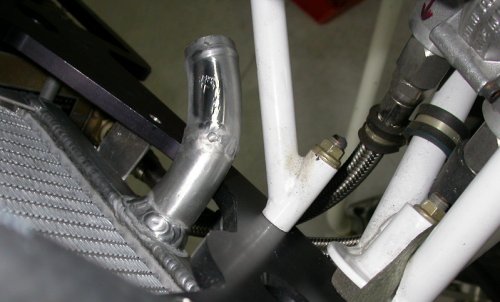 This pic shows how I tightened the angle on the LT radiator hose fitting, so
it's parallel with the engine frame tube it's so close to. The end of
the fitting had been right up next to the tube and would have been a fit problem
with the hose.
This pic shows how I tightened the angle on the LT radiator hose fitting, so
it's parallel with the engine frame tube it's so close to. The end of
the fitting had been right up next to the tube and would have been a fit problem
with the hose.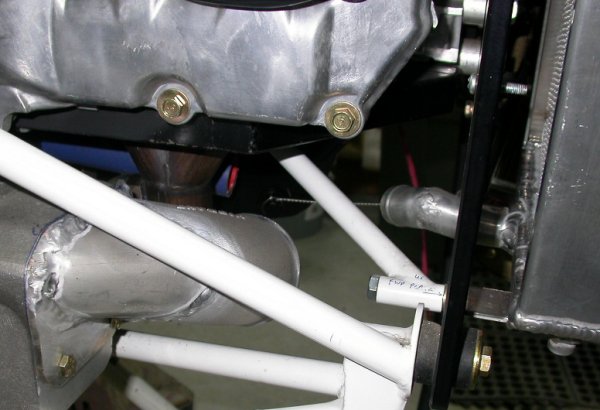 This is the reworked hose fitting on the RT radiator. It points
downward, so it's aimed at the hose from the water pump housing. The
end of the hose is the little blue & red in the LT center of the pic.
You can also see the mounted supercharger inlet air adapter in the lower LT
of the pic. Great fit, aimed perfectly between the engine tubes.
The only problem with it is that the plate doesn't fit great to the
supercharger, so I'll fix that. The plate either didn't start off
perfectly flat, or it got warped a bit in the welding. Easy
enough to fix; just weld some more material on the low part & mill it smooth
& flat.
This is the reworked hose fitting on the RT radiator. It points
downward, so it's aimed at the hose from the water pump housing. The
end of the hose is the little blue & red in the LT center of the pic.
You can also see the mounted supercharger inlet air adapter in the lower LT
of the pic. Great fit, aimed perfectly between the engine tubes.
The only problem with it is that the plate doesn't fit great to the
supercharger, so I'll fix that. The plate either didn't start off
perfectly flat, or it got warped a bit in the welding. Easy
enough to fix; just weld some more material on the low part & mill it smooth
& flat.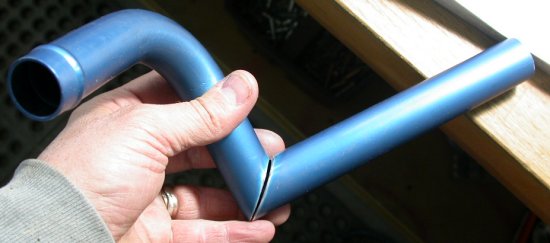 In order to reuse one of Egg's 90 degree pieces, I'd have had to do another
90 degree turn to make the dogleg, plus it needs to go off to the RT 45
degrees. Much better to ditch all this and do it with two 45s.
In order to reuse one of Egg's 90 degree pieces, I'd have had to do another
90 degree turn to make the dogleg, plus it needs to go off to the RT 45
degrees. Much better to ditch all this and do it with two 45s.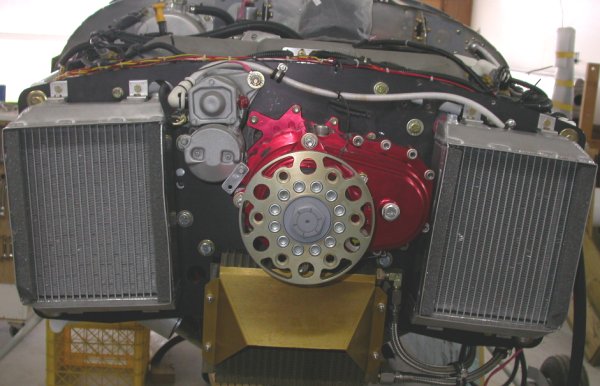 New radiators completely mounted. Upper hoses installed.
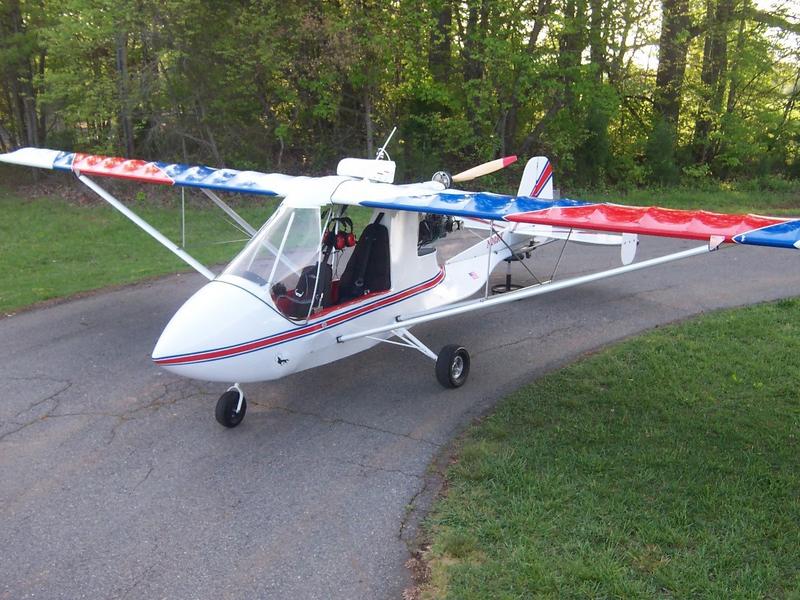