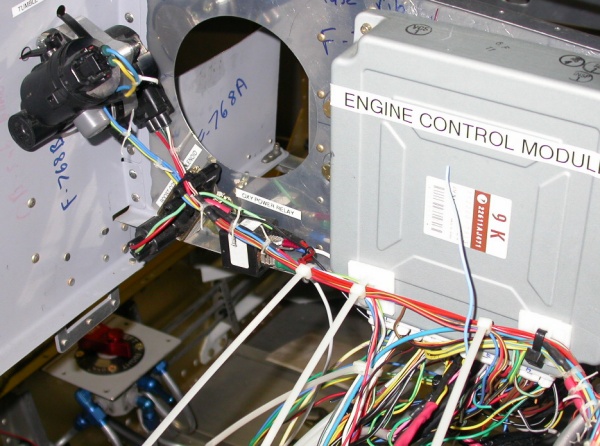
 This pic shows the other ECM leads and the various "other" components, all
installed and their wires cut to length and neatly tied.
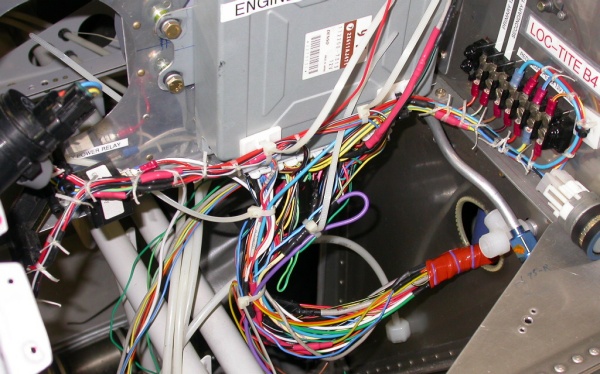
This pic shows the other ECM leads and the various "other" components, all
installed and their wires cut to length and neatly tied.ENGINE WORK June, 2006
June 2 - ordered solenoid valve from Canton Racing Products. They said I can return it OK if it just isn't going to work. Did some research on bulbs for indicators I already have, and worked on more wiring and splicing. 4.5 hr
June 3 - more untangling, wiring, splicing of engine harness. Wiring up engine sensor connectors. Finally got the harness through the firewall pretty well straightened out and ready to start enclosing it. 7.5 hr
This pic shows the other ECM leads and the various "other" components, all
installed and their wires cut to length and neatly tied.
June 4 - use silicone tape to wrap engine wiring harness through the firewall. Removed fuel pressure regulator assembly to make it easier. Spent time securing FWF side of harness and trying to figure out how to properly seal the 2.125" hole I have in the firewall. The nylon and rubber bushing (P/N NMCS45A-13), recommended by the manual, is NOT designed for use on a firewall, and will provide no protection at all. I also noticed, as I was wiring up the various sensors on the engine, that the inlet air temp probe is not going to work well where it is - in the RT radiator inlet. No wonder people are having mixture problems. I emailed Jan to confirm this & to see why it shouldn't be located at the intercooler outlet. 3.0 hr
 This shows the aft half of the wrapped harness going out through the
firewall to the engine. As you can see, the rest of the harness is all
now a nice neat bundle, with all the wires going in the same direction.
It sure took a lot of work to get it like this! Some of the remaining
wires go over to the LT side of the engine, and some are going to the
instrument panel.
This shows the aft half of the wrapped harness going out through the
firewall to the engine. As you can see, the rest of the harness is all
now a nice neat bundle, with all the wires going in the same direction.
It sure took a lot of work to get it like this! Some of the remaining
wires go over to the LT side of the engine, and some are going to the
instrument panel.
 This is the fwd part of the harness, wrapped nice and tight with silicone
tape. With the harness wrapped tight like this, it's as stiff as a
piece of metal (good). I moved the fuel pressure regulator and its
plumbing out of the way to make this job easier. The harness will be
secured to the coolant where it passes by the tank.
This is the fwd part of the harness, wrapped nice and tight with silicone
tape. With the harness wrapped tight like this, it's as stiff as a
piece of metal (good). I moved the fuel pressure regulator and its
plumbing out of the way to make this job easier. The harness will be
secured to the coolant where it passes by the tank.
June 5 - Got my Canton order, for the solenoid valve for the wastegate. A few minutes of testing revealed that it is not going to work. It has 1/2" NPT ports, but the orifice that is valved must be very tiny, as I cold barely blow through it when the valve was opened. Packaged that back up to return to Canton.
June 6 - put together an order for stuff at ACS 0.5 hr
June 7 - placed ACS order, called Waytek again about the order they screwed up.
June 8 - Jan confirmed the IAT probe should be moved to the intercooler outlet. It's surprising that no one has ever noticed before that it should not be at the radiator inlet on a supercharged application. Also exchanging emails on Eggenfellner list about Jan's new recommendation that we swap the aluminum belt guide rail on the supercharger drive pulley for a stronger, slightly taller stainless steel one. Trying 3rd attempt for Waytek to get my order right. I had ordered some dual wall heatshrink from them. They sent me single wall. Fortunately I caught that error. For the replacement order, they sent me dual wall heatshrink, but the wrong color, diameter, and length. Maybe they can get it right on the third attempt. Study electrical chapter in Eggenfellner manual. 0.5 hr
June 10 - start moving IAT sensor 1.75 hr
 I removed the port cover I had made for the unused port at the intercooler
outlet, put a big hole in the center of it, and glued the grommet into it
with hi-tempRTV. Jan later caught this, and recommended that we not
attempt to mount the IAT probe in a pressurized environment using this
grommet.
I removed the port cover I had made for the unused port at the intercooler
outlet, put a big hole in the center of it, and glued the grommet into it
with hi-tempRTV. Jan later caught this, and recommended that we not
attempt to mount the IAT probe in a pressurized environment using this
grommet.
June 11 - clean up tools & supplies. Pondering how to make a good secure, fireproof firewall passthru for the engine wiring harness. Decided on a design & started fabricating it. Mickey Coggins had a good idea, but I already did my harness and connectors passing through the firewall, so too late to use that idea. But my idea is a basic 2-piece version of the same idea. 4.5 hr
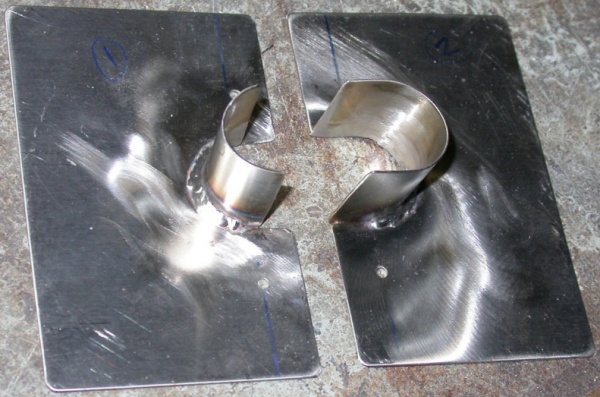
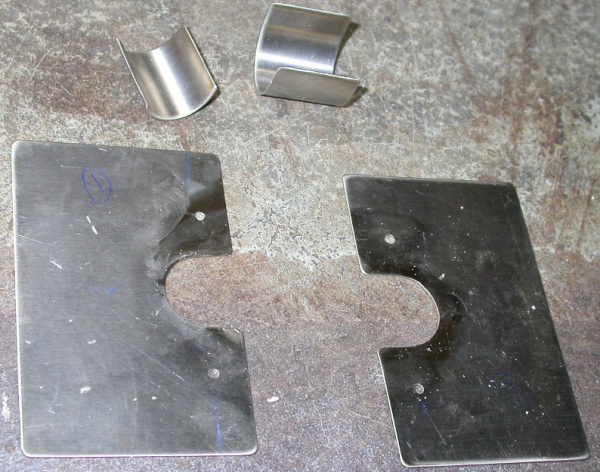 Here are the parts I made up, using stainless steel sheet a bit thicker than
the firewall, to make a passthru that I can use with a wiring harness that's
already in place. I will send them out to be welded together into 2
interlocking pieces. I'll put up a pic of the completed pieces when I
get them back from the welder.
Here are the parts I made up, using stainless steel sheet a bit thicker than
the firewall, to make a passthru that I can use with a wiring harness that's
already in place. I will send them out to be welded together into 2
interlocking pieces. I'll put up a pic of the completed pieces when I
get them back from the welder.
June 12 - reworking IAT probe to be a hard mount, rather than reusing the grommet mount that was used when it was in the radiator inlet. Had to create a new port cover, as I'd already cut out a large hole in the one I'd made, to put in the grommet. Jan says that, because of the pressure, he does not recommend using the grommet mount. Came up with something that definitely isn't going anywhere. Initially made it to be riveted on, then decided to use #4 screws, because it's too difficult to get anything in there to squeeze the rivets. That also makes it easier to replace it, if I should need to. 1.5 hr
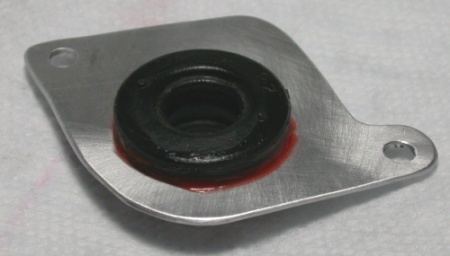
 This is the solid mount for the IAT probe. Four #4 screws hold it in
place, and it's sealed with hi-temp RTV. Also just to record the part
number of this probe before I started drilling holes in it where the part
number was printed, it is 11E14 170400-6020
This is the solid mount for the IAT probe. Four #4 screws hold it in
place, and it's sealed with hi-temp RTV. Also just to record the part
number of this probe before I started drilling holes in it where the part
number was printed, it is 11E14 170400-6020
 Here is the Inlet Air Temp probe, in a solid mount to a new port cover plate
I made. It used four s/s #4 screws that have a nylon locking device built
into the side of the screw. So, they don't look like locking nuts, but
they are locked in.
Here is the Inlet Air Temp probe, in a solid mount to a new port cover plate
I made. It used four s/s #4 screws that have a nylon locking device built
into the side of the screw. So, they don't look like locking nuts, but
they are locked in.
June 13 - finish mounting and sealing IAT probe to new port plate. 0.5 hr
 Even though the 4 screws holding the IAT probe onto the plate have nylon
locks, it would REALLY suck to lose a nut off one of them, because the nut
would instantly be sucked into the engine. So, I also used hi-temp RTV
and further glued all 4 screws, nuts, and the IAT probe together. The
RTV is also pressed into the recesses in the probe (note them on previous
pic). No way can a nut come off and get into the engine with this
setup. After this cures several days, I will reinstall the cover plate
and wire up the sensor.
Even though the 4 screws holding the IAT probe onto the plate have nylon
locks, it would REALLY suck to lose a nut off one of them, because the nut
would instantly be sucked into the engine. So, I also used hi-temp RTV
and further glued all 4 screws, nuts, and the IAT probe together. The
RTV is also pressed into the recesses in the probe (note them on previous
pic). No way can a nut come off and get into the engine with this
setup. After this cures several days, I will reinstall the cover plate
and wire up the sensor.
June 14 - Update web site 4.0 hr doc
June 15 - pick up welded firewall passthru. Work on fitting it to firewall & harness. Looks like it will work great. 0.5 hr
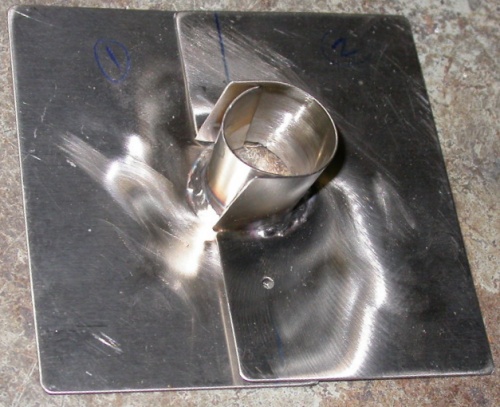
 These are the 2 pieces I had welded. The ID is a little under 3/4". The 2
halves will go over the engine wiring harness that is already in place, and
will overlap each other. The harness will get extra protection where
it goes through here. Then the longer tabs will be bent over the
shorter ones some, and held in place with a hose clamp. Firesleeve
will be clamped over all that and the harness. And the metal
will be sealed to the firewall and to the harness with hi-temp RTV.
These are the 2 pieces I had welded. The ID is a little under 3/4". The 2
halves will go over the engine wiring harness that is already in place, and
will overlap each other. The harness will get extra protection where
it goes through here. Then the longer tabs will be bent over the
shorter ones some, and held in place with a hose clamp. Firesleeve
will be clamped over all that and the harness. And the metal
will be sealed to the firewall and to the harness with hi-temp RTV.
 This is what it will look like when it is overlapped and mounted to the
firewall, covering the existing big hole I had to make to get all the ECM
connectors through it. Note that the outer one is not welded all the
way to the end of the metal. This way, after it's installed, I squeeze
the outer tabs around the inner piece.
This is what it will look like when it is overlapped and mounted to the
firewall, covering the existing big hole I had to make to get all the ECM
connectors through it. Note that the outer one is not welded all the
way to the end of the metal. This way, after it's installed, I squeeze
the outer tabs around the inner piece.
June 16 - wrap more of the engine wiring harness in silicone tape. That stuff works great! Match-drill passthru fitting to firewall. Drilling stainless steel sucks! Install and seal harness passthru. 2.5 hr
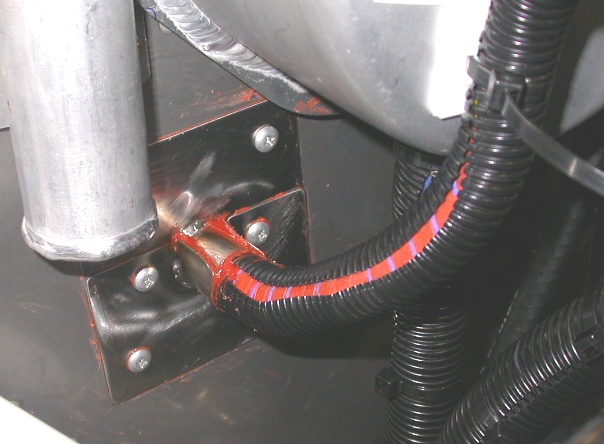 Here is the firewall passthru installed. I used plenty of hi-temp RTV
to seal everything. After installing the 2 plates, I squeezed the
outer ring in around the inner ring. All this then got covered later
with another layer of the next size larger corrugated tubing. I
am using DOUBLE coverage of corrugated tubing over everything in or near the
plane of the SC belt. If the SC belt breaks or comes off, I don't want
it taking anything out with it. The 2 coolant hoses in the lower LT of
the pic are done in 2 layers of corrugated tubing.
Here is the firewall passthru installed. I used plenty of hi-temp RTV
to seal everything. After installing the 2 plates, I squeezed the
outer ring in around the inner ring. All this then got covered later
with another layer of the next size larger corrugated tubing. I
am using DOUBLE coverage of corrugated tubing over everything in or near the
plane of the SC belt. If the SC belt breaks or comes off, I don't want
it taking anything out with it. The 2 coolant hoses in the lower LT of
the pic are done in 2 layers of corrugated tubing.
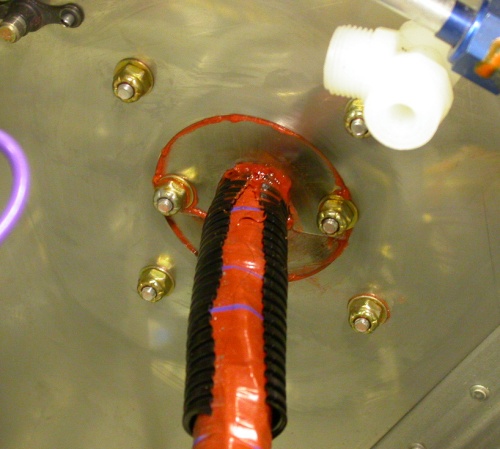 And here is the aft side view of the passthru. The harness is slightly
larger here than fwd of the firewall, so this 5/8" tubing doesn't fully
cover it. But it's less critical aft of the firewall, and I can always
add a second layer of larger tubing on top, if I choose to.
And here is the aft side view of the passthru. The harness is slightly
larger here than fwd of the firewall, so this 5/8" tubing doesn't fully
cover it. But it's less critical aft of the firewall, and I can always
add a second layer of larger tubing on top, if I choose to.
June 18 - cleanup shop, install more corrugated conduit onto wiring harness. Work on wires to IAT probe. Lots of screwing around, trying to get that just right. Then, more harness securing. 3.5 hr
June 19 - Finish securing IAT probe wiring. More wiring and tubing securing. Make silicone tubing buffers for air inlet duct. Reinstall and secure fuel pressure regulator and its plumbing. Install corrugated split tubing onto fuel hose and vacuum line to fuel pressure regulator. 2.5 hr
June 20 - Confirmed via Eggenfellner list that wiring to battery is #6 shown in manual, not #2 supplied in Van's Basic Wiring Kit. Everyone says #6 is fine. Placed order with SteinAir for #6 and #8 wiring and related terminals and parts. Continue putting split tubing onto LT side fuel lines. Install & torque Andair fuel selector valve plumbing nuts. 2.75 hr
June 21 - Finish Andair valve setup. Start fuel pumps wiring. 0.5 hr
June 22 - finished wiring up fuel pumps. Tested heater wires & current draw. Decided to use 18AWG wire 1.75 hr
|
COLOR |
SPEED |
AMPS |
|
orange |
hi |
3a |
|
red (to purple) |
med |
2.5a |
|
yellow |
low |
2a |
June 25 - clean up, finish wiring up heater, organize wires 2.25 hr
June 28 - secure heater & fuel pumps wiring, secure fuel line from pumps to filter 0.75 hr
June 30 - Jan generously offered to weld up my supercharger pulley for me if I'd send it to him, so I started removing that. Remove and pack SC pulley for shipping. While the SC pulley and intercooler are off, now is a GREAT time to do the wiring to the oil pressure and temp sensors, and to put the split tubing onto the coolant lines to the heater. 2.0 hr
GO TO JULY, 2006 ENGINE
BACK TO MY RV BUILDER'S HOME
BACK TO BRIAN'S HOME