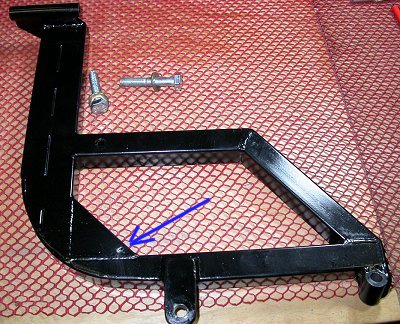
 Here's the new supercharger mount bracket, with the 2 bolts (and washers) that came with
it. The blue arrow shows where I drilled it to accept safety
wire for the inboard RT header nut.
Here's the new supercharger mount bracket, with the 2 bolts (and washers) that came with
it. The blue arrow shows where I drilled it to accept safety
wire for the inboard RT header nut.ENGINE WORK November, 2005
Nov 3 - Jan was kind enough to send me my supercharger bracket early, while we're all still waiting for all our STi upgrade parts. I wanted it early so I can put the RT header back on and continue with the muffler work. Although now I understand Jan has some new mufflers which are supposed to be smaller, lighter, and better. I got the bracket via UPS today, so I started trying to put that back on. I had asked that my new SC bracket include new bolts, as you may recall that the old ones were bulled and jammed in so bad the threads were all messed up. The bracket came with 2 bolts, not the 3 I need. So now I have to go into town and search around for proper metric bolts before I can install this. 0.5 hr
Here's the new supercharger mount bracket, with the 2 bolts (and washers) that came with
it. The blue arrow shows where I drilled it to accept safety
wire for the inboard RT header nut.
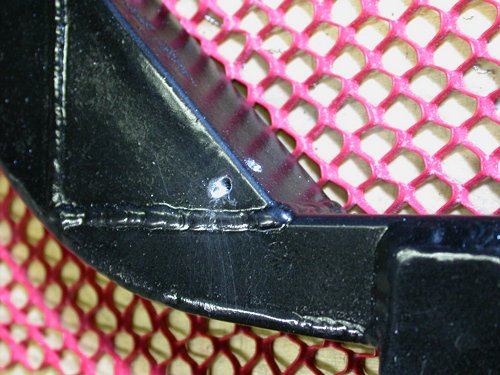 I drilled a little hole here in the corner, to use to safety wire the inside
RT header nut. MUCH easier to do with the bracket removed.
I drilled a little hole here in the corner, to use to safety wire the inside
RT header nut. MUCH easier to do with the bracket removed.
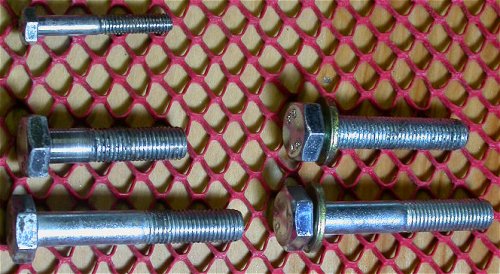 On the LT are the original 3 bolts, with no washers. On the RT are the
2 replacement bolts, with washers, that came with the replacement bracket.
The top RT bolt (50mm - replaces middle LT bolt - 40mm) is actually a better
length (also goes thru support strut), but it has full threads.
I told Jan I'd rather have one that isn't full threads, so he is going to
send me that, with the 6x40mm bolt I need.
On the LT are the original 3 bolts, with no washers. On the RT are the
2 replacement bolts, with washers, that came with the replacement bracket.
The top RT bolt (50mm - replaces middle LT bolt - 40mm) is actually a better
length (also goes thru support strut), but it has full threads.
I told Jan I'd rather have one that isn't full threads, so he is going to
send me that, with the 6x40mm bolt I need.
Nov 4 - spent a couple hours running around Claremont, looking for the supercharger bracket bolts I need. I couldn't find any that were right - I just found ones with full threads to the head. Emailed Jan about it, and he will send me proper bolts. I had forgotten that the longer bolt goes in the thinner tab on the bracket - this is because it also has to hold on the strut tube that goes over to the engine mount plate. 2.0 hr
 This shows how the 10mm bolts are supposed to go on the bracket.
The longer (60mm) one goes on the thinner tab, but through the brace strut
first. This layout will give me a full 17-18 threads of engagement.
After I found out that a 50mm bolt was the best length, I was able to find
one locally that was not threaded all the way to the head.
This shows how the 10mm bolts are supposed to go on the bracket.
The longer (60mm) one goes on the thinner tab, but through the brace strut
first. This layout will give me a full 17-18 threads of engagement.
After I found out that a 50mm bolt was the best length, I was able to find
one locally that was not threaded all the way to the head.
Nov 15 - Jan sent me an email, saying he'd found that the initial set of new brackets was not welded at quite the right angle, so he is sending me another one. I had thought, from just holding the bracket up the the engine, that it appeared that the alignment of the round housing the supercharger mount bolt goes through, was not quite right. But I hadn't yet had time to measure if it was perpendicular to the engine. Jan is quite good at standing behind his products and taking care of things that come up. I also got the new 6x40mm bolt he'd sent me. So, as soon as I get the new bracket, I'll be ready to put the bracket on, then the headers.
Nov 29 - got back from 11 days
vacation in SoCal & Las Vegas. Among other things, I spent a
couple days off-road riding in Anza-Borrego State Park, and I rode the
2-day LA-Barstow to Vegas dual sport ride, commemorating the famous B-V
desert race
that used to run over Thanksgiving weekend. Almost 200 miles the
first day, 300 the second. It was great! My STi upgrade kit
was there when I got home, so I immediately tore into that. I
tried fitting the intercooler to the firewall, to see how it would fit,
as I initially figured it would be the first thing that needed to be
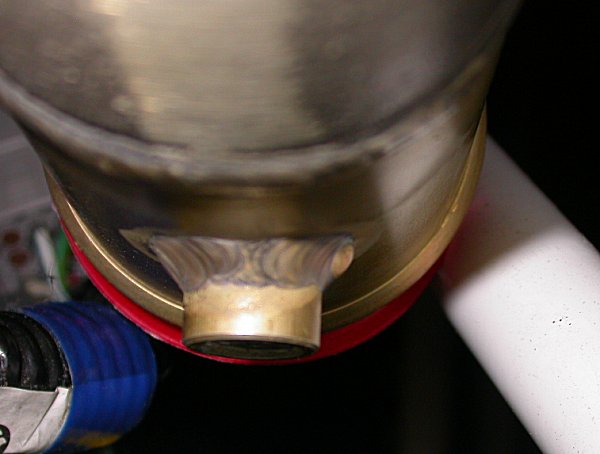
installed. It's a great fit, except for one problem. The problem is that
the intake downtube should have been welded on so the bottom of it tips
a bit fwd, rather than just straight down. With the downtube going
straight down, it interferes with one of the engine frame tubes. In
order to make the downtube clear the frame, I have to bring the outboard
end of the intercooler fwd about an inch from the firewall.
Sent email to "STi Upgrade" list, to see what they say about it.
Then, cleaned up bolt holes in supercharger bracket and did a trial fit
of the supercharger bracket to the engine.
It later occurred to me that the order of installation will need to be
the cam sprockets first, then the supercharger bracket and supercharger,
then the intercooler, then the interconnecting plumbing. I'll need all
the clearance I can get to do the cam sprockets.
1.25 hr
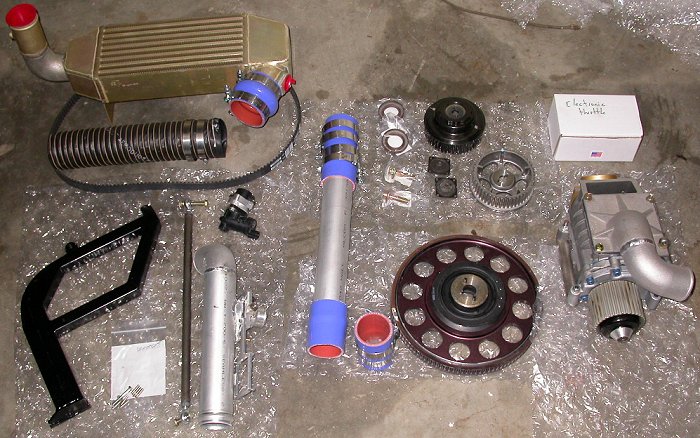 Here
is the STi upgrade kit and all its parts (at least the ones that were
pertinent to me - others may need more or less parts).
Here
is the STi upgrade kit and all its parts (at least the ones that were
pertinent to me - others may need more or less parts).
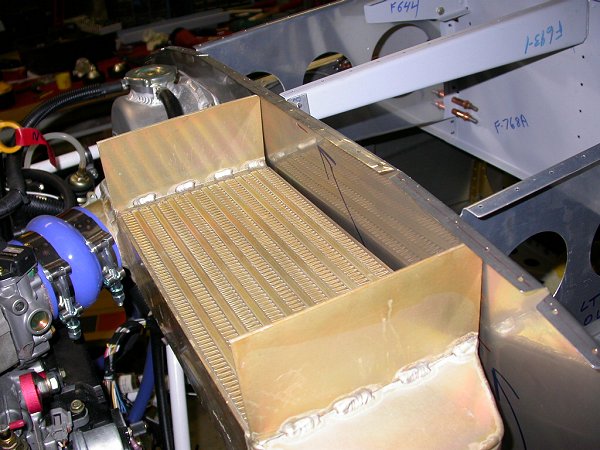 The
intercooler fit right in nicely between the firewall and where it connects
to the intake manifold at the blue silicone flex connector.
The
intercooler fit right in nicely between the firewall and where it connects
to the intake manifold at the blue silicone flex connector.
 Unfortunately, with the intercooler in the position previously shown, there
is considerable interference between the air intake tube and the engine
frame LT diagonal.
Unfortunately, with the intercooler in the position previously shown, there
is considerable interference between the air intake tube and the engine
frame LT diagonal.
 The left edge of the intercooler has to be swung fwd about an inch to get
the intake tube to clear the engine frame. Waiting now to hear
response about this from Eggenfellner.
The left edge of the intercooler has to be swung fwd about an inch to get
the intake tube to clear the engine frame. Waiting now to hear
response about this from Eggenfellner.
Nov 30 - update web page 1.0 hr doc
Well, I didn't get a lot done in November. Let's see if I can accomplish more in DECEMBER ENGINE
BACK TO MY RV BUILDER'S HOME
BACK TO BRIAN'S HOME