A lot of what I am doing right now is wiring related toward
getting the engine ready to start. If it's strictly engine wiring, it
on this page. If it's more general supporting wiring, it's on the
avionics/electric page, so be sure to check there for details.
I am also getting the console set up to
support starting the engine.
Nov 1 - reconnect LT side engine
harness wires. Remove intercooler again. Clean up bench.
0.5 hr
Nov 6 - received reworked Andair
fuel valve.
Nov 9 - Feeling slightly better.
Reinstalled Andair fuel control valve. Torqued AN fittings and
replaced rubber 3/8" hose from valve to fuel pump inlet filters.
1.5 hr
Nov 11 - Dick Tasker had
suggested to me that I change the configuration of my fuel pressure block.
Also, there's been talk on the Eggenfellner list about people having various
problems with the Barksdale fuel pressure switch; leaking, DOA, failing after
use, erratic operation. So, I decided to remove the fuel pressure
block and redo it, removing the Barksdale switch and moving the fuel
pressure transducer to where the Barksdale currently is located.
1.5 hr
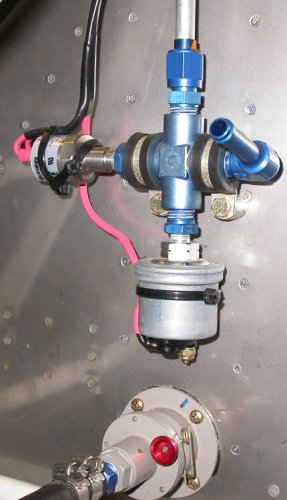
This is my fuel pressure block configuration before changing it.
Andair firewall fuel filter at bottom of pic. After hearing all the
bad press on the Eggenfellner mail list about the the Barksdale switch, I
decided to remove it. I wasn't going to be using it as intended,
anyway. I was only going to use it to drive a warning light, rather
than to drive a relay to automatically control the fuel pumps, as in
standard Eggenfellner configuration. My EIS will alarm me for low fuel
pressure, so I really don't need this switch. Also, Dick Tasker had
emailed me and suggested that I not mount the fuel pressure transducer
upside-down like this, as it could trap water which could then freeze and
break the transducer. For awhile I thought I'd also redo the fuel hose
input to it and make it a solid line, but then I decided my original idea
was best; a rubber hose will let me open up and clean the Andair filter
below without having to disconnect any fuel lines.
So, I pulled the whole thing off, and reconfigured it thusly. The fuel pressure transducer wire and all the wires from the
engine LT side are going through the Schultz eyeball fitting shown in the
top center of the pic. The brass bolts on the RT side are what hold
the ground plate to the aft side of the firewall, and the engine ground
strap (not shown in pic) is attached to the top bolt.
Nov 30 - Calculate and plan
electronic throttle layout. The throttle lever travels 3 9/32",
and its length where it hits the stops in the quadrant is 4 1/4".
Therefore, to get exactly 2" travel for the electronic throttle rod, as
required for the electronic throttle module, my electronic throttle
attach point must be 2 17/32" from the pivot point. I'll need a
mount bracket about 9" long to do the job. It looks like I will need to do some
modifications to the standard console/quadrant,
to fit my needs. 0.5 hr
 This is my fuel pressure block configuration before changing it.
Andair firewall fuel filter at bottom of pic. After hearing all the
bad press on the Eggenfellner mail list about the the Barksdale switch, I
decided to remove it. I wasn't going to be using it as intended,
anyway. I was only going to use it to drive a warning light, rather
than to drive a relay to automatically control the fuel pumps, as in
standard Eggenfellner configuration. My EIS will alarm me for low fuel
pressure, so I really don't need this switch. Also, Dick Tasker had
emailed me and suggested that I not mount the fuel pressure transducer
upside-down like this, as it could trap water which could then freeze and
break the transducer. For awhile I thought I'd also redo the fuel hose
input to it and make it a solid line, but then I decided my original idea
was best; a rubber hose will let me open up and clean the Andair filter
below without having to disconnect any fuel lines.
This is my fuel pressure block configuration before changing it.
Andair firewall fuel filter at bottom of pic. After hearing all the
bad press on the Eggenfellner mail list about the the Barksdale switch, I
decided to remove it. I wasn't going to be using it as intended,
anyway. I was only going to use it to drive a warning light, rather
than to drive a relay to automatically control the fuel pumps, as in
standard Eggenfellner configuration. My EIS will alarm me for low fuel
pressure, so I really don't need this switch. Also, Dick Tasker had
emailed me and suggested that I not mount the fuel pressure transducer
upside-down like this, as it could trap water which could then freeze and
break the transducer. For awhile I thought I'd also redo the fuel hose
input to it and make it a solid line, but then I decided my original idea
was best; a rubber hose will let me open up and clean the Andair filter
below without having to disconnect any fuel lines. 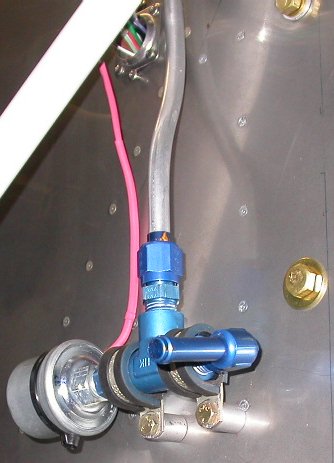 So, I pulled the whole thing off, and reconfigured it thusly. The fuel pressure transducer wire and all the wires from the
engine LT side are going through the Schultz eyeball fitting shown in the
top center of the pic. The brass bolts on the RT side are what hold
the ground plate to the aft side of the firewall, and the engine ground
strap (not shown in pic) is attached to the top bolt.
So, I pulled the whole thing off, and reconfigured it thusly. The fuel pressure transducer wire and all the wires from the
engine LT side are going through the Schultz eyeball fitting shown in the
top center of the pic. The brass bolts on the RT side are what hold
the ground plate to the aft side of the firewall, and the engine ground
strap (not shown in pic) is attached to the top bolt.