 Got all the
hardware into this one box of bins.
Got all the
hardware into this one box of bins. FEBRUARY 2003
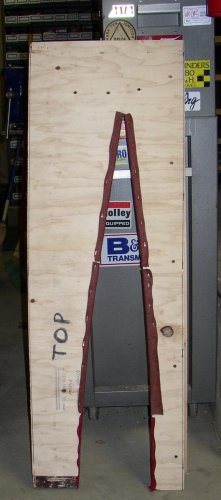
Feb 10 - Received my QB wings and fuselage about a month early 6.5 hr
Feb 12 - worked off & on during afternoon and evening, between troubleshooting my snowmobile problems, on making some simple fixtures to hold my wings while I work on them. I am using lumber and screws from the crates to make most of the fixtures. I am using my own design for them, based on what I have seen at Alexander Technical Center (ATC) and on the Wings "From the Ground Up" and Ornforff RV-6 QB videos. I want a rotisserie design, so I can rotate them around as necessary. Also working on dismantling the crates. Weather is bitter cold; well below zero, and snowing about every other day. I generally warm the garage up to about 35-40 degrees when I am working out there. Any more heat than that adds cost and endangers my tools from rust due to condensation from big temperature changes. 9.0 hr
Feb 13 - worked all day and evening on more crate dismantling, wing stand building, fuselage stand building, and taking inventory. It was 27 degrees below zero tonight. It warms up to single digits during the day, even though the sky is clear and the sun is bright. By midnight, I'd finished the wing stands, gotten the crates mostly dismantled, made a stand for the fuselage front, and inventoried all the big stuff, except the box of little bags. The nails and staples holding all the crate wood together are a bitch to pull. Most of them grip so tightly I break one or both boards and/or pull the heads through the board before the boards will separate. It would have been a lot nicer if Van's had built these crates with screws, like ATC did. I took the box of bags into the house, where it's warmer, and worked to 0200 inventorying all the little bags. I was surprised at how relatively few rivets were included. Well, I guess that indicates most of the heavy riveting has already been done. The only inventory work left is identifying all the stuff that has no label; mostly bulk materials and all the powder-coated pieces. 11.5 hr
Feb 14 - slept late and got a bit of a late start. Spent the afternoon moving all the dismantled crate lumber out into my barn. 2.0 hr It's another crystal clear, bitter cold night, and I've had a cough all day, so in the evening I just worked in the house on putting all the small bag contents into a bin of drawers, combining like items, and labeling all the drawers. 3.5 hr
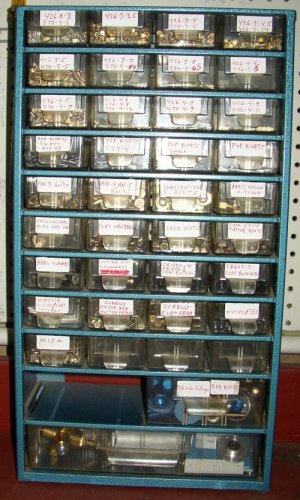
Got all the
hardware into this one box of bins.
 HINT: if
you combine items in one bin, make sure the 2 are easily distinguishable, as
those plastic bin separators are notorious for rising up & letting
things mix. If you put 426-3-4 and 426-3-4.5 rivets in the same box
and they get commingled, you'll have lots of fun separating them. By
combining 426 and 470 rivets in the same box, I can easily deal with it if
they get mixed.
HINT: if
you combine items in one bin, make sure the 2 are easily distinguishable, as
those plastic bin separators are notorious for rising up & letting
things mix. If you put 426-3-4 and 426-3-4.5 rivets in the same box
and they get commingled, you'll have lots of fun separating them. By
combining 426 and 470 rivets in the same box, I can easily deal with it if
they get mixed.
I sure hope to start actually working on the PLANE soon!
Feb 15 - Not feeling too great, so I stayed in all day and read. In the evening, I finished taking inventory and started making aileron bellcrank rods. It's so cold in the garage, even with the heater, that my Scotchbrite-mounted buffer won't run. Moved buffer to basement. 5.0 hr
Feb 16 - worked on making aileron control rods in basement. NOTE: circumference of 716 control rods is 90mm, so dividing that by 3 to make 6 evenly spaced rivet holes was easy. Mark the 3 points 30mm apart, then drill each all the way through, giving you 6 evenly spaced holes. High temp for the day was zero. 9.0 hr
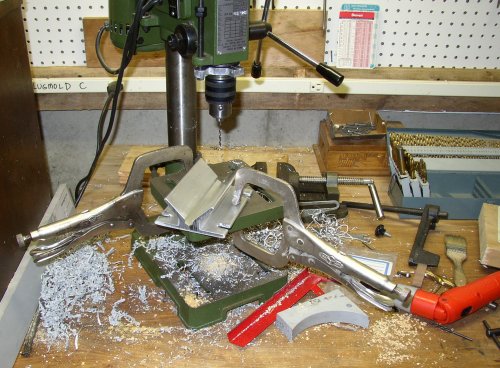 This is my
drill press setup for drilling the rods. The fixture, from Avery, made
it easy.
This is my
drill press setup for drilling the rods. The fixture, from Avery, made
it easy.
 W-716 rods
clecoed and ready to rivet.
W-716 rods
clecoed and ready to rivet.
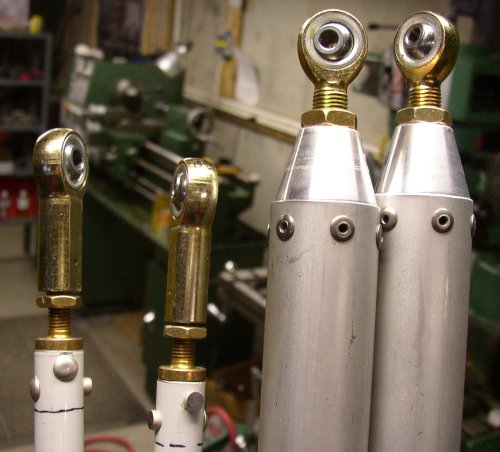
 W-818 rod
ready to rivet. It was tempting to TIG weld both these and the
W-716 rods, instead of riveting them, but I don't trust my TIG
skills/consistency enough. I couldn't squeeze the rivets because of their
length (-12). It was a bit cumbersome to do this riveting, as
I had to use a gun & backing plate, and the things wanted to roll
around. Reminds
me of a story about a monkey and a football.....
W-818 rod
ready to rivet. It was tempting to TIG weld both these and the
W-716 rods, instead of riveting them, but I don't trust my TIG
skills/consistency enough. I couldn't squeeze the rivets because of their
length (-12). It was a bit cumbersome to do this riveting, as
I had to use a gun & backing plate, and the things wanted to roll
around. Reminds
me of a story about a monkey and a football.....
 Rod ends all
done! Removed wing tanks from wings, and dicked around all night
drilling and reaming to get fit on aileron bellcrank bushings ID and OD just right.
Rod ends all
done! Removed wing tanks from wings, and dicked around all night
drilling and reaming to get fit on aileron bellcrank bushings ID and OD just right.
Feb 17, 18 ,19- too sick to work on plane. Mostly slept.
Feb 19-25 - busy welding up new frame for plow truck.
Feb 20 - trim length of LT aileron bellcrank bushing and install it. 1 hr
Feb 24 - trim length of RT aileron bellcrank bushing and install it. Fabricate & prime spacers for W-716 rods. 1 hr
Feb 25 - install aileron control rods to bellcranks. Below zero all day. 2 hr
 This shows
the aileron control rods and the bellcrank.
This shows
the aileron control rods and the bellcrank.
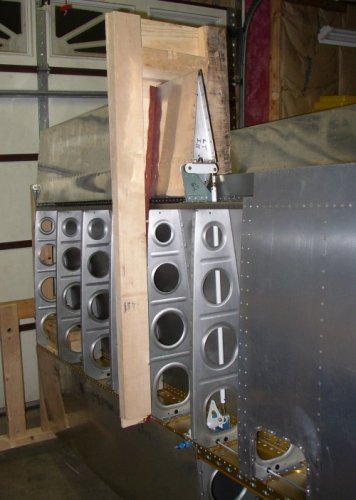
Feb 26 - working on pitot tube install. George Orndorff's videos about this part are about useless, as the 6 is so different here. George also showed taking off the wing tank, which I did, to get access to run the tubing. But it's run all differently on the 7, and it turns out there was no need to remove the tank. 10.0 hr
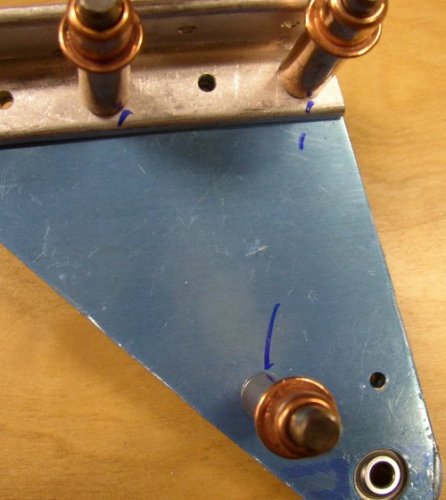
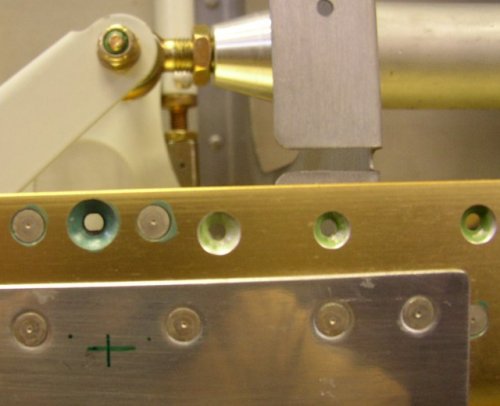 + shows where I
think the hole should go for the AN bulkhead fitting, but I emailed Van's
first, to double-check. The dots show how big the hole will be.
It seems awful close to those rivets.
+ shows where I
think the hole should go for the AN bulkhead fitting, but I emailed Van's
first, to double-check. The dots show how big the hole will be.
It seems awful close to those rivets.
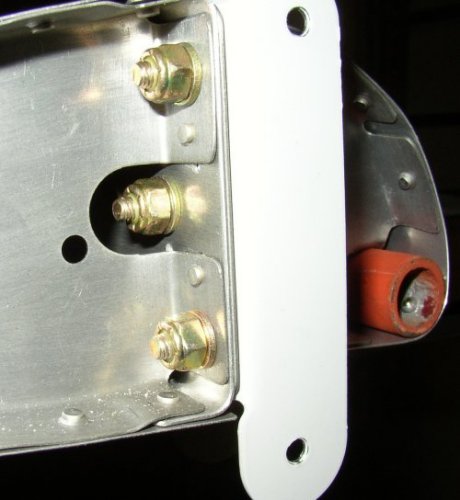 Started working on mounting the Inboard and Outboard Aileron brackets to the
left aileron. The plans called for a nutplate on the center bolt here
on the A-407-R Inboard Aileron Bracket, but I decided a locknut was much
easier. I double-checked with Van's about it, and they
concurred. The U-shaped cutout, which made using a nut and wrench
possible, was not shown on the plans.
Started working on mounting the Inboard and Outboard Aileron brackets to the
left aileron. The plans called for a nutplate on the center bolt here
on the A-407-R Inboard Aileron Bracket, but I decided a locknut was much
easier. I double-checked with Van's about it, and they
concurred. The U-shaped cutout, which made using a nut and wrench
possible, was not shown on the plans.
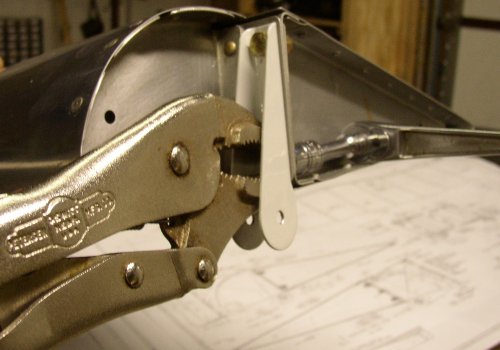 I never thought
I'd be using Vise-Grips on my plane, but for this application, bolting on
the A-406-1 Outboard Aileron Bracket, it was the only way. There was
only access from the end, and access only to 2 opposite flats on the bolt
head; too close on the sides to get a socket in.
I never thought
I'd be using Vise-Grips on my plane, but for this application, bolting on
the A-406-1 Outboard Aileron Bracket, it was the only way. There was
only access from the end, and access only to 2 opposite flats on the bolt
head; too close on the sides to get a socket in.
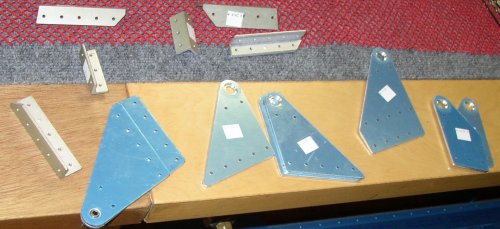 After getting the aileron brackets installed on the left aileron, and while
waiting on Van's advice about drilling the pitot tube hole, I started
working on the W-413 and W-414 left & right Inboard and Outboard Aileron
Hinge Bracket Assemblies. These are the parts that I will use to make
the assemblies.
After getting the aileron brackets installed on the left aileron, and while
waiting on Van's advice about drilling the pitot tube hole, I started
working on the W-413 and W-414 left & right Inboard and Outboard Aileron
Hinge Bracket Assemblies. These are the parts that I will use to make
the assemblies.
Feb 27 - see notes with pics below. 9.5 hr
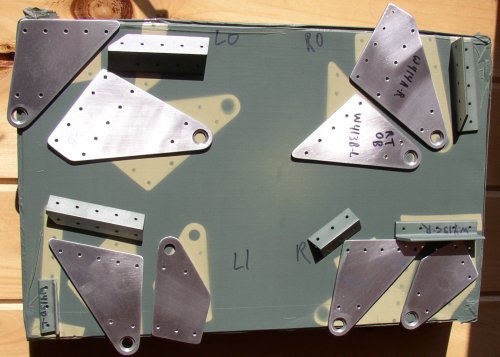 match-drilled, cleaned, deburred, countersunk, polished, and primed the
Aileron Hinge Bracket Assemblies.
match-drilled, cleaned, deburred, countersunk, polished, and primed the
Aileron Hinge Bracket Assemblies.
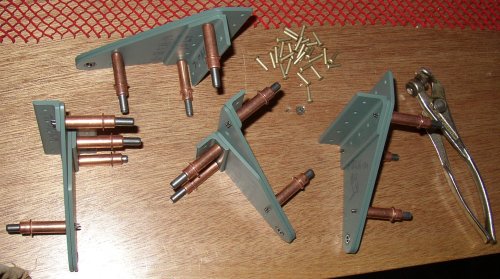 After the primer dried awhile, I clecoed and riveted the Aileron Hinge
Bracket Assemblies together. With these assemblies, you have to pay
close attention to the rivets, as each piece uses multiple sizes and types, and
where 427 flush rivets are specified, they must also be facing in a particular
direction.
After the primer dried awhile, I clecoed and riveted the Aileron Hinge
Bracket Assemblies together. With these assemblies, you have to pay
close attention to the rivets, as each piece uses multiple sizes and types, and
where 427 flush rivets are specified, they must also be facing in a particular
direction.
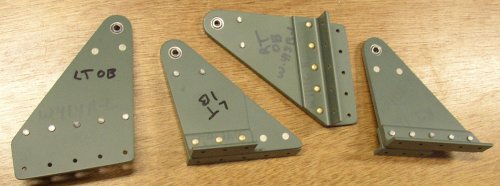 Aileron Hinge Bracket Assemblies completely assembled
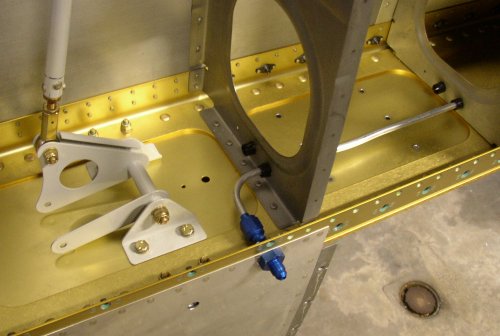 Went back to
pitot system and installed the pitot tube. I ran the tube down the
lower series of routing holes, rather than the ones in the center, as shown
in the plans. I checked with Van's and they said it was OK. I
thought it was better that way, because it helps keep it away from the
aileron bellcrank. They also confirmed where I thought I should drill
the 1/2" hole for the bulkhead AN fitting.
Went back to
pitot system and installed the pitot tube. I ran the tube down the
lower series of routing holes, rather than the ones in the center, as shown
in the plans. I checked with Van's and they said it was OK. I
thought it was better that way, because it helps keep it away from the
aileron bellcrank. They also confirmed where I thought I should drill
the 1/2" hole for the bulkhead AN fitting.
 After finishing the pitot system, spent the rest of the evening riveting the
aileron bracket assemblies onto the wing. Some of the rivets could be
squeezed, and some had to be done with a gun and a long double offset rivet
set. I never could find where on the plans it specified what
rivets to use to mount the brackets to the wing, but I finally just went
ahead with what I thought they should be.
After finishing the pitot system, spent the rest of the evening riveting the
aileron bracket assemblies onto the wing. Some of the rivets could be
squeezed, and some had to be done with a gun and a long double offset rivet
set. I never could find where on the plans it specified what
rivets to use to mount the brackets to the wing, but I finally just went
ahead with what I thought they should be.
 This is an
example of a trick I picked up at the Alexander Technical Center. It's
especially useful on large assemblies, with lots of rivets, but it also
works well on smaller parts. After putting in the initial set of
clecoes, mark each one. Then, after you match-drill all the non-clecoed
holes and move the clecoes to match-drilled holes, you'll know for sure
which holes you did not match-drill on the first cycle, and thus need to
drill on the second cycle..
This is an
example of a trick I picked up at the Alexander Technical Center. It's
especially useful on large assemblies, with lots of rivets, but it also
works well on smaller parts. After putting in the initial set of
clecoes, mark each one. Then, after you match-drill all the non-clecoed
holes and move the clecoes to match-drilled holes, you'll know for sure
which holes you did not match-drill on the first cycle, and thus need to
drill on the second cycle..
Feb 28 - Made up bushings for aileron mount brackets. Hung LT and RT ailerons. Made wing template. Adjusted ailerons. Started working on LT flap. Lots of dicking around trying to get flap fit just right. Also spent a bunch of time studying the plans, to figure out what went where how. 13.0 hr
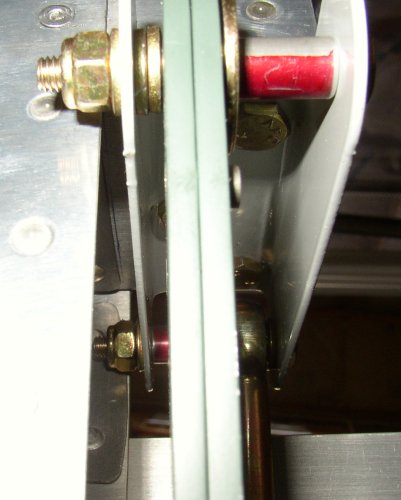 Here's a closeup of the hardware used to hang the ailerons on the
wings. This is the inboard side, with the control rod. There was
lots of messing around getting all those washers and spacers in there.
The red is just machinist's dye, used for marking the tubing I made the
bushings from.
Here's a closeup of the hardware used to hang the ailerons on the
wings. This is the inboard side, with the control rod. There was
lots of messing around getting all those washers and spacers in there.
The red is just machinist's dye, used for marking the tubing I made the
bushings from.
 After getting
both ailerons hung, it was time to adjust them. This is the wing form
template I made from the plans. The plans showed making one covering
the whole wing shape, and using it with the leading edge up. I figured
it was much easier to put the ailerons and flaps on with the leading edge
down, rather than up, as shown on Van's plans and Orndorff tapes.
Speaking of the Orndorff tapes, I am finding that they are totally useless
for a -7 QB. Everything is different, which shows me all the
improvements Van's has made. George ought to be ashamed of himself for
selling his -6 tapes as "useful for -7 builders, too". They
are not at all useful. Anyway, I spent 3 hours making this template. I had
some narrow scraps of felt, so I lined the part of the template that touches
the wing with felt.
After getting
both ailerons hung, it was time to adjust them. This is the wing form
template I made from the plans. The plans showed making one covering
the whole wing shape, and using it with the leading edge up. I figured
it was much easier to put the ailerons and flaps on with the leading edge
down, rather than up, as shown on Van's plans and Orndorff tapes.
Speaking of the Orndorff tapes, I am finding that they are totally useless
for a -7 QB. Everything is different, which shows me all the
improvements Van's has made. George ought to be ashamed of himself for
selling his -6 tapes as "useful for -7 builders, too". They
are not at all useful. Anyway, I spent 3 hours making this template. I had
some narrow scraps of felt, so I lined the part of the template that touches
the wing with felt.
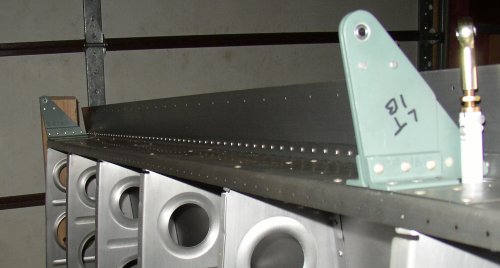
 Here is
the template in place for adjusting the ailerons. I think it's much
easier to work on these with the ailerons & flaps on top, rather than on
the bottom while I'm laying on the floor, as shown in the Orndorff videos.
Here is
the template in place for adjusting the ailerons. I think it's much
easier to work on these with the ailerons & flaps on top, rather than on
the bottom while I'm laying on the floor, as shown in the Orndorff videos.
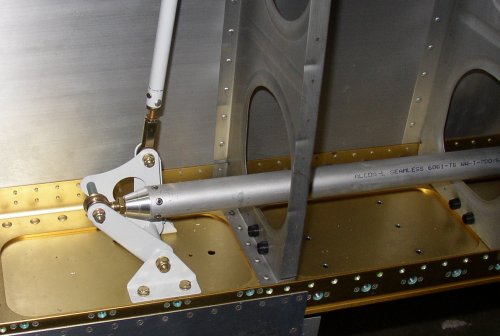
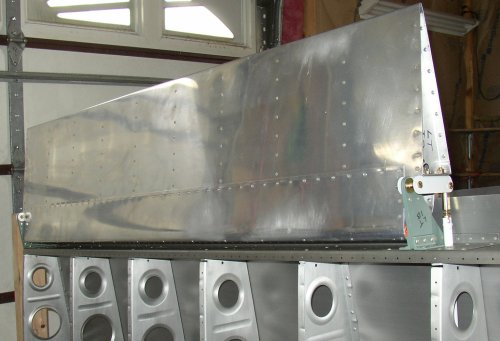 LT aileron
all adjusted. It took 3 hours to make the template, but only half an
hour to do the adjustments for both sides. The ailerons are adjusted by setting the
bellcrank to the neutral position with a jig that came with the kit, then
adjusting the length of the W-818 rod (white rod in this pic) so the aileron
and wing shape match the template.
LT aileron
all adjusted. It took 3 hours to make the template, but only half an
hour to do the adjustments for both sides. The ailerons are adjusted by setting the
bellcrank to the neutral position with a jig that came with the kit, then
adjusting the length of the W-818 rod (white rod in this pic) so the aileron
and wing shape match the template.
83.0 hours total for month
go to MARCH, 2003
BACK TO MY RV BUILDER'S HOME
BACK TO BRIAN'S HOME