June 2 - wire autopilot
breaker, add lighting switches to switches subpanel. I have some fit
issues with the taxi and landing light switches and their indicators, and
will have to order new switches. Drew up my flashing taxi light wiring
schematic. 1.5 hr
Here is a picture of a couple Lady Slippers growing out behind the
barn. There
were a whole bunch of them growing back there; all around where I'd stored
some excess steel a few years ago and around where I park my race trailer. Lady Slippers are a
rare wild plant in NH. It's illegal to pick or attempt to transplant
them. Transplanting never works, anyway. You can't grow them.
They just come up where ever they feel like it. I've never seen them
before where they came up and next year, they'll most likely come up
somewhere else. It is not at all
predictable. When you do see them in the woods, it's usually just one
or two. I had about a dozen growing out there, so it was very cool. They are lovely to see at this time of year. They
are a member of the orchid family. Click on pic for a large version.
Here's a cluster of four of them.
June 3 - Laid out flashing taxi light circuit
and tested it OK. Found a place to mount the taxi light flasher and
mounted it. Started wiring flasher. 2.0
hr
June 4 - worked on taxi flasher wiring a bit.
Cleaned up bench some, sorted AGC & ATO fuses. Looking into switches I
need to order for landing & taxi lights with indicators.
1.0 hr
June 5 - after much research and help from
Allied sales people, placed Allied order for some switches that will clear
the indicators for the taxi & landing lights. Wired landing light
switch LED indicator. Decided I can just get by with the 1.32" high
DPST switch I already have for that position. Update web site
1.5 hr + 1.0 hr doc
June 6 - bought several inline fuse holders.
Pondering how & where to mount them for DMV leads. The DVM leads
previously did not have a fuse between the hot side of each battery
contactor and the DVM, so I thought I'd better add one. I also need to
install one between the taxi light wig-wag flasher and the blue indicator
light. The flasher is on a 10a fuse for the heavy 16ga wire to the
light, but that's too big a fuse for the little 22ga wire going from the
flasher to the indicator light, so that part needs a separate inline fuse.
added
inline 2a glass fuses for each DVM lead. 1 amp fuses would have been
OK for this, but I had more 2a fuses on hand than 1a, so 2a is fine for this
22ga wire.
June 7 - wiring inline fuse for taxi light
flasher indicator. Make single pin connector for taxi light indicator
ground and tie it to connector for landing light indicator ground.
1.0 hr
Because these 2 indicators, for landing and flashing taxi lights, mount from
the front of the panel, if I need to pull them out, I'd have to pull
the ground wires through the harness, all the way back to back to the ground
plate. So, I made these clever little inline connectors I can
disconnect. Each "connector" is simply a crimped machined DB
pin/socket. After connecting them, clear heatshrink tubing will be
shrunk over them. That will make them impossible to pull apart without
cutting the heatshrink first. Using clear heatshrink lets me see
what's under the heatshrink. Small black heatshrink is also over the
wire and the base of each pin/socket, to strengthen it. In the far RT
of pic, the 2 ground leads for these 2 indicators are spliced into one run
that will go to the ground plate on the firewall.
June 8 - received
A&T Labs K11 dimmer system. It is very large and VERY heavy.
It must weigh at least a pound. I opened it up and looked it over to
see if I could maybe mount it to the airframe as a heatsink, and not use the
big heavy heatsink that came with it. Also received my order of floor
mats from Global. 0.5 hr
This
is the K11 dimmer. Mighty big! In retrospect, the web site does
say 16 oz, but I hadn't noticed that before. Most of the weight (and
size) is in the heatsink, so I ditched that, and just mounted the power
transistors to one of the custom baggage compartment walls. That
should dissipate heat just fine.
I got
several 3' x 3' floor mats (p/n 239227) from
Global Industrial. These are meant for wet floors, but the holes
are also very handy for capturing crud from your shoes and little things
that get dropped. Instead of bouncing instantly into Lost Parts Land,
they don't bounce much and if they roll, it's right into a capture hole.
They are also great for avoiding standing on the concrete. They mate
together to form longer pads.
June 9 - Pondering what to do about K11 dimmer;
install as-is, remove heatsink, return it? Talked to Rhinehart at A&T
Labs about what I can do about size and weight of K11 dimmer. He said
it should be OK to mount power transistors to airframe, if I can unsolder
them from the PCB (printed circuit board) OK. Should be no problem for me, as I used to be an
electronic tech many moons ago. Desoldered power transistors and removed heatsink.
I was also considering mounting the board separate from the power
transistors, but eventually decided that was too much trouble, because I'd
have to redo the PCB mounting system. The existing system uses the
power transistors as mounting for one side, and there isn't enough spare
room on the PCB to drill mount holes on one end of that side. Started
mounting K11 and its power transistors to the custom baggage separation
wall. That wall should give plenty of heat dissipation. I guess
I really should have just gotten his kit, rather than paying for the pre-made system.
2.25 hr
June 10 - visit my
completed hangar at VSF.
Looks good. Worked on mounting the K11 dimmer system.
2.5 hr
June 11 - received Allied switches order &
resumed populating switches panel. I haven't been working on the plane
quite as much lately, because I've been busy working with a forester, adding
a few miles of trails to our property. And of course, there's been the
hangar, as well as multitude of other things. I didn't race last year,
and haven't gotten to the track yet this year, either. I may sell the
race bike. Installed cover for K11 dimmer
system. Worked on more switches configuration. Removed switches
panel, laid out for new additional switches. Worked to 0200.
1.5 hr
June 12 - Karla woke me up at 0500 (after I
went to bed at 0200), because there TWO full-size bears wandering around the
lawn. It was pretty cool to see them, especially with their black
shiny fur against the green grass. I couldn't get back to sleep, so I
worked on the plane awhile & went in to work. It wasn't fully light,
and I wasn't able to get any pictures of the bears. I do have a pic of
what may or may not have been one of those bears who wandered across the
lawn last Friday evening while we were having dinner. Continued with
switches panel layout. Added pot for K11 dimmer, and added a 12 volt
"cigarette lighter" adapter jack. I have DB9 connectors for PC
connection for both the Sandia and the Dynon, but I decided to move them to
the subpanel, rather than taking up critical space on the panel or switches
panel. 1.75 hr
I fired
off a quick (camera) shot as the bear walked around the end of the woodshed.
I'm fairly sure the two this morning were both bigger than this. One
was considerably bigger.
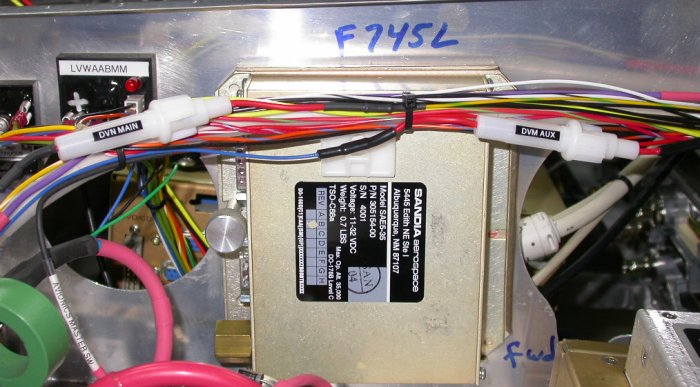
Here,
I've cut the holes to mount my 2 PC ports, for the Sandia encoder and the
Dynon EFIS, into the subpanel. This is so you can hook a PC to them
for updating the software. This is the fwd side of my RT siubpanel,
where the engine ECM and related parts are mounted.
June 14 - Filled a couple unused screw holes
with JB Weld on the switches panel.
0.25 hr
June 15 - fill another small hole on on the
switches panel. Trying to get the thing ready to paint, so I can
permanently mount the switches. 0.25 hr
June 16 - fill 2 more small holes in switches
panel. 0.25 hr
June 17 - installed cabin floors and center
console, so I can see exactly where to cut the console notch in the switches
panel. Cut out notch for panel. Decided to open up the bend in
the switches panel angle a few degrees. It has several benefits - fits the console
better, angles the switches panel up a bit for better visibility, slightly
more leg clearance under switches panel, and lets the fwd end of the console
better support the bottom of the MT prop controller.
2.5 hr
June 18 - been awful busy lately with lots of
different stuff; forestry work, hangar completion, etc. Yesterday, I
went to a commemoration and visit to the site of a
June 15,
1947 B-29 bomber crash in nearby Perkinsville, VT. Update
web site 1.0 hr doc
June 20 - final tweak of fit & angle of
switches panel. Refill cuts in ends of switches panel with JB Weld.
1.25 hr
June 21 - clean, prep, prime switches panel.
Hook up old switches panel to do an engine run.
1.0 hr
June 22 - paint new switches panel
My EIS amps reading is 0 with Avionics Master off (see
engine run) because the alternator Field
breaker gets its power from fuse 26. Not sure if I really want to
change it or not - perhaps OK where it is. Removed old switches panel
from switches. 0.75 hr
June 24 - bake paint on new switches panel.
While I have the cabin floors and console installed, confirmed length of
Andair fuel valve extension, and pinned that into place. Not getting a
whole lot done lately. 1.75 hr
June 26 - assemble switches to new switches
panel. 1.0 hr
June 29 - rewire low coolant wiring through
new DB-37 connector 1.0 hr
 Here is a picture of a couple Lady Slippers growing out behind the
barn. There
were a whole bunch of them growing back there; all around where I'd stored
some excess steel a few years ago and around where I park my race trailer. Lady Slippers are a
rare wild plant in NH. It's illegal to pick or attempt to transplant
them. Transplanting never works, anyway. You can't grow them.
They just come up where ever they feel like it. I've never seen them
before where they came up and next year, they'll most likely come up
somewhere else. It is not at all
predictable. When you do see them in the woods, it's usually just one
or two. I had about a dozen growing out there, so it was very cool. They are lovely to see at this time of year. They
are a member of the orchid family. Click on pic for a large version.
Here is a picture of a couple Lady Slippers growing out behind the
barn. There
were a whole bunch of them growing back there; all around where I'd stored
some excess steel a few years ago and around where I park my race trailer. Lady Slippers are a
rare wild plant in NH. It's illegal to pick or attempt to transplant
them. Transplanting never works, anyway. You can't grow them.
They just come up where ever they feel like it. I've never seen them
before where they came up and next year, they'll most likely come up
somewhere else. It is not at all
predictable. When you do see them in the woods, it's usually just one
or two. I had about a dozen growing out there, so it was very cool. They are lovely to see at this time of year. They
are a member of the orchid family. Click on pic for a large version. 
 added
inline 2a glass fuses for each DVM lead. 1 amp fuses would have been
OK for this, but I had more 2a fuses on hand than 1a, so 2a is fine for this
22ga wire.
added
inline 2a glass fuses for each DVM lead. 1 amp fuses would have been
OK for this, but I had more 2a fuses on hand than 1a, so 2a is fine for this
22ga wire.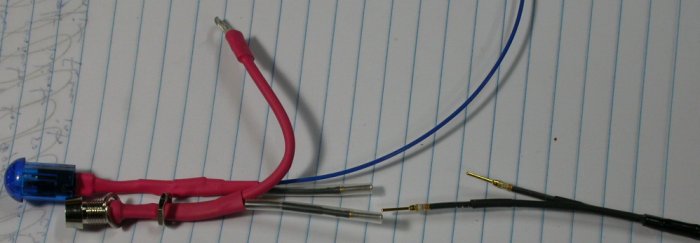 Because these 2 indicators, for landing and flashing taxi lights, mount from
the front of the panel, if I need to pull them out, I'd have to pull
the ground wires through the harness, all the way back to back to the ground
plate. So, I made these clever little inline connectors I can
disconnect. Each "connector" is simply a crimped machined DB
pin/socket. After connecting them, clear heatshrink tubing will be
shrunk over them. That will make them impossible to pull apart without
cutting the heatshrink first. Using clear heatshrink lets me see
what's under the heatshrink. Small black heatshrink is also over the
wire and the base of each pin/socket, to strengthen it. In the far RT
of pic, the 2 ground leads for these 2 indicators are spliced into one run
that will go to the ground plate on the firewall.
Because these 2 indicators, for landing and flashing taxi lights, mount from
the front of the panel, if I need to pull them out, I'd have to pull
the ground wires through the harness, all the way back to back to the ground
plate. So, I made these clever little inline connectors I can
disconnect. Each "connector" is simply a crimped machined DB
pin/socket. After connecting them, clear heatshrink tubing will be
shrunk over them. That will make them impossible to pull apart without
cutting the heatshrink first. Using clear heatshrink lets me see
what's under the heatshrink. Small black heatshrink is also over the
wire and the base of each pin/socket, to strengthen it. In the far RT
of pic, the 2 ground leads for these 2 indicators are spliced into one run
that will go to the ground plate on the firewall.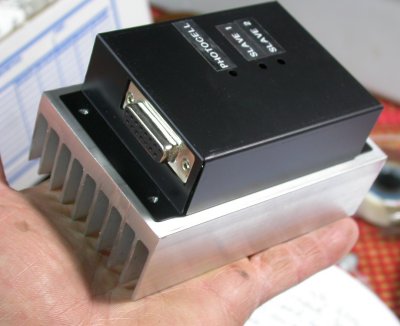 This
is the K11 dimmer. Mighty big! In retrospect, the web site does
say 16 oz, but I hadn't noticed that before. Most of the weight (and
size) is in the heatsink, so I ditched that, and just mounted the power
transistors to one of the custom baggage compartment walls. That
should dissipate heat just fine.
This
is the K11 dimmer. Mighty big! In retrospect, the web site does
say 16 oz, but I hadn't noticed that before. Most of the weight (and
size) is in the heatsink, so I ditched that, and just mounted the power
transistors to one of the custom baggage compartment walls. That
should dissipate heat just fine.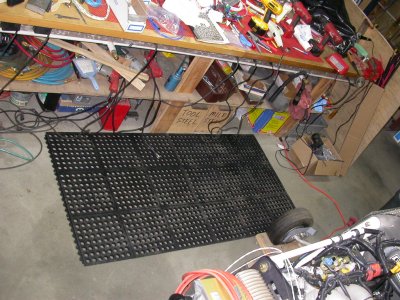 I got
several 3' x 3' floor mats (p/n 239227) from
I got
several 3' x 3' floor mats (p/n 239227) from
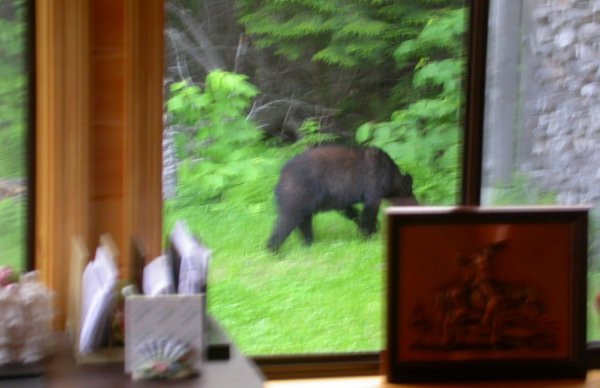 I fired
off a quick (camera) shot as the bear walked around the end of the woodshed.
I'm fairly sure the two this morning were both bigger than this. One
was considerably bigger.
I fired
off a quick (camera) shot as the bear walked around the end of the woodshed.
I'm fairly sure the two this morning were both bigger than this. One
was considerably bigger.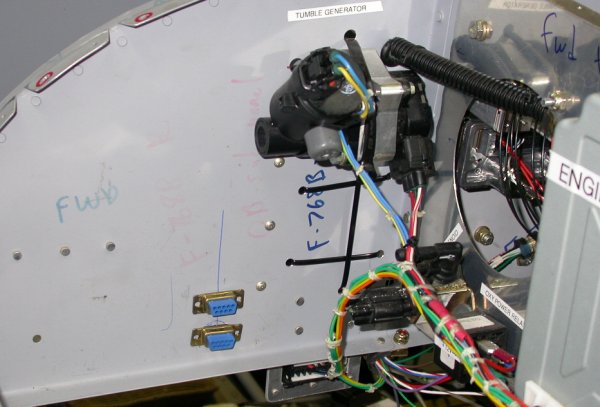 Here,
I've cut the holes to mount my 2 PC ports, for the Sandia encoder and the
Dynon EFIS, into the subpanel. This is so you can hook a PC to them
for updating the software. This is the fwd side of my RT siubpanel,
where the engine ECM and related parts are mounted.
Here,
I've cut the holes to mount my 2 PC ports, for the Sandia encoder and the
Dynon EFIS, into the subpanel. This is so you can hook a PC to them
for updating the software. This is the fwd side of my RT siubpanel,
where the engine ECM and related parts are mounted.