If it's strictly engine wiring, it's
on this page. If it's more general supporting wiring, it's on the
avionics/electric page, so be sure to check
there for details.
April 1 - trim wastegate, plan for
and make wastegate actuating arm (4 times!). After finally getting
actuating arm just right, put duct tube back into plane and realized this
method isn't going to work, because the heater is right in the way of where
the cable would run. Grrrr. Back to the drawing board.
5.0 hr
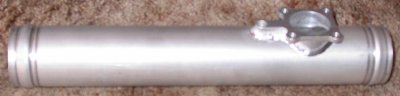
This is my new supercharger plumbing piece from Eggenfellner. I am
moving the wastegate adapter, from the tube with the ell welded onto it, to
this straight piece that is directly after the supercharger. That will
let me point the outlet right at the center cowl air exit.
I made a new actuating lever for the wastegate 4 times. On LT is the
stock one. It was made to be used with a servo, and is much too small
to use with a clevis end on a Bowden cable. Then, left to right, I
made it over and over, milling the slot and hand fitting it, changing it a
little each time, until I had it just right; the one on the RT.
Here is the wastegate mounted on the tubing, with the Bowden cable clevis
end attached to the final version of the lever. Perfect. Until I
went to mount it. Seems I overlooked the HEATER in the way. No
way can I run the cable that way. This HAD been a great idea, because
it would have let me keep the cable in the center of the plane, and just run
it straight from the quadrant to the wastegate. Now, I'll have to go
back to running the cable out the RT side of the firewall, then lengthwise
along this tubing. I'll turn the wastegate mounting 90 degrees, back
to being similar to how it was mounted on the stock duct. I may still
be able to use this arm or the previous version, though. This whole
wastegate actuation thing is totally "roll your own" with this engine, and
I've spent a huge amount of time on it.
April 4 - worked on trying to figure out a new
way to control the wastegate and how to get the Bowden cable smoothly to the
butterfly valve. I am getting VERY pissed about this. On
the wastegate control, probably more than any other aspect of this "complete
FWF engine", we are on our own to try to figure out how to make something
work. That, exacerbated by the crap and attacks Jan gave me
a month ago for changing the wastegate
opening size (after I'd talked about it for months on the STi list), is
making me especially frustrated about this.
1.0 hr
April 5 - emailed STi list about how others are
doing the wastegate. Got a quick reply from Chuck Chappell that
reminded me I already have 4 pics from Richard Reid's install and 2 from
Mickey Coggins HERE, from nearly a year
ago, when I first started working on the wastegate issues. These are
helpful. I'll try again tonight, and maybe I won't be as frustrated by
this as I got last night. Later on, got more good replies from Robert
Paisley, Jim Skala, Ziggy, Randy Crothers, and a couple others.
April 10 - Been too busy working on
panel wiring to get back to the wastegate
yet. Here is a picture of John Moody's RV-8A wastegate installation:
April 18 - resumed laying out wastegate
control, cable routing, and wastegate cable clamp mount
2.0 hr
Here, I used RTV silicone seal to temporarily glue the proposed bracket into
place, so I could put the tubing into the plane and do a clearance check
that the cable would work laid out like this. I used a 2.125" metal
holesaw in my mill to cut the aluminum angle so it followed the curve of the
tubing at this angle. I made a couple of these, at different angles
and depths.
April 19 - final layout, positioning, and test
fit of wastegate control cable clamp mount bracket
3.25 hr
Once I was confident the path I'd chosen for the cable and bracket would
work, I drilled the bracket and attached the cable and cable clamp hardware
to it. The cable also helped a lot to keep the bracket from sliding
around. Then, I duct taped the bracket into place. The bracket
will be tack welded with the tape holding it right where I want it, then all
the tape and hardware removed and the bracket welded into position.
April 20 - get wastegate control cable clamp
bracket welded onto supercharger tubing. Drill and ream one-hole
firewall eyeball fitting (aka spherical metal grommet) to hold the cable as
it passes thru the firewall. These fitting are available at
Avery and
ACS. I have both the one-hole and the multiple hole versions.
I think the one-hole versions are easier to install, although the fit of the
hole to the object going through the hole seems to be more critical with the
one-hole version. I got the 0.188
model, and drilled it out to #3 (0.2130"). I need to ream it just a
tad bigger, so I'm getting 0.2135 and 0.2140 reamers from MSC. I have
a 0.2165 reamer (I got it for the Bowden cable clamps at each end), but it
makes too big a hole for the eyeball fitting to grasp the cable tightly.
2.0 hr
All welded and ready to install onto the engine and the cable run laid out.
This is the wastegate fully closed position. I have 1.375" cable
travel with this setup.
April 21 - update web site
1.0 hr doc
April 22 - drill 1 1/16" hole in firewall for
eyeball fitting for wastegate cable. Drill & ream eyeball fitting to
0.213". Still a bit too tight. Will have to order a bit larger
reamer; 0.214 or 0.215. The 5.5mm (0.2165") reamer I have for
the Bowden cable clamps is a bit too big for the eyeball fitting, as it
clamps differently from the way the cable clamp does.
1.5 hr
April 24 - I forgot to order the reamer I
need, so I got that on order, from MSC.
I decided to get just one, in 0.2145". $10 in shipping.
UPS's minimum shipping charge now seems to be $10, which is a lot for
something weighing a couple ounces.
April 25 - got my MSC order. Reamed
eyeball fitting to 0.2145". Perfect fit for Bowden cable eyeball
fitting (perfect fit for cable end clamps was 0.2165", due to difference in
how the two clamp the cable). Spent an inordinate amount of time (to
0400) screwing around installing, rigging, securing cable for wastegate.
After redoing it a couple times, I finally got it mostly completed to my
satisfaction. 4.25 hr
This is the routing I ended up with for my wastegate control cable.
Here is another view of how the wastegate control cable comes out of the
firewall and is routed to the wastegate in the center of the plane. I
had to try a few different variations on this before getting it to be as
smooth a run as possible. I'm using one of the duct clamps as a
mount for an Adel clamp to hold the cable in the middle of the routing.
Looks pretty simple, but I spent HOURS planning, laying out, and executing
this. This is the second layout path I tried. The first one was
binding the cable too much.
April 26 - finish up wastegate control cable
installation. Tweak cable adjustment until I was satisfied. Mark
and drill throttle quadrant for a positive stop for wastegate lever.
Fully install & seal wastegate butterfly valve. Fine-tune cable
adjustments & alignments to 0200. 3.25 hr
I wanted a positive stop for when the wastegate is fully opened, so I am not
stressing the cable installation when I pull back on the lever, so I added
this 3/32" roll pin in the middle of the wastegate lever's travel path on
the throttle quadrant.
I
had a late night visit from this big Spotted Salamander.
And, speaking of nature pics, I've also been busy lately, watching and
taking lots of pictures of the flock of 25 or so turkeys that spend most of
all day, every day, in our back yard. I put out about 6-8 quarts of
cracked corn and some sunflower seeds for them every day. Click
HERE for a few of the hilights.
April 29 - make up engine test run plan and
run engine. Overall, the engine ran MUCH better with this new
wastegate. I'm not getting nearly as much supercharger howl as I was
with the 1/2" wastegate. It turns out that the old 1/2" one was way
too small. The 1.25" butterfly valve supplied by Eggenfellner seems to
be the perfect size. I got 0 psi at idle. The butterfly valve
wastegate starts making pressure as soon as the valve starts to close, so
this 1.25" valve size is the minimum. All my engine warning alarms
worked properly. The low fuel pressure alarms worked OK. I am
seeing 27-28 psi with the main pump, 26-27 psi with the aux pump, and about
35 psi with both pumps on. I'll ask STi list if the 35 psi with both
pumps is normal. There's a slight change in idle speed when selecting
both fuel pumps. I marked the quadrant where the SC pressure
starts hitting 3 psi, and I will use this setting to make sure my EIS SC
pressure sensor is set correctly and reading the same value at that point.
The cooling fans seemed to work well, and allowed me to run the engine
longer. The temp went up to 180s then climbed slowly into the upper
190s, at which point I shut the engine down. Even though I set my EIS
tach P/R setting to "2", I am still seeing about 1500 rpm at startup and
about 1100 rpm after it warms up a bit. I don't think the engine is
really idling at that speed, so I will ask about this on the STi list, too.
0.5 hr
April 30 - Emailed questions to STi list about
fuel pressure changes and about idle speed. I was going to do a quick
engine run to test the supercharger
pressure transducer installation and
related EIS settings. But the engine wouldn't start. I tried
again later and it eventually fired, after cranking a long time. It
ran very rough for a few seconds, then cleared out. In retrospect, I
think it was because usually I turn on the main fuel pump, then immediately
start the engine. This evening, I had been fooling around with the
fuel pump switches, noting pressures and flow with either one on and with
both on. I think I also left them on much longer than previously,
before I tried to start it. I suspect I had flooded the engine.
I used that experience to develop a written start and stop sequence:
0.5 hr
STARTUP:
ECM on
EIS on
main battery on
aux battery switch to ON
main fuel pump on
engage starter
check oil pressure
aux battery switch to AUTO
avionics on
SHUTDOWN:
avionics off
aux battery off
main battery off
EIS off
ECM off
fuel pump off
 This is my new supercharger plumbing piece from Eggenfellner. I am
moving the wastegate adapter, from the tube with the ell welded onto it, to
this straight piece that is directly after the supercharger. That will
let me point the outlet right at the center cowl air exit.
This is my new supercharger plumbing piece from Eggenfellner. I am
moving the wastegate adapter, from the tube with the ell welded onto it, to
this straight piece that is directly after the supercharger. That will
let me point the outlet right at the center cowl air exit. I made a new actuating lever for the wastegate 4 times. On LT is the
stock one. It was made to be used with a servo, and is much too small
to use with a clevis end on a Bowden cable. Then, left to right, I
made it over and over, milling the slot and hand fitting it, changing it a
little each time, until I had it just right; the one on the RT.
I made a new actuating lever for the wastegate 4 times. On LT is the
stock one. It was made to be used with a servo, and is much too small
to use with a clevis end on a Bowden cable. Then, left to right, I
made it over and over, milling the slot and hand fitting it, changing it a
little each time, until I had it just right; the one on the RT.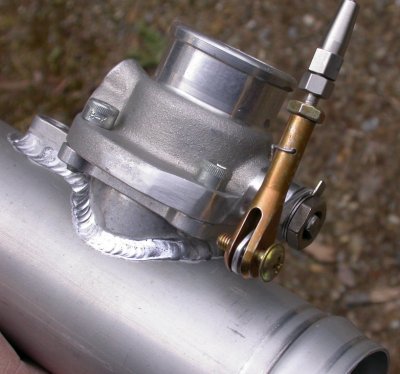 Here is the wastegate mounted on the tubing, with the Bowden cable clevis
end attached to the final version of the lever. Perfect. Until I
went to mount it. Seems I overlooked the HEATER in the way. No
way can I run the cable that way. This HAD been a great idea, because
it would have let me keep the cable in the center of the plane, and just run
it straight from the quadrant to the wastegate. Now, I'll have to go
back to running the cable out the RT side of the firewall, then lengthwise
along this tubing. I'll turn the wastegate mounting 90 degrees, back
to being similar to how it was mounted on the stock duct. I may still
be able to use this arm or the previous version, though. This whole
wastegate actuation thing is totally "roll your own" with this engine, and
I've spent a huge amount of time on it.
Here is the wastegate mounted on the tubing, with the Bowden cable clevis
end attached to the final version of the lever. Perfect. Until I
went to mount it. Seems I overlooked the HEATER in the way. No
way can I run the cable that way. This HAD been a great idea, because
it would have let me keep the cable in the center of the plane, and just run
it straight from the quadrant to the wastegate. Now, I'll have to go
back to running the cable out the RT side of the firewall, then lengthwise
along this tubing. I'll turn the wastegate mounting 90 degrees, back
to being similar to how it was mounted on the stock duct. I may still
be able to use this arm or the previous version, though. This whole
wastegate actuation thing is totally "roll your own" with this engine, and
I've spent a huge amount of time on it.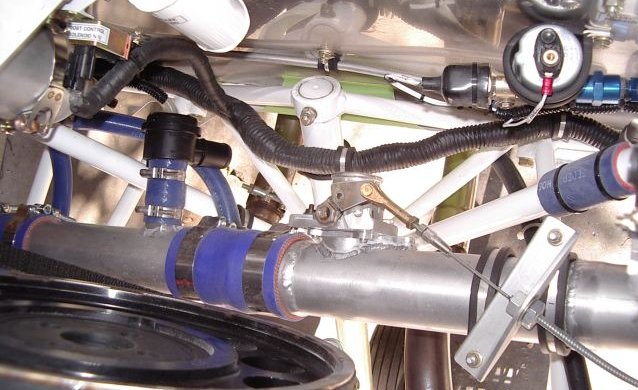
 Here, I used RTV silicone seal to temporarily glue the proposed bracket into
place, so I could put the tubing into the plane and do a clearance check
that the cable would work laid out like this. I used a 2.125" metal
holesaw in my mill to cut the aluminum angle so it followed the curve of the
tubing at this angle. I made a couple of these, at different angles
and depths.
Here, I used RTV silicone seal to temporarily glue the proposed bracket into
place, so I could put the tubing into the plane and do a clearance check
that the cable would work laid out like this. I used a 2.125" metal
holesaw in my mill to cut the aluminum angle so it followed the curve of the
tubing at this angle. I made a couple of these, at different angles
and depths.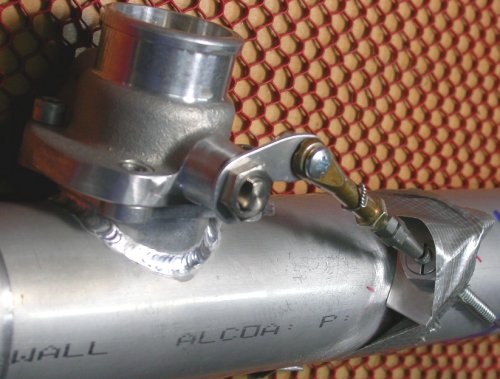 Once I was confident the path I'd chosen for the cable and bracket would
work, I drilled the bracket and attached the cable and cable clamp hardware
to it. The cable also helped a lot to keep the bracket from sliding
around. Then, I duct taped the bracket into place. The bracket
will be tack welded with the tape holding it right where I want it, then all
the tape and hardware removed and the bracket welded into position.
Once I was confident the path I'd chosen for the cable and bracket would
work, I drilled the bracket and attached the cable and cable clamp hardware
to it. The cable also helped a lot to keep the bracket from sliding
around. Then, I duct taped the bracket into place. The bracket
will be tack welded with the tape holding it right where I want it, then all
the tape and hardware removed and the bracket welded into position.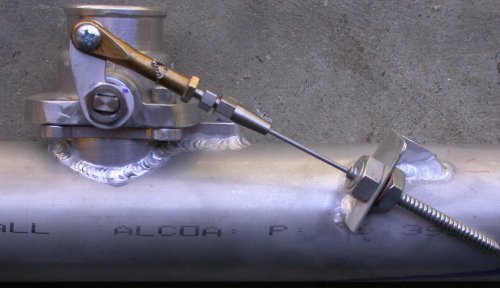 All welded and ready to install onto the engine and the cable run laid out.
This is the wastegate fully closed position. I have 1.375" cable
travel with this setup.
All welded and ready to install onto the engine and the cable run laid out.
This is the wastegate fully closed position. I have 1.375" cable
travel with this setup.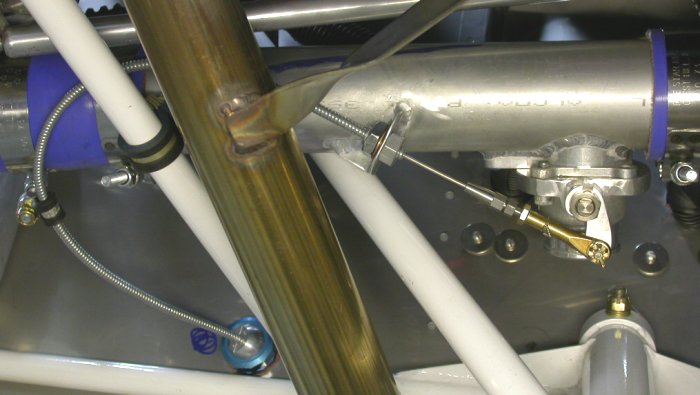 This is the routing I ended up with for my wastegate control cable.
 Here is another view of how the wastegate control cable comes out of the
firewall and is routed to the wastegate in the center of the plane. I
had to try a few different variations on this before getting it to be as
smooth a run as possible. I'm using one of the duct clamps as a
mount for an Adel clamp to hold the cable in the middle of the routing.
Looks pretty simple, but I spent HOURS planning, laying out, and executing
this. This is the second layout path I tried. The first one was
binding the cable too much.
Here is another view of how the wastegate control cable comes out of the
firewall and is routed to the wastegate in the center of the plane. I
had to try a few different variations on this before getting it to be as
smooth a run as possible. I'm using one of the duct clamps as a
mount for an Adel clamp to hold the cable in the middle of the routing.
Looks pretty simple, but I spent HOURS planning, laying out, and executing
this. This is the second layout path I tried. The first one was
binding the cable too much. I wanted a positive stop for when the wastegate is fully opened, so I am not
stressing the cable installation when I pull back on the lever, so I added
this 3/32" roll pin in the middle of the wastegate lever's travel path on
the throttle quadrant.
I wanted a positive stop for when the wastegate is fully opened, so I am not
stressing the cable installation when I pull back on the lever, so I added
this 3/32" roll pin in the middle of the wastegate lever's travel path on
the throttle quadrant.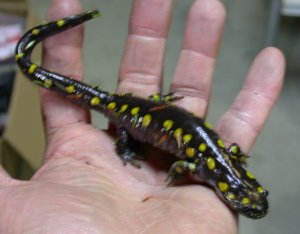 I
had a late night visit from this big Spotted Salamander.
I
had a late night visit from this big Spotted Salamander.